SHIFT CONTROL ACTUATOR INSTALLATION

PROCEDURE
-
INSTALL SHIFT CONTROL ACTUATOR SEAL
Note
It is not always necessary to replace or remove/install the shift control actuator seal at the same time when replacing the shift control actuator assembly.
Tech Tips
Remove/install the shift control actuator seal only if oil leaks from the shift control actuator seal or other faults are found when the shift control actuator assembly is removed.
-
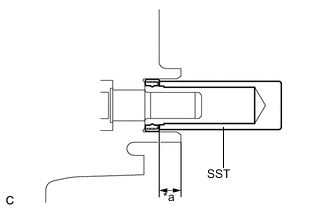
Text in Illustration *a Seal installation depth Using SST and a hammer, tap in a new shift control actuator seal.
- SST
- 09820-00031
Seal installation depth 8.5 to 9.8 mm (0.335 to 0.386 in.)
-
-
INSTALL SHIFT CONTROL ACTUATOR ASSEMBLY
-
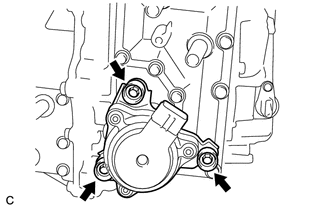
Install the shift control actuator assembly with 3 new shift control actuator bolts.
- Torque:
- 9.5 N*m { 97 kgf*cm, 84 in.*lbf }
-

Install 3 new shift control actuator bolt caps to the shift control actuator bolts.
Note
Push in each shift control actuator cap firmly until the claw of the shift control actuator bolt cap engages with the control actuator bolt.
-
Install the bolt and connect the wire harness clamp bracket.
- Torque:
- 29 N*m { 296 kgf*cm, 21 ft.*lbf }
-
Connect the 2 connectors.
-
-
INSTALL WATER HOSE
-
ADD COOLANT (for Inverter)
-
INSPECT FOR COOLANT LEAK (for Inverter)
-
INSTALL NO. 1 ENGINE UNDER COVER