ECM INSTALLATION
PROCEDURE
INSTALL NO. 2 ECM BRACKET
Install the No. 2 ECM bracket to the ECM with the 2 screws.
3.0 N*m
31 kgf*cm
27 in.*lbf
INSTALL NO. 1 ECM BRACKET
Install the No. 1 ECM bracket to the ECM with the 2 screws.
3.0 N*m
31 kgf*cm
27 in.*lbf
INSTALL ECM
-
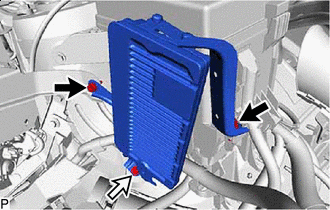

Bolt A

Bolt B
Install the ECM with the 3 bolts.
for bolt A (Type A)
6.5 N*m
66 kgf*cm
58 in.*lbf
for bolt A (Type B)
7.5 N*m
76 kgf*cm
66 in.*lbf
for bolt B
8.4 N*m
86 kgf*cm
74 in.*lbf
Note:There are 2 types of bolt A and the types have differing tightening torques.
Replace with a new part if it is dropped or if it receives a strong impact.
Bolt Length (for Bolt A)
Item
Length
Type A
20 mm (0.787 in.)
Type B
18 mm (0.709 in.)
-
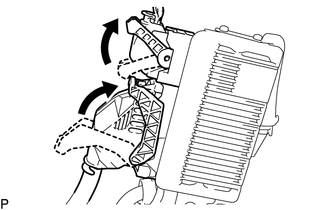
Connect the 2 ECM connectors and lock with the 2 levers.
Note:When connecting a connector, make sure that dirt, water and other foreign matter are not stuck between the connector and ECM.
Make sure that the 2 levers are securely lowered.
Connect the wire harness to the No. 2 ECM bracket with the bolt.
8.4 N*m
86 kgf*cm
74 in.*lbf
-
INSTALL AIR CLEANER CASE SUB-ASSEMBLY
Install the air cleaner case sub-assembly with the 2 bolts.
7.0 N*m
71 kgf*cm
62 in.*lbf
INSTALL AIR CLEANER FILTER ELEMENT SUB-ASSEMBLY
Install the air cleaner filter element sub-assembly to the air cleaner case sub-assembly.
INSTALL AIR CLEANER CAP AND HOSE