STARTER (for 2.0 kW Type) REASSEMBLY
-
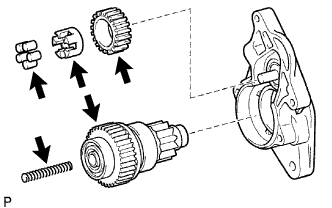
INSTALL STARTER CLUTCH SUB-ASSEMBLY
-
Apply high-temperature grease to the steel ball and install it to the starter clutch shaft hole.
-
Apply high-temperature grease to the return spring, starter idle gear retainer, starter idle gear pinion and starter crutch sub-assembly.
-
Install the return spring to the starter clutch sub-assembly.
-
Install the starter clutch sub-assembly, starter idle clutch roller, starter idle gear retainer and starter idle gear pinion to the starter drive housing assembly
-
-
INSTALL MAGNET STARTER SWITCH ASSEMBLY
-
Install the magnet starter switch assembly to the starter drive housing assembly with the 2 screws.
- Torque:
- 9.3 N*m { 95 kgf*cm, 82 in.*lbf }
-
-
INSTALL STARTER ARMATURE ASSEMBLY
-
Apply high-temperature grease to the bearings and install the starter armature assembly to the starter yoke assembly.
-
-
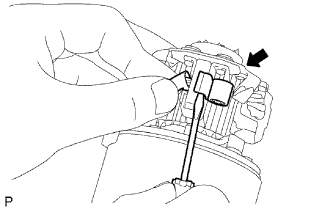
INSTALL STARTER BRUSH HOLDER ASSEMBLY
-
Install the starter brush holder assembly to the starter yoke assembly.
-
Install the 4 starter brushes to the starter brush holder assembly.
-
Using a screwdriver, pull back the spring.
-
Install the brush to the brush holder.
Note
Check that the positive (+) lead wires are not grounded.
-
-
Install a new O-ring to the groove of the field frame.
-
Install the starter end frame with the 2 screws.
- Torque:
- 3.8 N*m { 39 kgf*cm, 34 in.*lbf }
-
-
INSTALL STARTER YOKE ASSEMBLY
-
Install a new O-ring to the groove of the starter yoke assembly.
-
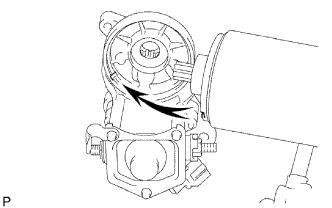
Align the key of the starter yoke assembly with the groove of the magnet starter switch assembly.
-
Install the 2 through bolts.
- Torque:
- 9.3 N*m { 95 kgf*cm, 82 in.*lbf }
-
Attach the wire harness clamp and connect the lead wire to terminal C with the nut.
- Torque:
- 5.9 N*m { 60 kgf*cm, 52 in.*lbf }
-