SFI SYSTEM(w/ Canister Pump Module) Lack of Power (Turbocharger System)
CAUTION / NOTICE / HINT
Tech Tips
-
The diagnosis flowchart is for lack of power due to turbocharger factors.
-
If symptom-specific diagnosis indicates a turbocharger related problem, check using this flowchart.
PROCEDURE
-
CHECK DTC OUTPUT
-
Connect the GTS to the DLC3.
-
Start the engine and warm it up until the engine coolant temperature reaches 75°C (167°F) or higher.
-
Turn the engine switch off and wait for at least 30 seconds.
-
Start the engine and wait 1 minute or more.
-
Turn the GTS on.
-
Enter the following menus: Powertrain / Engine / Trouble Codes.
-
Read the DTCs.
Powertrain > Engine > Trouble CodesResult Result Proceed to DTCs are not output A DTC is output B
B 
GO TO DTC CHART Click here
A 
-
-
CHECK TURBOCHARGER SUB-ASSEMBLY
-
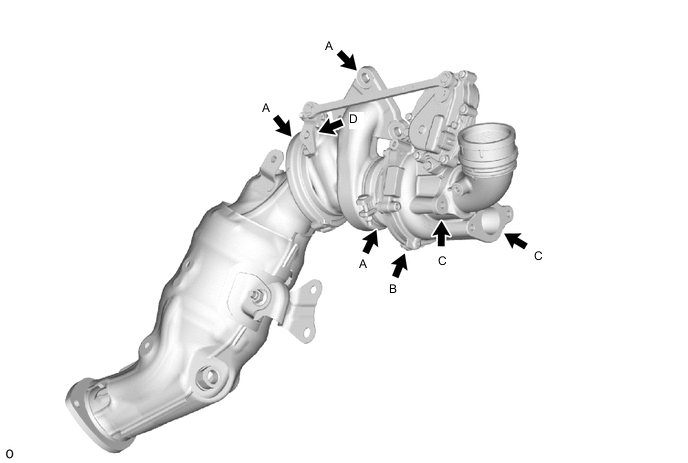
Check that no soot or oil adheres to the turbocharger sub-assembly connectors.
Tech Tips
If adhering soot or an oil leak exists, air leaking at that position may be the cause of the lack of boost pressure.
Result Result Proceed to No adhering soot or an oil A Soot adhering around the turbine housing, flange, or V band (A in the illustration) B Oil leak from the contact surface between the compressor housing and the seal plate or between the seal plate and the bearing housing (B in the illustration) Oil leak from the compressor housing flange (C in the illustration) Soot adhering around the bushing (D in the illustration) C Tech Tips
Perform "Inspection After Repair" after replacing the turbocharger sub-assembly.
B
REPLACE TURBOCHARGER SUB-ASSEMBLY Click here
C 
CHECK TURBOCHARGER SUB-ASSEMBLY Click here
A
-
-
CHECK TURBINE SHAFT
-
Check that the turbine shaft rotates smoothly, without catching.
Tech Tips
If the turbine shaft catches, it could indicate poor sliding due to seal damage due to seizing or a deposit build-up.
Result Result Proceed to No turbine shaft malfunction A Turbine shaft malfunction B
B
CHECK TURBINE WHEEL Click here
A
-
-
CHECK TURBINE WHEEL
-
Check for damage to the turbine wheel.
-
Check for interference between the turbine wheel and the turbine housing.
Result Result Proceed to No damage or interference A Damage or interference exists B Tech Tips
Perform "Inspection After Repair" after replacing the turbocharger sub-assembly.
B
REPLACE TURBOCHARGER SUB-ASSEMBLY Click here
A
-
-
CHECK TURBINE SHAFT
-
Check for loose turbine mounting nuts and for axial play in the turbine shaft.
Tech Tips
If there is no play or excessive play, it could indicate poor sliding due to seal damage due to seizing or a deposit build-up.
Standard value 0.10 mm (0.00394 in.) or less Tech Tips
-
If there no play or excessive play, it could indicate poor sliding due to seal damage due to seizing or a deposit build-up.
-
If there is no malfunction in the turbine shaft, the waste gate valve actuator, waste gate valve or turbine housing may be malfunctioning.
Result Result Proceed to No turbine shaft malfunction A Turbine shaft malfunction B Tech Tips
Perform "Inspection After Repair" after replacing the turbocharger sub-assembly.
-
A
REPLACE TURBOCHARGER SUB-ASSEMBLY Click here
B
REPLACE TURBOCHARGER SUB-ASSEMBLY Click here
-
-
CHECK TURBINE WHEEL
-
Check for interference between the turbine wheel and the turbine housing.
Result Result Proceed to No damage or interference A Damage or interference exists B Tech Tips
Perform "Inspection After Repair" after replacing the turbocharger sub-assembly.
A
REPLACE TURBOCHARGER SUB-ASSEMBLY Click here
B
REPLACE TURBOCHARGER SUB-ASSEMBLY Click here
-
-
CHECK TURBOCHARGER SUB-ASSEMBLY
-
Check that the bushing of the turbine housing waste gate valve link is free of cracks and the play does not exceed 0.5 mm.
Standard No cracks and play does not exceed 0.5 mm (0.0196 in.) Result Proceed to OK NG Tech Tips
Perform "Inspection After Repair" after replacing the turbocharger sub-assembly.
OK
PROCEED TO NEXT SUSPECTED AREA SHOWN IN PROBLEM SYMPTOMS TABLE Click here
NG
REPLACE TURBOCHARGER SUB-ASSEMBLY Click here
-