WINDSHIELD OUTSIDE MOULDING REMOVAL
CAUTION / NOTICE / HINT
The necessary procedures (adjustment, calibration, initialization or registration) that must be performed after parts are removed and installed, or replaced during windshield outside moulding removal/installation are shown below.
| Replaced Part or Performed Procedure | Necessary Procedure | Effect/Inoperative Function when Necessary Procedure not Performed | Link |
|---|---|---|---|
| Windshield glass sub-assembly | Adjust forward recognition camera |
|
Note
When replacing the windshield glass of a vehicle equipped with a forward recognition camera, make sure to use a Lexus genuine part. If a non-Lexus genuine part is used, the forward recognition camera may not be able to be installed due to a missing bracket. Also, the LKA/LDA system, forward recognition camera system, dynamic radar cruise control system, pre-crash safety system, automatic high beam system, adaptive high beam system or road sign assist system may not operate properly due to a difference in the transmissivity or black ceramic border.
Tech Tips
-
Use the same procedure for the RH side and LH side.
-
The following procedure is for the LH side.
PROCEDURE
-
REMOVE WINDSHIELD OUTSIDE MOULDING
-
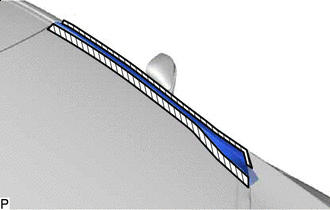

Protective Tape Apply protective tape around the windshield outside moulding.
-
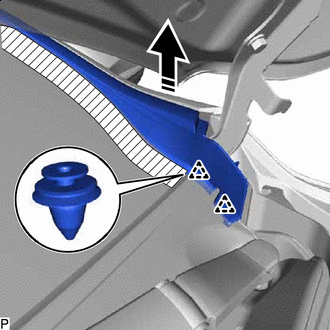

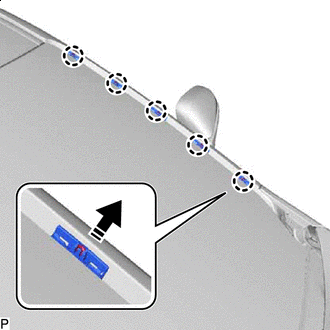
Remove in this Direction Disengage the 2 clips as shown in the illustration.
-
Using a moulding remover, disengage the 10 claws and remove the windshield outside moulding.
-
-
REMOVE NO. 1 WINDSHIELD OUTSIDE MOULDING CLIP
Tech Tips
Perform the following procedure only when replacement of a No. 1 windshield outside moulding clip is necessary.
-
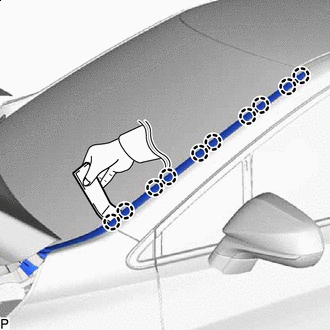
Remove in this Direction Disengage the 5 claws as shown in the illustration to remove the 5 No. 1 windshield outside moulding clips.
-
-
REMOVE NO. 3 WINDSHIELD OUTSIDE MOULDING CLIP
Tech Tips
Perform the following procedure only when replacement of a No. 3 windshield outside moulding clip is necessary.
-
Remove the windshield glass sub-assembly.
-
Insert a 4.0 mm (0.157 in.) drill bit into a drill.
-
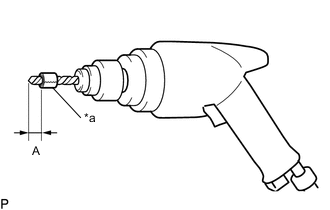
*a Tape Tape the 4.0 mm (0.157 in.) drill bit 5.0 mm (0.197 in.) from the tip as shown in the illustration.
Standard Measurement Area Measurement A 5.0 mm (0.197 in.) Note
Tape the 4.0 mm (0.157 in.) drill bit to prevent the drill bit from going too deep.
-
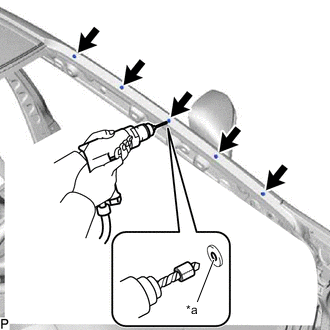
*a Flange Lightly press the drill bit against the No. 3 windshield outside moulding clip to drill off the No. 3 windshield outside moulding clip flanges, and remove the 5 No. 3 windshield outside moulding clips.
CAUTION:
Be careful of the drilled No. 3 windshield outside moulding clips, as they may be hot.
Note
-
Make sure to protect both the inside and outside of the vehicle as the No. 3 windshield outside moulding clip shavings will fly about.
-
Pressing the drill too firmly will cause the No. 3 windshield outside moulding clip to turn and result in the No. 3 windshield outside moulding clip not being drilled through.
-
Prying the No. 3 windshield outside moulding clips with the drill may damage the No. 3 windshield outside moulding clip installation holes or drill bit.
-
-
Using a vacuum cleaner, remove the No. 3 windshield outside moulding clip fragments and shavings from the drilled areas.
-