STEREO COMPONENT AMPLIFIER INSTALLATION
PROCEDURE
INSTALL NO. 2 AMPLIFIER BRACKET
Install the No. 2 amplifier bracket with the 2 screws.
3.0 N*m
31 kgf*cm
27 in.*lbf
INSTALL NO. 1 AMPLIFIER BRACKET
Install the No. 1 amplifier bracket with the 2 screws.
3.0 N*m
31 kgf*cm
27 in.*lbf
INSTALL STEREO COMPONENT AMPLIFIER ASSEMBLY
-
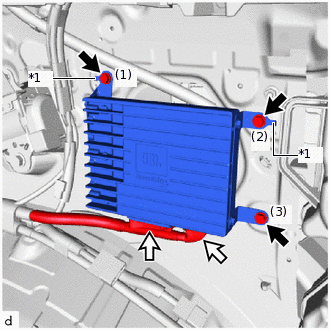
*1
Guide

Bolt

Connector
Attach the 2 guides to temporarily install the stereo component amplifier assembly with bracket.
Install the stereo component amplifier assembly with bracket with the 3 bolts.
Tip:Tighten the bolts in the order shown in the illustration.
4.5 N*m
46 kgf*cm
40 in.*lbf
Connect the 2 connectors.
-
INSTALL DECK TRIM SIDE PANEL ASSEMBLY RH
INSTALL REAR SEAT ASSEMBLY
for LH:
for RH:
INSTALL REAR NO. 1 FLOOR MAT SUPPORT SIDE PLATE
INSTALL REAR FLOOR FINISH PLATE (for Compact Spare Tire)
INSTALL REAR DECK TRIM COVER (for Full Size Spare Tire)
INSTALL DECK BOARD ASSEMBLY
INSTALL TONNEAU COVER ASSEMBLY (w/ Tonneau Cover)
INSTALL PACKAGE TRAY TRIM POCKET SUB-ASSEMBLY (w/ Partition Net)
INSTALL REAR DOOR OPENING TRIM WEATHERSTRIP RH
INSTALL REAR DOOR SCUFF PLATE RH