FRONT SEAT INNER BELT ASSEMBLY INSTALLATION
Tech Tips
-
Use the same procedure for RHD and LHD vehicles.
-
The procedure listed below is for LHD vehicles.
-
Use the same procedure for the RH and LH sides.
-
The procedure listed below is for the LH side.
-
A bolt without a torque specification is shown in the standard bolt chart Click here.
-
INSTALL FRONT SEAT INNER BELT ASSEMBLY LH
-
Install the front seat cushion cover LH.
-
Install the front seat anchor plate.
-
w/ Seat Belt Warning System:
-
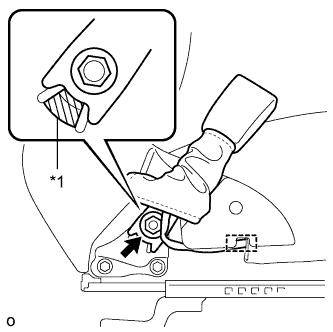
Text in Illustration *1 Protruding Part Install the front seat inner belt assembly LH with the nut.
- Torque:
- 42 N*m { 428 kgf*cm }
Note
Do not overlap the anchor part of the front seat inner belt assembly LH and protruding part of the seat adjuster.
-
Attach the wire harness to the clamp.
-
-
w/o Seat Belt Warning System:
-
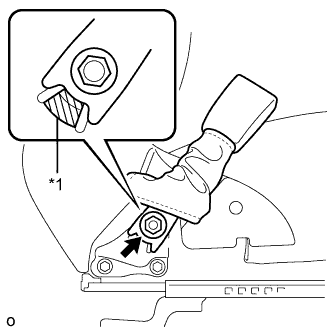
Text in Illustration *1 Protruding Part Install the front seat inner belt assembly LH with the nut.
- Torque:
- 42 N*m { 428 kgf*cm }
Note
Do not overlap the anchor part of the front seat inner belt assembly LH and protruding part of the seat adjuster.
-
-
-
INSTALL FRONT SEAT INNER BELT ASSEMBLY RH (for Separate Seat Type)
-
Install the front seat cushion cover RH.
-
Install the front seat anchor plate.
-
w/ Front Passenger Seat Belt Warning System:
-
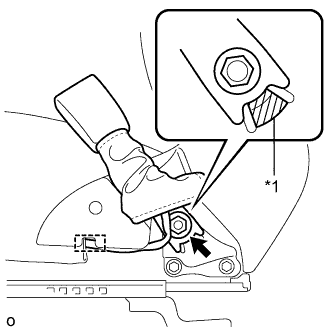
Text in Illustration *1 Protruding Part Install the front seat inner belt assembly RH with the nut.
- Torque:
- 42 N*m { 428 kgf*cm }
Note
Do not overlap the anchor part of the front seat inner belt assembly RH and protruding part of the seat adjuster.
-
Attach the wire harness to the clamp.
-
Connect the connector and attach the 2 clamps.
-
-
w/o Front Passenger Seat Belt Warning System:
-
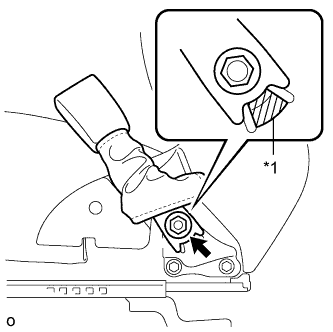
Text in Illustration *1 Protruding Part Install the front seat inner belt assembly RH with the nut.
- Torque:
- 42 N*m { 428 kgf*cm }
Note
Do not overlap the anchor part of the front seat inner belt assembly RH and protruding part of the seat adjuster.
-
-
-
INSTALL FRONT SEAT INNER BELT ASSEMBLY RH (for Bench Seat Type)
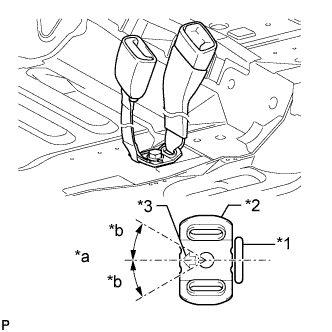
Text in Illustration *1 Protruding Part *2 Floor Anchor *3 Arrow *a Vehicle Front (0°) *b 5°
-
Align the direction of the anchor plate with the protruding part of the vehicle body as shown in the illustration.
-
Install the front seat inner belt assembly RH with the bolt.
- Torque:
- 42 N*m { 428 kgf*cm, 31 ft.*lbf }
Note
-
Do not overlap the anchor part of the front seat inner belt assembly RH and protruding parts of the vehicle body.
-
Make sure that the arrow on the front seat inner belt assembly RH floor anchor is facing towards the front of the vehicle.
-
Install the front seat inner belt assembly RH so that the angle of the floor anchor is with in the standard range.
Standard 0°to 5°
-
-
INSTALL FRONT SEAT LAP TYPE CENTER BELT ASSEMBLY (for Bench Seat Type)
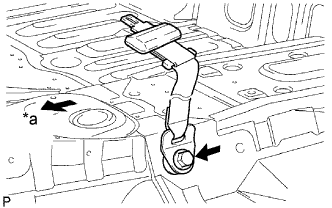
Text in Illustration *a Front
-
Install the front seat lap type center belt assembly with its built-in bolt.
- Torque:
- 42 N*m { 428 kgf*cm, 31 ft.*lbf }
-
-
INSTALL FRONT SEAT ASSEMBLY (for Separate Seat Type)
-
Place the front seat assembly in the cabin.
Note
Be careful not to damage the vehicle body.
-
Connect the connector and attach the wire harness clamp under the seat.
-
Temporarily install the front seat assembly with the 4 bolts.
-
Lift up the seat track handle sub-assembly LH and move the seat to the rearmost position.
-

Tighten the bolts in the order shown in the illustration.
- Torque:
- 37 N*m { 377 kgf*cm, 27 ft.*lbf }
-
Lift up the seat track handle sub-assembly LH and move the seat to the foremost position.
-
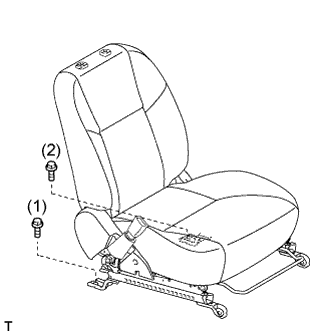
Tighten the bolts in the order shown in the illustration.
- Torque:
- 37 N*m { 377 kgf*cm, 27 ft.*lbf }
-
-
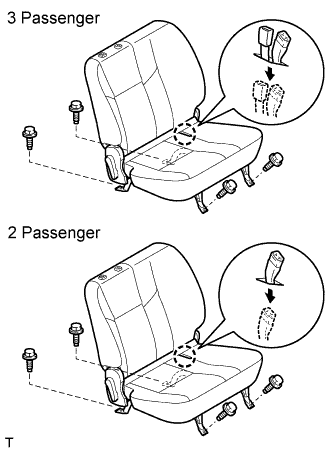
INSTALL FRONT SEAT ASSEMBLY (for Bench Seat Type)
-
Place the seat in the cabin.
Note
Be careful not to damage the vehicle body.
-
w/ Occupant detection sensor:
Connect the connector under the seat.
-
Install the seat with the 4 bolts.
- Torque:
- 37 N*m { 377 kgf*cm, 27 ft.*lbf }
Tech Tips
Tighten the bolts in the order indicated in the illustration.
-
Pass the inner belts through the hole of the seat cushion.
-
-
CONNECT CABLE TO NEGATIVE BATTERY TERMINAL
Note
When disconnecting the cable, some systems need to be initialized after the cable is reconnected Click here.