BACK DOOR DISASSEMBLY
PROCEDURE
-
REMOVE PACKAGE TRAY TRIM PANEL ASSEMBLY (w/ Package Tray Trim)
-
REMOVE TONNEAU COVER ASSEMBLY (w/ Tonneau Cover)
-
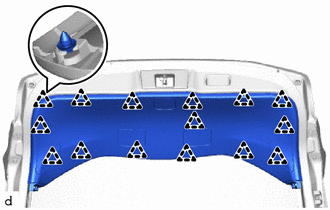
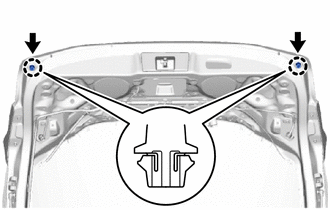
REMOVE BACK DOOR TRIM UPPER PANEL ASSEMBLY
-
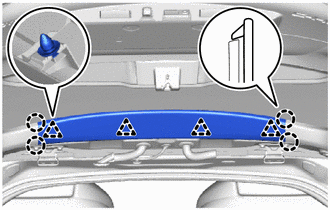
Disengage the claws and clips to remove the back door trim upper panel assembly.
-
-
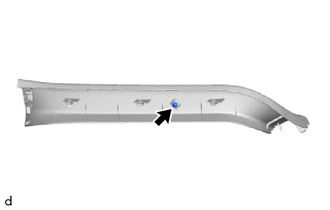
REMOVE BACK DOOR SIDE GARNISH LH
-
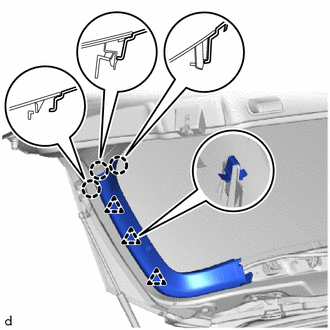
Disengage the claws and clips to remove the back door side garnish LH.
-
-
REMOVE BACK DOOR SIDE GARNISH RH
Tech Tips
Use the same procedure as for the LH side.
-
REMOVE PACKAGE TRAY TRIM GARNISH HOOK
Tech Tips
Use the same procedure for the RH side and LH side.
-
Remove the screw.
-
Remove the package tray trim garnish hook.
-
-
REMOVE BACK DOOR TRIM PANEL ASSEMBLY
-
Disengage the clips to remove the back door trim panel assembly.
-
-
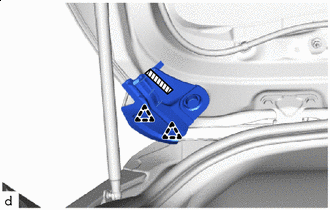
REMOVE DOOR PULL HANDLE
-
Using a moulding remover D, disengage the claws to remove the door pull handle.
-
-
REMOVE NO. 1 BACK DOOR SERVICE HOLE COVER
-
Disengage the claws to remove the No. 1 back door service hole cover.
-
-
REMOVE NO. 2 BACK DOOR SERVICE HOLE COVER
Tech Tips
Use the same procedure as for the No. 1 back door service hole cover.
-
REMOVE NO. 3 BACK DOOR SERVICE HOLE COVER
-
Disengage the claws to remove the No. 3 back door service hole cover.
-
-
REMOVE BACK DOOR SERVICE HOLE COVER LH
-
Disengage the claws to remove the back door service hole cover LH.
-
-
REMOVE BACK DOOR SERVICE HOLE COVER RH
Tech Tips
Use the same procedure as for the LH side.
-
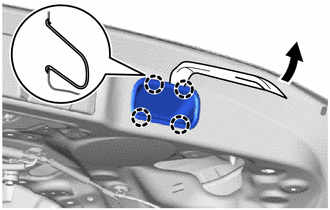
REMOVE BACK DOOR LOCK COVER
-

Double-sided Tape Disengage the claws.
-
Remove the double-sided tape and back door lock cover.
Note
Remove any remaining double-sided tape from the back door.
-
-
REMOVE BACK DOOR LOCK ASSEMBLY
-
REMOVE REAR WIPER ARM AND BLADE ASSEMBLY (w/ Rear Wiper)
-
REMOVE REAR WIPER MOTOR ASSEMBLY (w/ Rear Wiper)
-
REMOVE REAR WIPER MOTOR GROMMET (w/ Rear Wiper)
-
REMOVE BACK DOOR LOWER STOPPER
-
Remove the bolt.
-
Disengage the guide to remove the back door lower stopper.
Tech Tips
Use the same procedure for the RH side and LH side.
-
-
REMOVE REAR SPOILER ASSEMBLY
-
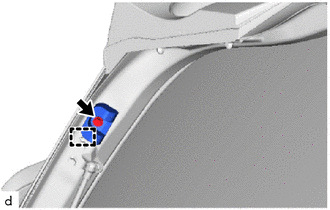
REMOVE REAR WASHER NOZZLE (w/ Rear Wiper)
-
REMOVE BACK DOOR OUTSIDE GARNISH SUB-ASSEMBLY
-
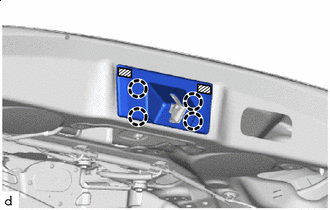
REMOVE BACK DOOR OPENER SWITCH ASSEMBLY
-
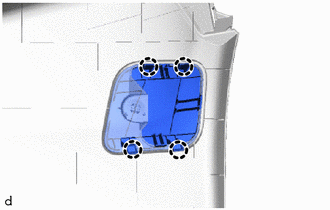
REMOVE LICENSE PLATE LIGHT ASSEMBLY
-
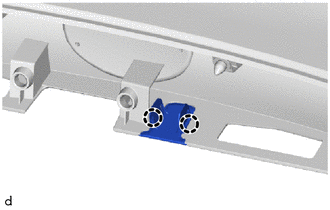
REMOVE REAR TELEVISION CAMERA ASSEMBLY (w/ Rear View Monitor System)
-
REMOVE NO. 2 BACK DOOR GARNISH RETAINER (w/o Rear View Monitor System)
-
Disengage the claws to remove the No. 2 back door garnish retainer.
-
-
REMOVE BACK DOOR PANEL CUSHION
-
Disengage the claws to remove the 2 back door panel cushions.
-
-
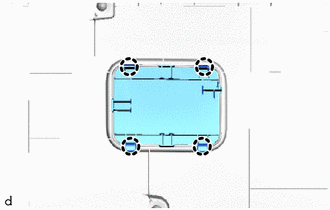
REMOVE NO. 2 BACK DOOR PANEL PROTECTOR
-
Double-sided Tape Using a clip remover, disengage the clips.
-
Remove the double-sided tape and No. 2 back door panel protector.
Note
Remove any remaining double-sided tape from the back door.
-
-
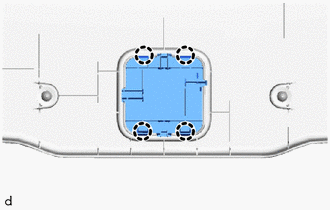
REMOVE NO. 1 BACK DOOR PANEL PROTECTOR
Tech Tips
Use the same procedure for the No. 2 back door panel protector.
-
REMOVE REAR LIGHT ASSEMBLY LH
-
REMOVE REAR LIGHT ASSEMBLY RH
Tech Tips
Use the same procedure as for the LH side.
-
REMOVE NO. 1 BACK DOOR NAME PLATE (w/ Brand Mark)
-
REMOVE NO. 2 BACK DOOR NAME PLATE
-
REMOVE NO. 4 BACK DOOR NAME PLATE (for AWD)
-
REMOVE NO. 1 BACK DOOR EMBLEM