REAR DOOR COURTESY SWITCH INSTALLATION
CAUTION / NOTICE / HINT
Tech Tips
-
Use the same procedure for the RH and LH sides.
-
The procedure listed below is for the LH side.
PROCEDURE
-
INSTALL REAR DOOR COURTESY LIGHT SWITCH ASSEMBLY
-
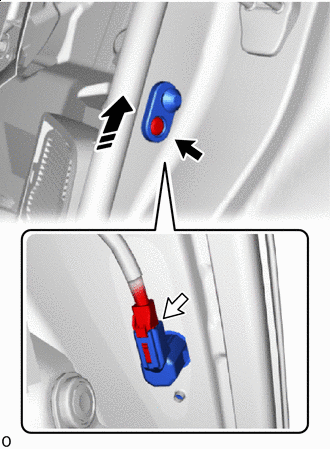

Install in this Direction 
"TORX" Screw 
Connector Connect the connector.
-
Set the rear door courtesy light switch assembly in the direction indicated by the arrow shown in the illustration.
-
Using a T30 "TORX" socket wrench, install the front door courtesy light switch with a new "TORX" screw.
- Torque:
- 6.3 N*m { 64 kgf*cm, 56 in.*lbf }
-
-
INSTALL REAR SEAT SIDE GARNISH LH
-
INSTALL REAR DOOR SCUFF PLATE LH
-
INSTALL REAR SEATBACK ASSEMBLY LH (for Power Seat)
-
INSTALL REAR SEAT CUSHION LOCK HOOK (for Power Seat)
-
INSTALL REAR SEAT CUSHION ASSEMBLY LH (for Power Seat)
-
INSTALL REAR SEATBACK HOLDER (for Fixed Seat Type)
-
INSTALL REAR SEAT CUSHION LOCK HOOK (for Fixed Seat Type)
-
INSTALL REAR SEATBACK ASSEMBLY (for Fixed Seat Type)
-
INSTALL NO. 1 SEAT ARMREST CAP (for Fixed Seat Type)
-
INSTALL REAR SEAT CUSHION ASSEMBLY (for Fixed Seat Type)
-
CONNECT CABLE TO NEGATIVE BATTERY TERMINAL
Note
When disconnecting the cable, some systems need to be initialized after the cable is reconnected.
-
INSTALL LUGGAGE COMPARTMENT MAT SUB-ASSEMBLY
-
PERFORM DIAGNOSTIC SYSTEM CHECK
-
CHECK SRS WARNING LIGHT