FRONT BUMPER INSTALLATION
CAUTION / NOTICE / HINT
Tech Tips
When the front bumper is damaged or deformed due to an accident or contact with other objects, etc., or the bumper installation area on the body is repaired, it is necessary to perform millimeter wave radar sensor adjustment.
PROCEDURE
-
INSTALL FRONT BUMPER ASSEMBLY
-
w/ Headlight Cleaner System:
-
Connect the headlight cleaner hose.
-
-
w/ Fog Light:
-
Connect the connector.
-
-
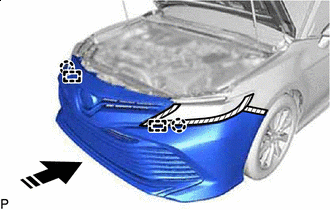

Install in this Direction Move the front bumper assembly into position and engage the 2 guides and 2 claws as shown in the illustration.
-
Install the 4 bolts.
- Torque:
- 7.5 N*m { 76 kgf*cm, 66 in.*lbf }
-
Install the 2 clips.
-
w/ TOYOTA Parking Assist-sensor System:
-
Connect the connector.
-
-
w/ Blind Spot Monitor System:
-
Connect the connector.
-
-
w/ Pre-collision System:
-
Connect the connector.
-
-
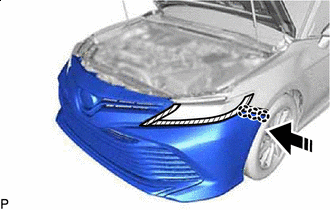
Install in this Direction Engage the 3 claws as shown in the illustration.
Tech Tips
Use the same procedure for the RH side and LH side.
-
Install the 8 screws.
-
Install the clip.
Tech Tips
Use the same procedure for the RH side and LH side.
-
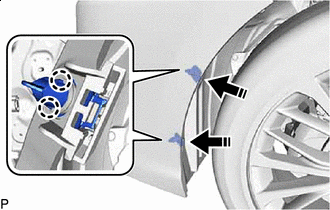
Install in this Direction Engage the 4 claws to install the 2 pin hold clips as shown in the illustration.
Tech Tips
Use the same procedure for the RH side and LH side.
-
Install the front bumper assembly.
-
-
INSTALL COOL AIR INTAKE DUCT SEAL
-

Install in this Direction (1) 
Install in this Direction (2) Engage the guide as shown in the illustration.
-
Install the cool air intake duct seal with the 5 clips.
-
-
ADD WASHER FLUID (w/ Headlight Cleaner System)
-
ADJUST HEADLIGHT ASSEMBLY (for LED Type Turn Signal Light)
Tech Tips
Perform this procedure only when replacement of the front bumper reinforcement is necessary.
-
ADJUST HEADLIGHT ASSEMBLY (for Bulb Type Turn Signal Light)
Tech Tips
Perform this procedure only when replacement of the front bumper reinforcement is necessary.
-
ADJUST FOG LIGHT ASSEMBLY (w/ Fog Light)
-
ADJUST FRONT TELEVISION CAMERA ASSEMBLY (w/ Panoramic View Monitor System)