SUSPENSION CONTROL SYSTEM(w/ Air Suspension) ON-VEHICLE INSPECTION
PROCEDURE
INSPECT TIRES
ADJUST STANDARD VEHICLE HEIGHT
Release the parking brake and stabilize the suspension by bouncing the corners of the vehicle.
With the shift lever in N, settle the tires by moving the vehicle back and forth.
Start the engine.
Operate the height control switch to raise and then lower the vehicle height. Perform this operation twice.
Note:Be sure to release the parking brake and move the shift lever to N.
INSPECT VEHICLE HEIGHT
INSPECT VEHICLE HEIGHT SELECTION
ADJUST VEHICLE HEIGHT
Note:While adjusting vehicle height, do not put anyone or anything on or in the vehicle because doing so will affect vehicle height.
Height control sensors are installed on both the left and right sides. However, each side cannot be adjusted individually, as the left and right sides are not controlled independently.
Even if the height control sensor of only one side is adjusted, the vehicle height of both the left and right sides will change.
Suspend vehicle height control by pressing the height control switch.
Put the vehicle on a level surface.
-
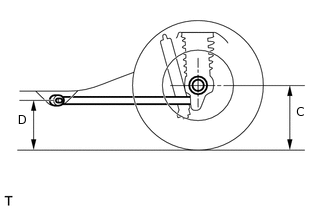
Measure the vehicle height (C - D measurement) on the right side and left side.
Standard vehicle height
Difference between right and left side
10 mm (0.394 in.) or less
If the actual vehicle height differs from the vehicle height (C - D measurement), adjust it by jacking up the frame, etc. (Procedure "A").
-
If the procedure "A" differs from the vehicle height (C - D measurement), adjust it by following the procedures below.
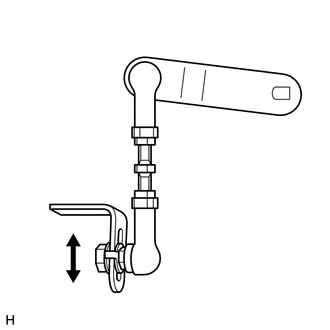
Loosen the nut.
Move the height control sensor link up and down along the slotted hole of the bracket.
Adjust the vehicle height to the vehicle height (C - D measurement) while checking the value on the intelligent tester or voltmeter.
Standard voltage
2.5 V
Tighten the nut.
5.4 N*m
55 kgf*cm
48 in.*lbf
If the vehicle height cannot be adjusted by performing procedure "A", adjust it again by following the procedures below.
-
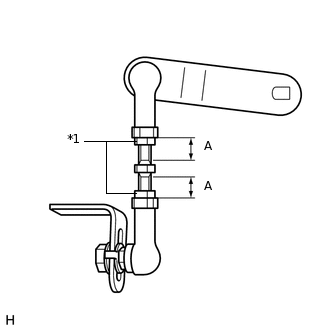
*1
Lock Nut
Loosen the 2 lock nuts of the height control sensor link.
Adjust the vehicle height to the vehicle height (C - D measurement) by turning the link while checking the value on the intelligent tester or the voltmeter.
Standard voltage
2.5 V
Tip:The vehicle height will be changed by approximately 3.0 mm (0.118 in.) when changing the link by approximately 2 mm (0.0787 in.).
Tighten the 2 lock nuts.
5.4 N*m
55 kgf*cm
48 in.*lbf
-
Check that the lengths of the screw parts, labeled "A" in the illustration, are within the standard values.
Standard Length
Item
Specified Condition
LH
6.0 to 12.5 mm (0.237 to 0.492 in.)
RH
6.5 to 15.0 mm (0.256 to 0.590 in.)
Change the vehicle height (from the normal position to the high position, and from the high position to the normal position).
Measure the vehicle height (C - D measurement) on the right and left side (Procedure "D").
Check if the vehicle height (C - D measurement) is within the specified range.
Tip:If the values are outside the standard range, perform the procedures from procedure "A" to procedure "D" again.