FUEL INJECTOR REMOVAL
PROCEDURE
PRECAUTION
Note:After turning the ignition switch off, waiting time may be required before disconnecting the cable from the negative (-) battery terminal. Therefore, make sure to read the disconnecting the cable from the negative (-) battery terminal notices before proceeding with work.
DISCHARGE FUEL SYSTEM PRESSURE
DISCONNECT CABLE FROM NEGATIVE BATTERY TERMINAL
Note:When disconnecting the cable, some systems need to be initialized after the cable is reconnected.
REMOVE FRONT WIPER MOTOR AND LINK ASSEMBLY
REMOVE FRONT NO. 1 VENTILATOR SEAL
for LHD:Click here
for RHD:Click here
REMOVE FRONT AIR SHUTTER SEAL RH
for LHD:Click here
for RHD:Click here
REMOVE OUTER COWL TOP PANEL
for LHD:Click here
for RHD:Click here
REMOVE THROTTLE W/MOTOR BODY ASSEMBLY
REMOVE IGNITION COIL ASSEMBLY
REMOVE NO. 1 VACUUM PIPE
REMOVE NO. 2 VACUUM PIPE
REMOVE NO. 1 VACUUM SWITCHING VALVE ASSEMBLY (PURGE VSV)
DISCONNECT VACUUM HOSE ASSEMBLY
REMOVE VENTILATION NO. 1 CONNECTOR (w/ HEATER)
REMOVE VENTILATION NO. 1 CONNECTOR (w/o HEATER)
SEPARATE INTAKE MANIFOLD
REMOVE FUEL DELIVERY PIPE
REMOVE FUEL INJECTOR ASSEMBLY
-
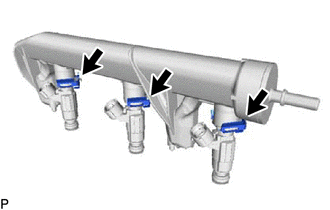
Remove the 3 No. 1 fuel injector holder.
-
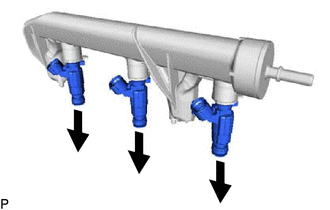
Pull the 3 fuel injector assemblies out of the fuel delivery pipe.
-

Remove the O-rings from each fuel injector assembly.
For reinstallation, attach a tag or label with the corresponding cylinder number to each fuel injector assembly.
Note:Protect the fuel injector assemblies by covering them with plastic bags.
-