REAR CENTER SEAT OUTER BELT ASSEMBLY (for 3 Point Type Rear Center Seat Belt) INSTALLATION
CAUTION:
-
The rear No. 1 seat inner belt assembly LH cannot be disconnected from the rear seat 3 point type belt assembly RH.
-
When replacing the rear seat 3 point type belt assembly RH or rear No. 1 seat inner belt assembly LH, make sure to replace both with new ones.
-
Make sure to connect the new rear seat 3 point type belt assembly RH and new rear No. 1 seat inner belt assembly LH.
-
INSTALL SEAT BELT BRACKET
-
Install the seat belt bracket with the 2 bolts.
- Torque:
- 42 N*m { 428 kgf*cm, 31 ft.*lbf }
-
-
INSTALL REAR SEAT 3 POINT TYPE BELT ASSEMBLY RH
-
When reusing the rear seat 3 point type belt assembly RH:
-
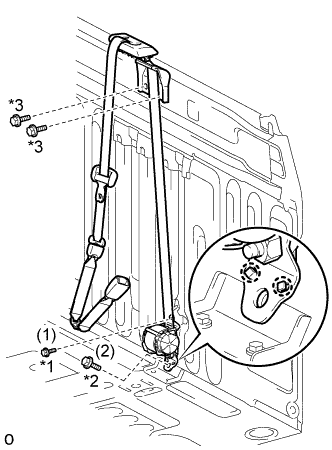
Text in Illustration *1 Bolt A *2 Bolt B *3 Bolt C Attach the 2 claws and temporarily install the rear 3 point type belt assembly RH retractor with the 2 bolts A and B.
Note
When installing the rear 3 point type belt assembly RH retractor, make sure the claws of the seat belt bracket only contact the installation areas of the rear 3 point type belt assembly RH retractor.
-
Tighten the 2 bolts in the order shown in the illustration.
- Torque:
- Bolt A
- 4.9 N*m { 50 kgf*cm, 43 in.*lbf }
- Bolt B
- 42 N*m { 428 kgf*cm, 31 ft.*lbf }
-
Connect the upper part of the rear 3 point type belt assembly RH with the 2 bolts C
- Torque:
- Bolt C
- 42 N*m { 428 kgf*cm, 31 ft.*lbf }
-
-
When using a new rear seat 3 point type belt assembly RH:
-
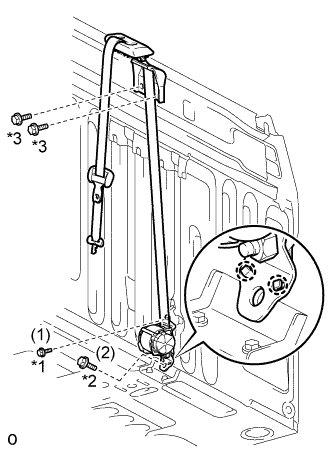
Text in Illustration *1 Bolt A *2 Bolt B *3 Bolt C Attach the 2 claws and temporarily install the rear 3 point type belt assembly RH retractor with the 2 bolts A and B.
Note
When installing the rear 3 point type belt assembly RH retractor, make sure the claws of the seat belt bracket only contact the installation areas of the rear 3 point type belt assembly RH retractor.
-
Tighten the 2 bolts in the order shown in the illustration.
- Torque:
- Bolt A
- 4.9 N*m { 50 kgf*cm, 43 in.*lbf }
- Bolt B
- 42 N*m { 428 kgf*cm, 31 ft.*lbf }
-
Connect the upper part of the rear 3 point type belt assembly RH with the 2 bolts C
- Torque:
- Bolt C
- 42 N*m { 428 kgf*cm, 31 ft.*lbf }
-
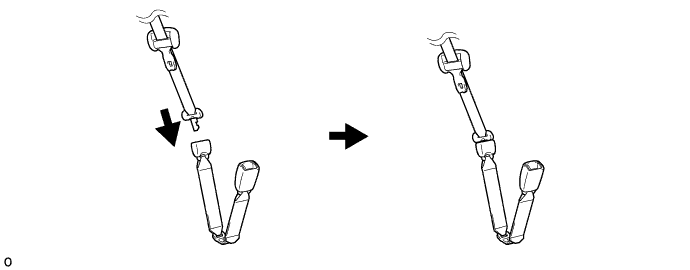
Connect the new rear 3 point type belt assembly RH and new rear No. 1 seat inner belt assembly LH.
CAUTION:
Make sure to perform this step.
-
-
-
INSTALL BACK PANEL TRIM
-
Attach the 9 clips to install the back panel trim.
-
Install the 4 clips.
-
Attach the 3 claws and 2 guides to connect the cover to the back panel trim.
-
-
INSTALL REAR SEAT ASSEMBLY
-
Fold up the rear seat cushion assembly.
-
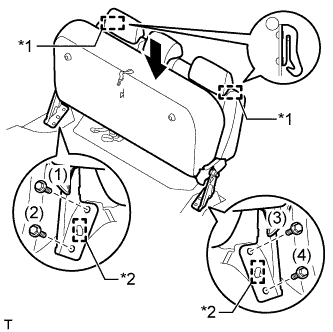
Text in Illustration *1 Hook *2 Guide Place the rear seat assembly in the cabin.
Note
Be careful not to damage the vehicle body.
-
Attach the 2 hooks and 2 guides.
-
Attach the fold seat stopper band to the vehicle body and temporarily fix the rear seat cushion assembly in place.
-
Temporarily install the rear seat assembly with the 4 bolts.
-
Tighten the 4 bolts in the order shown in the illustration.
- Torque:
- 20 N*m { 199 kgf*cm, 14 ft.*lbf }
-
Return the seat cushion to its original position.
-
Text in Illustration *1 Seat Cushion Rubber Band Pass the rear No. 1 seat inner belt assembly LH through the seat cushion rubber band.
-
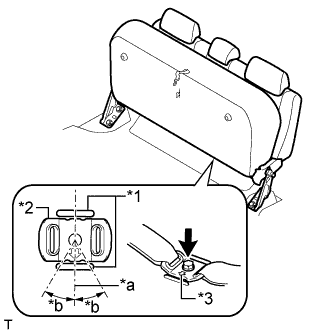
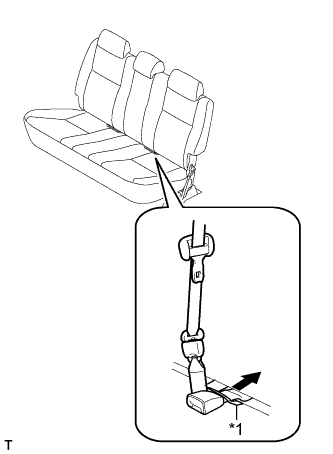
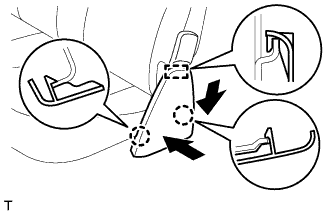
Text in Illustration *1 Protruding Part *2 Floor Anchor *3 Arrow *a Vehicle Front (0°) *b 5° Connect the rear No. 1 seat inner belt assembly LH with the bolt.
- Torque:
- 42 N*m { 428 kgf*cm, 31 ft.*lbf }
Note
-
Do not overlap the anchor part of the rear No. 1 seat inner belt assembly LH and protruding parts of the vehicle body.
-
Make sure that the arrow on the rear No. 1 seat inner belt assembly LH floor anchor is facing towards the front of the vehicle.
-
Connect the rear No. 1 seat inner belt assembly LH so that the angle of the floor anchor is with in the standard range.
Standard 0°to 5°
-
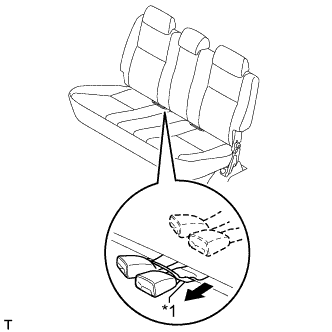
Text in Illustration *1 Seat Cushion Rubber Band Pass the rear No. 1 seat inner belt assembly RH through the seat cushion rubber band.
-
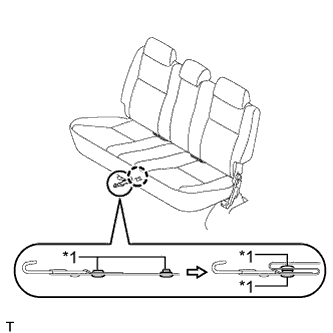
Text in Illustration *1 Fold Seat Stopper Band Button Lock the seat cushion lock.
-
Attach the fold seat stopper band button.
-
-
INSTALL REAR SEAT HINGE COVER LH
-
Attach the guide.
-
Push the rear seat hinge cover LH to attach the 2 claws and install the rear seat hinge cover LH.
-
-
INSTALL REAR SEAT HINGE COVER RH
Tech Tips
Use the same procedures described for the LH side.