NETWORK GATEWAY ECU INSTALLATION
CAUTION / NOTICE / HINT
PROCEDURE
-
INSTALL CENTRAL GATEWAY ECU (NETWORK GATEWAY ECU) (for LHD, w/o ECU Integration Box RH)
-
Engage the clamp.
-
Connect the central gateway ECU (network gateway ECU) connector.
-
Install the central gateway ECU (network gateway ECU) with the nut.
- Torque:
- 7.5 N*m { 76 kgf*cm, 66 in.*lbf }
-
-
INSTALL CENTRAL GATEWAY ECU (NETWORK GATEWAY ECU) (for LHD, w/ ECU Integration Box RH)
-
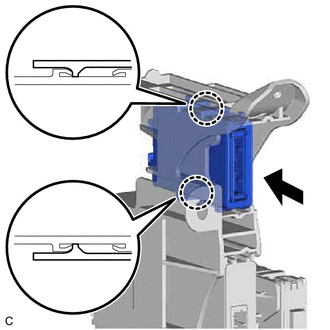
Engage the 2 claws to install the central gateway ECU (network gateway ECU).
Note
Make sure that the central gateway ECU (network gateway ECU) is securely installed.
-
-
INSTALL ECU INTEGRATION BOX RH (for LHD, w/ ECU Integration Box RH)
-
Install the ECU integration box RH with the bolt and nut.
- Torque:
- Bolt
- 7.5 N*m { 76 kgf*cm, 66 in.*lbf }
- Nut
- 5.5 N*m { 56 kgf*cm, 49 in.*lbf }
-
Engage the 2 clamps.
-
Connect each connector.
-
-
INSTALL LOWER INSTRUMENT PANEL SUB-ASSEMBLY (for LHD, w/o Passenger Side Knee Airbag)
-
INSTALL LOWER INSTRUMENT PANEL SUB-ASSEMBLY (for LHD, w/ Passenger Side Knee Airbag)
-
INSTALL LOWER NO. 2 INSTRUMENT PANEL AIRBAG ASSEMBLY (for LHD, w/ Passenger Side Knee Airbag)
-
INSTALL NO. 2 INSTRUMENT PANEL UNDER COVER SUB-ASSEMBLY (for LHD)
-
INSTALL INSTRUMENT SIDE PANEL RH (for LHD)
-
INSTALL FRONT DOOR OPENING TRIM WEATHERSTRIP RH (for LHD)
-
INSTALL COWL SIDE TRIM SUB-ASSEMBLY RH (for LHD)
-
INSTALL FRONT DOOR SCUFF PLATE RH (for LHD)
-
INSTALL INSTRUMENT PANEL FINISH PLATE GARNISH (for LHD)
-
INSTALL NO. 2 INSTRUMENT PANEL GARNISH SUB-ASSEMBLY (for LHD)
-
INSTALL NO. 1 METER HOOD CLUSTER (for LHD)
-
CONNECT CABLE TO NEGATIVE BATTERY TERMINAL (for LHD)
for 2AR-FE:
for A25A-FKS:
for 2GR-FKS:
-
PERFORM DIAGNOSTIC SYSTEM CHECK (for LHD, w/ Passenger Side Knee Airbag)
-
INSPECT SRS WARNING LIGHT (for LHD, w/ Passenger Side Knee Airbag)
-
INSTALL CENTRAL GATEWAY ECU (NETWORK GATEWAY ECU) (for RHD, w/o ECU Integration Box RH)
-
Connect the central gateway ECU (network gateway ECU) connector.
-
Install the central gateway ECU (network gateway ECU) with the nut.
- Torque:
- 7.5 N*m { 76 kgf*cm, 66 in.*lbf }
-
-
INSTALL CENTRAL GATEWAY ECU (NETWORK GATEWAY ECU) (for RHD, w/ ECU Integration Box RH)
-
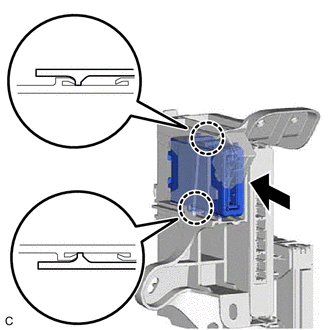
Engage the 2 claws to install the central gateway ECU (network gateway ECU).
Note
Make sure that the central gateway ECU (network gateway ECU) is securely installed.
-
-
INSTALL ECU INTEGRATION BOX RH (for RHD, w/ ECU Integration Box RH)
-
Install the ECU integration box RH with the bolt and 2 nuts.
- Torque:
- Bolt
- 7.5 N*m { 76 kgf*cm, 66 in.*lbf }
- Nut
- 5.5 N*m { 56 kgf*cm, 49 in.*lbf }
-
Engage the clamp.
-
Connect each connector.
-
-
INSTALL NO. 3 INSTRUMENT PANEL TO COWL BRACE SUB-ASSEMBLY (for RHD)
-
INSTALL LOWER NO. 1 INSTRUMENT PANEL AIRBAG ASSEMBLY (for RHD, w/ Driver Side Knee Airbag)
-
INSTALL NO. 1 INSTRUMENT PANEL SUB-ASSEMBLY (for RHD, w/o Driver Side Knee Airbag)
-
INSTALL NO. 1 INSTRUMENT PANEL SUB-ASSEMBLY (for RHD, w/ Driver Side Knee Airbag)
-
CONNECT HOOD LOCK CONTROL LEVER SUB-ASSEMBLY (for RHD)
-
INSTALL NO. 2 METER HOOD CLUSTER (for RHD)
-
INSTALL NO. 1 INSTRUMENT PANEL UNDER COVER SUB-ASSEMBLY (for RHD)
-
INSTALL INSTRUMENT SIDE PANEL RH (for RHD)
-
INSTALL FRONT DOOR OPENING TRIM WEATHERSTRIP RH (for RHD)
-
INSTALL COWL SIDE TRIM SUB-ASSEMBLY RH (for RHD)
-
INSTALL FRONT DOOR SCUFF PLATE RH (for RHD)
-
INSTALL LOWER CENTER INSTRUMENT PANEL FINISH PANEL (for RHD)
-
INSTALL NO. 1 METER HOOD CLUSTER (for RHD)
-
CONNECT CABLE TO NEGATIVE BATTERY TERMINAL (for RHD)
for 2AR-FE:
for 2GR-FKS:
-
PERFORM DIAGNOSTIC SYSTEM CHECK (for RHD, w/ Driver Side Knee Airbag)
-
INSPECT SRS WARNING LIGHT (for RHD, w/ Driver Side Knee Airbag)