CLEARANCE WARNING BUZZER(for Wagon Rear Side) REMOVAL
PROCEDURE
REMOVE DECK BOARD SUB-ASSEMBLY (w/ Deck Board)
REMOVE DECK BOARD ASSEMBLY (w/ Deck Board)
REMOVE FRONT DECK FLOOR BOX (w/ Deck Board)
REMOVE REAR FLOOR MAT ASSEMBLY
REMOVE NO. 2 DECK BOARD SUB-ASSEMBLY (w/ Deck Board)
REMOVE DECK FLOOR BOX RH
REMOVE TONNEAU COVER ASSEMBLY
REMOVE ROOM PARTITION NET ASSEMBLY (w/ Partition Net)
REMOVE REAR DECK TRIM COVER
REMOVE REAR SEAT CUSHION ASSEMBLY
REMOVE REAR SEAT HEADREST ASSEMBLY
REMOVE REAR SEAT CENTER HEADREST ASSEMBLY (w/ Center Headrest)
DISCONNECT REAR SEAT INNER WITH CENTER BELT ASSEMBLY RH
DISCONNECT REAR NO. 1 SEAT LOCK CABLE ASSEMBLY
REMOVE REAR SEATBACK ASSEMBLY RH
REMOVE REAR DOOR SCUFF PLATE RH
DISCONNECT REAR DOOR OPENING TRIM WEATHERSTRIP RH
REMOVE REAR SEATBACK HINGE SUB-ASSEMBLY RH
REMOVE REAR SEAT SIDE GARNISH RH
REMOVE NO. 2 DECK SIDE TRIM HOOK
REMOVE RECLINING REMOTE CONTROL BEZEL RH
REMOVE DECK TRIM SIDE PANEL ASSEMBLY RH
REMOVE NO. 2 CLEARANCE WARNING BUZZER
-
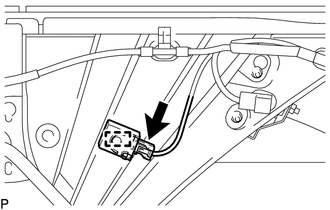
Disconnect the connector.
Disengage the clamp and remove the No. 2 clearance warning buzzer.
-