REAR NO. 1 SEAT ASSEMBLY REASSEMBLY
CAUTION / NOTICE / HINT
Wear protective gloves. Sharp areas on the parts may injure your hands.
Use the same procedure for the RH and LH sides.
The procedure listed below is for the LH side.
PROCEDURE
INSTALL NO. 1 SEATBACK FRAME SUB-ASSEMBLY LH
Install the No. 1 seatback frame sub-assembly LH with the 4 bolts.
42 N*m
428 kgf*cm
31 ft.*lbf
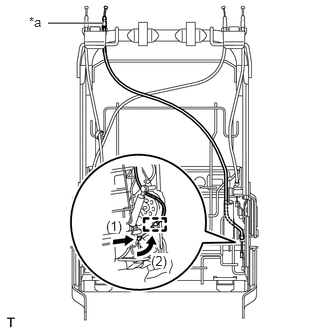
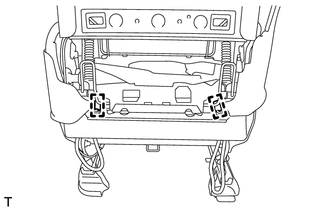
INSTALL NO. 2 SEAT ADJUSTER CONTROL CABLE ASSEMBLY
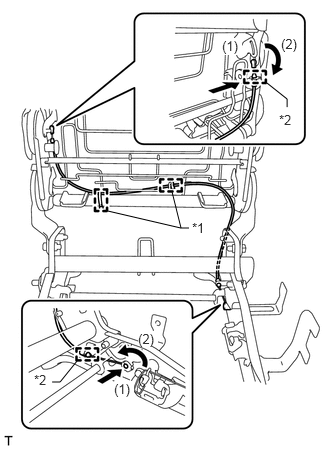
Install the No. 2 seat adjuster control cable assembly in the order shown in the illustration.
Attach the 2 clamps of the cable ends.
Install 2 new cable ties.
Table 1. Text in Illustration *1
Cable Tie
*2
Clamp
-
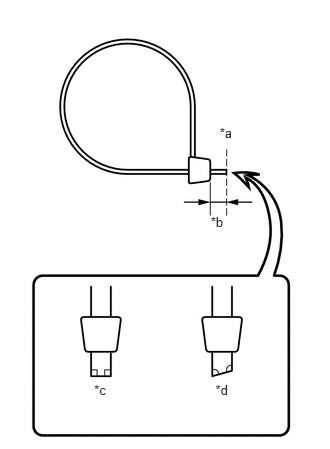
Cut off the end of the cable tie as shown in the illustration.
Table 2. Text in Illustration *a
Cut Here
*b
5 mm (0.20 in.)
*c
Correct
*d
Incorrect
Tip:Make sure that the end of the cable tie faces the seatback board.
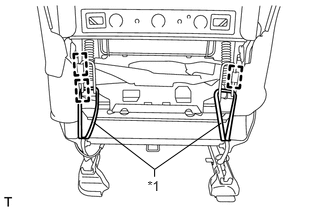
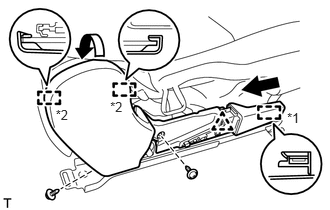
INSTALL REAR NO. 1 SEAT LOCK CABLE ASSEMBLY
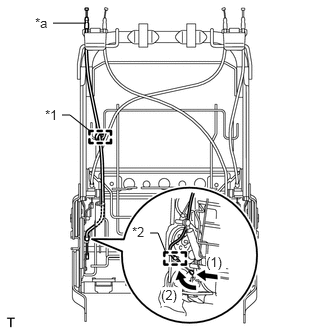
Install the rear No. 1 seat lock cable assembly in the order shown in the illustration.
Attach the clamp of the cable end.
Install a new cable tie.
Table 3. Text in Illustration *1
Cable Tie
*2
Clamp
*a
Blue Colored
-
Cut off the end of the cable tie as shown in the illustration.
Table 4. Text in Illustration *a
Cut Here
*b
5 mm (0.20 in.)
*c
Correct
*d
Incorrect
Tip:Make sure that the end of the cable tie faces the seatback board.
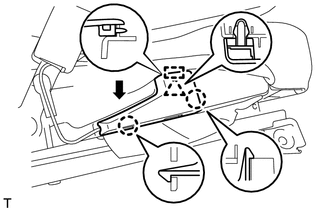
INSTALL RECLINING REMOTE CONTROL CABLE ASSEMBLY
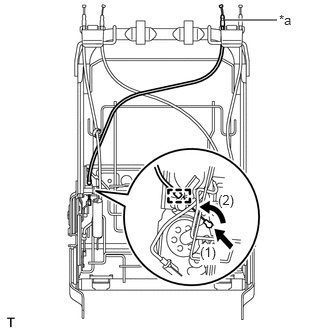
Install the reclining remote control cable assembly in the order shown in the illustration.
Table 5. Text in Illustration *a
Green Colored
Attach the clamp of the cable end.
INSTALL REAR NO. 1 SEAT LOCK CABLE ASSEMBLY
Install the rear No. 1 seat lock cable assembly in the order shown in the illustration.
Table 6. Text in Illustration *a
Yellow Colored
Attach the clamp of the cable end.
INSTALL RECLINING REMOTE CONTROL CABLE ASSEMBLY

Install the reclining remote control cable assembly in the order shown in the illustration.
Table 7. Text in Illustration *a
Red Colored
Attach the clamp of the cable end.
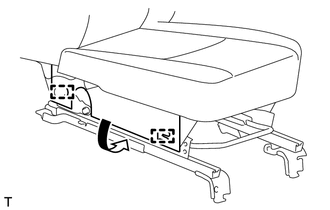
INSTALL NO. 1 SEAT CUSHION FRAME SUB-ASSEMBLY LH
Temporarily install the rear No. 1 seat cushion frame sub-assembly LH with the 2 bolts.
Using a T45 "TORX" socket wrench, temporarily install the 2 spacers with the 2 "TORX" bolts.
Using a T45 "TORX" socket wrench, tighten the 2 "TORX" bolts.
21 N*m
214 kgf*cm
15 ft.*lbf
Tighten the 2 bolts.
21 N*m
214 kgf*cm
15 ft.*lbf
INSTALL REAR NO. 1 SEATBACK SPRING
-
Temporarily install the rear back lock control lever RH.
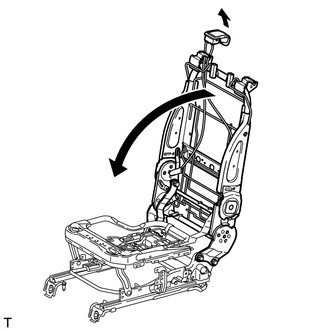
Operate the rear back lock control lever and fold down the seatback frame.
-
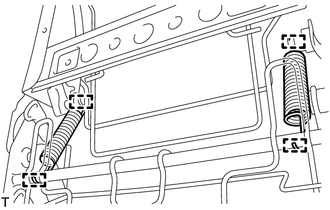
Attach the 4 hooks to install the 2 rear No. 1 seatback springs.
-
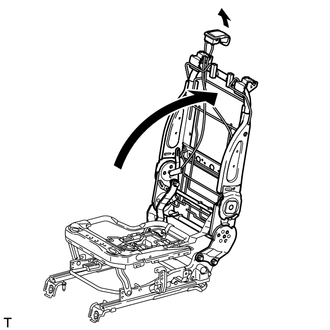
Operate the rear back lock control lever and raise the seatback frame.
Remove the rear back lock control lever RH.
-
INSTALL REAR SEATBACK COVER RH
-

Attach the guide and 2 claws to install the rear seatback cover RH.
-
INSTALL REAR SEATBACK COVER LH
-
Attach the guide and 2 claws to install the rear seatback cover LH.
-
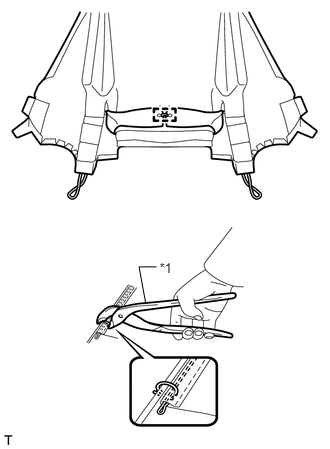
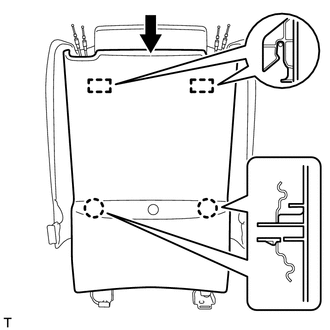
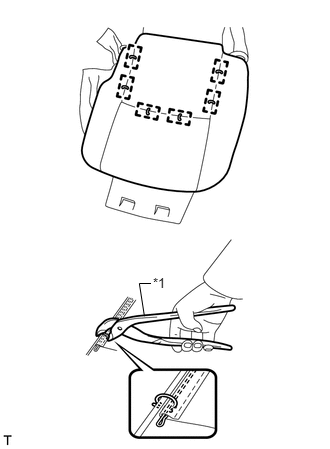
INSTALL REAR SEATBACK LOWER COVER SUB-ASSEMBLY LH
Install the lower part of the rear seatback lower cover sub-assembly LH to the rear seatback lower pad.
Using hog ring pliers, install the rear seatback lower cover sub-assembly LH to the rear seatback lower pad with new hog rings.
Note:Be careful not to damage the cover.
When installing the hog rings, avoid wrinkling the cover.
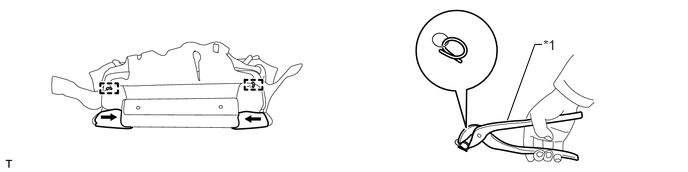
Table 8. Text in Illustration *1
Hog Ring Pliers
-
-
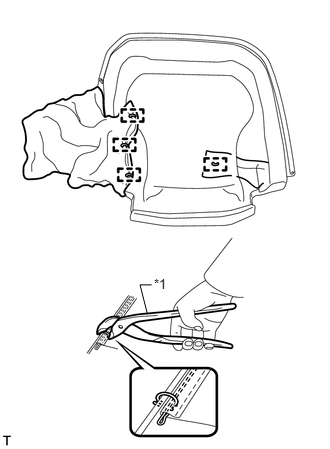
Using hog ring pliers, install the rear seatback lower cover sub-assembly LH with rear seatback lower pad to the seatback frame with new hog rings.
Note:Be careful not to damage the cover.
When installing the hog rings, avoid wrinkling the cover.
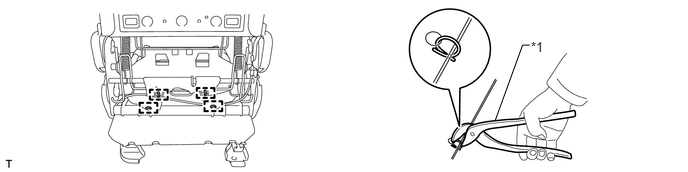
Table 9. Text in Illustration *1
Hog Ring Pliers
-
-
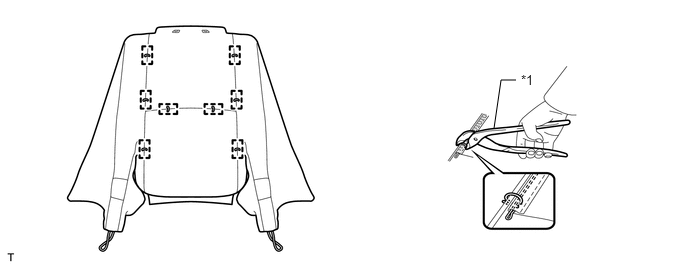
Using hog ring pliers, install new hog rings.
Note:Be careful not to damage the cover.
When installing the hog rings, avoid wrinkling the cover.
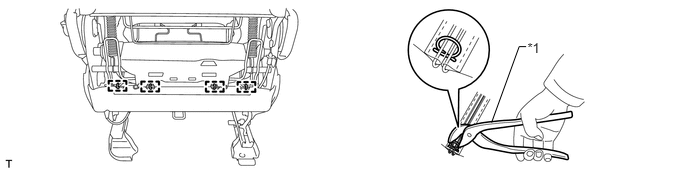
Table 10. Text in Illustration *1
Hog Ring Pliers
-
-
INSTALL SEPARATE TYPE REAR SEATBACK COVER
-
Using hog ring pliers, install the separate type rear seatback cover to the separate type rear seatback pad with new hog rings.
Table 11. Text in Illustration *1
Hog Ring Pliers
Note:Be careful not to damage the cover.
When installing the hog rings, avoid wrinkling the cover.
-
Using hog ring pliers, install the lower part of the separate type rear seatback cover with a new hog ring.
Table 12. Text in Illustration *1
Hog Ring Pliers
Note:Be careful not to damage the cover.
When installing the hog ring, avoid wrinkling the cover.
-
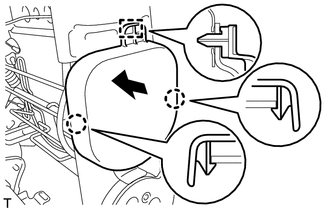
INSTALL REAR NO. 1 SEATBACK COVER WITH PAD
-
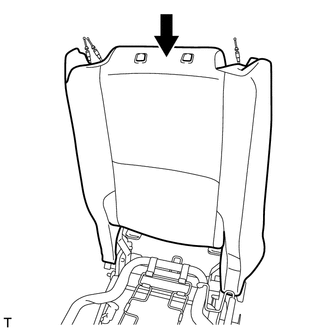
Temporary install the rear No. 1 seatback cover with pad.
-

Attach the 4 claws to install the 2 rear seat headrest supports.
Using hog ring pliers, install the rear No. 1 seatback cover with pad to the seatback frame with new hog rings and attach the 2 hooks.
Note:Be careful not to damage the cover.
When installing the hog rings, avoid wrinkling the cover.
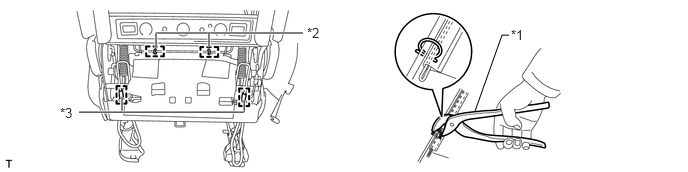
Table 13. Text in Illustration *1
Hog Ring Pliers
*2
Hog Ring
*3
Hook
-
-
-
Attach the 2 hooks.
-
Attach the 2 rubber bands and 3 hooks to install the rear No. 1 seatback cover with pad.
Table 14. Text in Illustration *1
Rubber Band
-
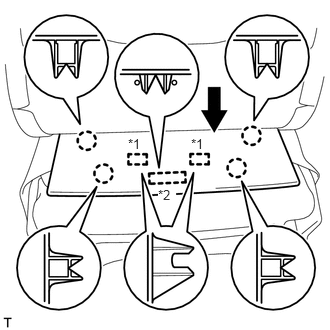
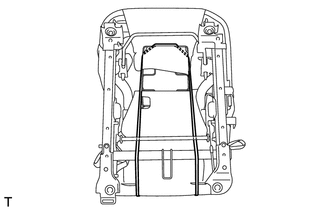
INSTALL REAR SEATBACK BOARD SUB-ASSEMBLY LH
-
Attach the 2 hooks.
Attach the 2 claws.
Attach the 3 hooks to install the rear seatback board sub-assembly LH.
-
INSTALL REAR NO. 1 SEATBACK BOARD
Attach the guide and 2 hooks.
Attach the 4 claws to install the rear No. 1 seatback board.
Table 15. Text in Illustration *1
Hook
*2
Guide
INSTALL REAR BACK LOCK CONTROL LEVER SUB-ASSEMBLY RH
-
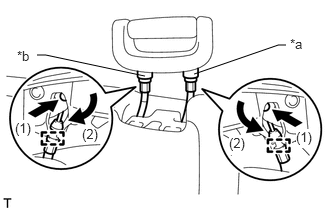
Connect the 2 cables in the order shown in the illustration.
Attach the 2 clamps of the cable ends.
Table 16. Text in Illustration *a
Blue Colored
*b
Yellow Colored
-
Attach the 2 claws to install the rear back lock control lever sub-assembly RH.
Install the screw.
-
INSTALL REAR BACK LOCK CONTROL LEVER SUB-ASSEMBLY LH
-
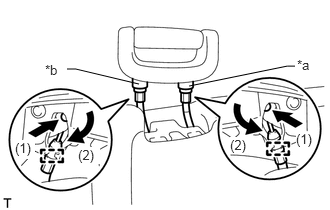
Connect the 2 cables in the order shown in the illustration.
Attach the 2 clamps of the cable ends.
Table 17. Text in Illustration *a
Green Colored
*b
Red Colored
-
Attach the 2 claws to install the rear back lock control lever sub-assembly LH.
Install the screw.
-
INSTALL SEPARATE TYPE REAR SEAT CUSHION COVER
-
Using hog ring pliers, install the separate type rear seat cushion cover to the separate type rear seat cushion pad with new hog rings.
Table 18. Text in Illustration *1
Hog Ring Pliers
Note:Be careful not to damage the cover.
When installing the hog rings, avoid wrinkling the cover.
-
Using hog ring pliers, attach the separate type rear seat cushion cover to the separate type rear seat cushion pad with new hog rings.
Table 19. Text in Illustration *1
Hog Ring Pliers
Note:Be careful not to damage the cover.
When installing the hog rings, avoid wrinkling the cover.
-
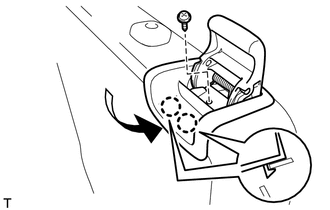
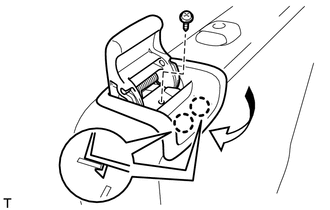
INSTALL REAR NO. 1 SEAT CUSHION COVER WITH PAD
Attach the 5 hooks to install the rear No. 1 seat cushion cover with pad.
Using hog ring pliers, attach the separate type rear seat cushion cover to the separate type rear seat cushion pad with new hog rings.
Note:Be careful not to damage the cover.
When installing the hog rings, avoid wrinkling the cover.
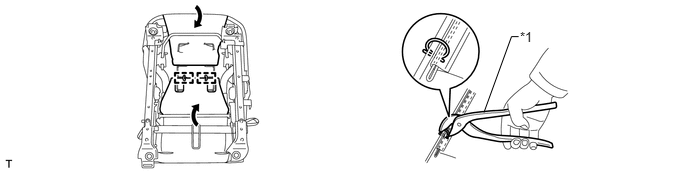
Table 20. Text in Illustration *1
Hog Ring Pliers
-
-
Close the upper part of the separate type rear seat cushion cover.
-
Attach the rubber band as shown in the illustration.
Pass the 2 seatback cover rubber bands through the 2 seat cushion cover rubber bands.
Attach the 2 seatback cover rubber bands.
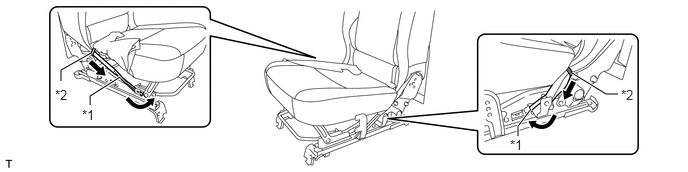
Table 21. Text in Illustration *1
Seatback Cover Rubber Band
*2
Seat Cushion Cover Rubber Band
-
Attach the 2 hooks to close the cover.
INSTALL REAR SEAT LEG SIDE COVER LH
Attach the hook labeled A.
Attach the 2 hooks labeled B to install the rear seat leg side cover LH.
Table 22. Text in Illustration *1
Hook A
*2
Hook B
Install the 2 screws.
INSTALL REAR SEAT 3 POINT TYPE INNER BELT ASSEMBLY LH
INSTALL REAR SEAT TRACK COVER LH
-
Attach the guide and clip.
Attach the 2 claws to install the rear seat track cover LH.
-
INSTALL REAR SEAT NO. 2 LEG SIDE COVER
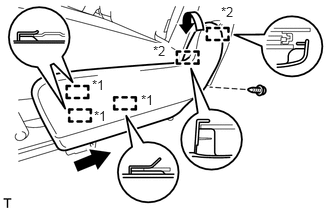
Attach the 3 hooks labeled A.
Attach the 2 hooks labeled B to install the rear seat No. 2 leg side cover.
Table 23. Text in Illustration *1
Hook A
*2
Hook B
Install the screw.
INSTALL REAR SEAT HEADREST ASSEMBLY
Install the rear seat headrest assembly.