RADIO RECEIVER INSTALLATION

-
PRECAUTION (for Radio and Display Type with Intuitive Parking Assist System)
Note
When installing the hard disk drive, eliminate static electricity by touching the vehicle body to prevent components from being damaged.
-
INSTALL RADIO RECEIVER ASSEMBLY (for Radio Receiver Type)
-
INSTALL RADIO AND DISPLAY RECEIVER ASSEMBLY (for Radio and Display Type)
-
INSTALL NAVIGATION ECU SUB-ASSEMBLY (for Radio and Display Type with Intuitive Parking Assist System)
-
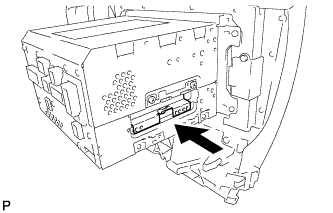
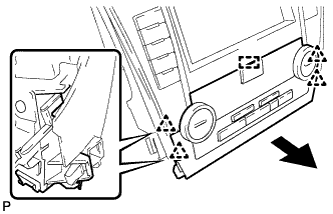
INSTALL HARD DISK DRIVE (for Radio and Display Type with Intuitive Parking Assist System)
-
Insert the hard disk drive in the direction shown by the arrow in the illustration to install it.
-
Engage the 2 guides to temporarily install the cover.
-
Install the cover with the 2 screws.
-
-
INSTALL EXTENSION MODULE (for Radio and Display Type)
w/ Navigation System: Click here
-
INSTALL AIR CONDITIONING CONTROL ASSEMBLY
-
Engage the guide and 4 clips to install the air conditioning control assembly as shown in the illustration.
-
-
INSTALL NO. 1 RADIO BRACKET (for Radio Receiver Type)
-
Install the No. 1 radio bracket with the 5 screws.
-
-
INSTALL NO. 2 RADIO BRACKET (for Radio Receiver Type)
-
Install the No. 2 radio bracket with the 5 screws.
-
-
INSTALL NO. 1 RADIO BRACKET (for Radio and Display Type)
-
w/o Navigation System:
-
Install the No. 1 radio bracket with the 5 screws.
-
-
w/ Navigation System:
-
Install the No. 1 radio bracket with the 7 screws.
-
-
-
INSTALL NO. 2 RADIO BRACKET (for Radio and Display Type)
-
w/o Navigation System:
-
Install the No. 2 radio bracket with the 5 screws.
-
-
w/ Navigation System:
-
Install the No. 2 radio bracket with the 7 screws.
-
-
-
INSTALL NO. 1 RADIO RECEIVER BRACKET (for Radio and Display Type with Intuitive Parking Assist System)
-
Install the No. 1 radio receiver bracket with the 5 screws.
-
-
INSTALL NO. 2 RADIO RECEIVER BRACKET (for Radio and Display Type with Intuitive Parking Assist System)
-
Install the No. 2 radio receiver bracket with the 5 screws.
-
-
INSTALL RADIO RECEIVER ASSEMBLY WITH AIR CONDITIONING CONTROL ASSEMBLY (for Radio Receiver Type)
-
Connect each connector.
-
Engage the 8 clips to the vehicle body to temporarily install the radio receiver assembly with air conditioning control assembly.
-
Install the radio receiver assembly with air conditioning control assembly with the 4 bolts.
-
-
INSTALL RADIO RECEIVER ASSEMBLY WITH AIR CONDITIONING CONTROL ASSEMBLY (for Radio and Display Type)
-
Connect each connector.
-
Engage the 8 clips to the vehicle body to temporarily install the radio receiver assembly with air conditioning control assembly.
-
Install the radio receiver assembly with air conditioning control assembly with the 4 bolts.
-
-
INSTALL NO. 2 INSTRUMENT PANEL REGISTER ASSEMBLY
-
Engage the 6 clips to install the No. 2 instrument panel register assembly.
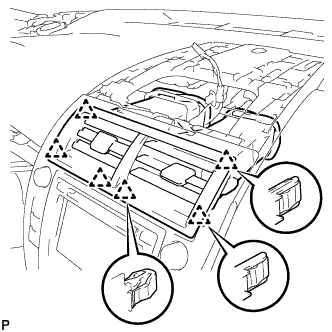
Note
When installing the No. 2 instrument panel register assembly, check that the wire harness is not caught between the No. 2 instrument panel register assembly and duct.
-
-
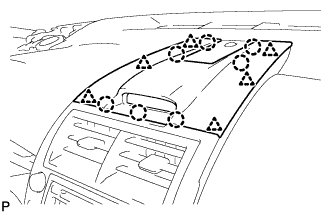
INSTALL CENTER INSTRUMENT CLUSTER FINISH PANEL ASSEMBLY
-
Connect the connector.
-
Engage the clamp.
-
Engage the 6 clips and 7 claws to install the center instrument cluster finish panel assembly.
-
-
INSTALL UPPER CONSOLE PANEL SUB-ASSEMBLY
-
Connect each connector.
-
Engage the 4 clips and guide.
-
Install the upper console panel sub-assembly with the 2 screws <D> or <E>.
-
-
INSTALL BOX BOTTOM MAT
-
Install the box bottom mat.
-
-
INSTALL REAR CONSOLE BOX ASSEMBLY
-
CONNECT CABLE TO AUXILIARY BATTERY NEGATIVE TERMINAL (for Radio and Display Type with Intuitive Parking Assist System)
Note
When disconnecting the cable, some systems need to be initialized after the cable is reconnected Click here.
-
INSTALL LUGGAGE TRIM SERVICE HOLE COVER (for Radio and Display Type with Intuitive Parking Assist System)
-
Engage the claw to connect the luggage trim service hole cover.
-
-
INSPECT HARD DISK DRIVE (for Radio and Display Type with Intuitive Parking Assist System)
-
REPLACED OPERATION (w/ Parking Assist Monitor System)