INTAKE MANIFOLD INSTALLATION

-
SET INTAKE MANIFOLD
-
Install the fuel vapor feed hose to the intake manifold.
-
Install the vacuum hose to the intake manifold.
-
Install the wire harness clamp bracket with the bolt.
- Torque:
- 10 N*m { 102 kgf*cm, 7 ft.*lbf }
-
Install a new gasket to the intake manifold.
-
Set the intake manifold on the engine assembly.
-
-
INSTALL FUEL DELIVERY PIPE SUB-ASSEMBLY
-
Install 4 new injector vibration insulators to the cylinder head.
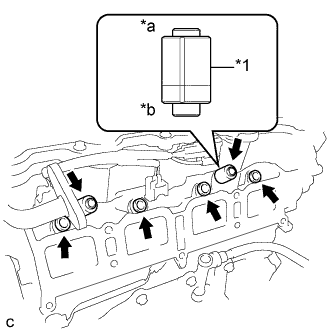
Text in Illustration *1 Fuel Delivery Spacer *a Fuel Delivery Pipe Side *b Cylinder Head Side -
Install the 2 fuel delivery spacers onto the cylinder head.
Tech Tips
Install the fuel delivery spacer so that the longer protrusion is on the cylinder head side.
-
Install the fuel delivery pipe sub-assembly with the 4 fuel injector assemblies and install the 2 bolts.
- Torque:
- 21 N*m { 214 kgf*cm, 15 ft.*lbf }
Note
-
Do not drop the fuel injectors when installing the fuel delivery pipe sub-assembly.
-
Check that the fuel injector assemblies rotate smoothly after installing the fuel delivery pipe sub-assembly.
-
Connect the 4 fuel injector connectors.
-
-
CONNECT FUEL TUBE SUB-ASSEMBLY
-
Push the tube connector onto the pipe until the tube connector makes a "click" sound.
Note
-
Before connecting the fuel tube connector and fuel pipe, check that there is no damage or foreign matter on the connecting part of the fuel pipe.
-
After connecting the fuel tube connector and fuel pipe, check that they are securely connected by trying to pull them apart.
-
-
Install the No. 1 fuel pipe clamp.
-
-
INSTALL INTAKE MANIFOLD
-
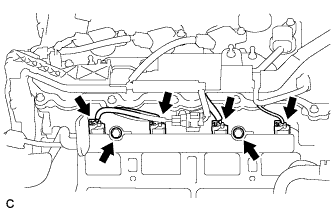
Temporarily install the intake manifold with the 6 bolts.
-
Tighten the 6 bolts in the order shown in the illustration.

- Torque:
- 21 N*m { 214 kgf*cm, 15 ft.*lbf }
-
Connect the 6 wire harness clamps.
-
Connect the heated oxygen sensor connector.
-
Connect the No. 2 ventilation hose.
-
-
INSTALL MANIFOLD ABSOLUTE PRESSURE SENSOR
-
Install the manifold absolute pressure sensor with the bolt.
- Torque:
- 5.0 N*m { 51 kgf*cm, 44 in.*lbf }
-
Connect the vacuum hose and connector.
-
-
INSTALL EGR VALVE ASSEMBLY
Tech Tips
After replacing the EGR valve assembly, perform the "Inspection After Repairs" Click here.
-
Install 2 new gaskets.
-
Temporarily install the EGR valve assembly with the 4 bolts.
-
Using an E8 "TORX" socket wrench, install the 2 stud bolts.
- Torque:
- 9.0 N*m { 92 kgf*cm, 80 in.*lbf }
-
Temporarily install the 2 nuts.
-
Tighten the 4 bolts.
- Torque:
- 10 N*m { 102 kgf*cm, 7 ft.*lbf }
-
Using a 12 mm deep socket wrench, tighten the 2 nuts.
- Torque:
- 21 N*m { 214 kgf*cm, 15 ft.*lbf }
-
Using a 10 mm deep socket wrench, install the bolt.
- Torque:
- 10 N*m { 102 kgf*cm, 7 ft.*lbf }
-
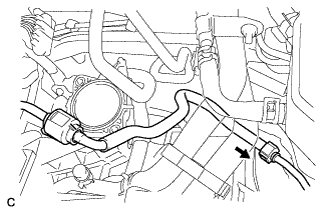
Connect the 2 water by-pass hoses.
-
Connect the connector.
-
-
INSTALL FRONT OUTER COWL TOP PANEL SUB-ASSEMBLY
-
Install the front outer cowl top panel sub-assembly with the 10 bolts.
- Torque:
- 10 N*m { 102 kgf*cm, 7 ft.*lbf }
-
Engage the 2 clamps to install the wire harness to the front outer cowl top panel sub-assembly.
-
-
INSTALL WINDSHIELD WIPER MOTOR AND LINK ASSEMBLY
-
INSTALL THROTTLE WITH MOTOR BODY ASSEMBLY
-
CONNECT CABLE FROM NEGATIVE AUXILIARY BATTERY TERMINAL
Note
When disconnecting the cable, some systems need to be initialized after the cable is reconnected Click here.
-
INSTALL LUGGAGE TRIM SERVICE HOLE COVER
-
Engage the claw to connect the luggage trim service hole cover.
-
-
INSPECT FOR FUEL LEAK
-
Check fuel pump operation.
-
Connect the Techstream to the DLC3.
-
Turn the power switch to on (IG) and turn the Techstream on.
Note
Do not start the engine.
-
Enter the following menus: Powertrain / Engine and ECT / Active Test / Control the Fuel Pump / Speed.
-
Check for pressure in the fuel inlet tube from the fuel line. Check that sounds of fuel flowing from the fuel tank can be heard. If no sounds can be heard, check the integration relay, fuel pump, ECM and wiring connectors.
-
-
Inspect for fuel leaks.
-
Check that there are no fuel leaks from the fuel system after doing any maintenance or repairs. If there is a fuel leak, repair or replace parts as necessary.
-
-
Turn the power switch off.
-
Disconnect the Techstream from the DLC3.
-