INTERIOR
-
OUTLINE
-
Design Theme
-
Tough and Gorgeous
-
"Authenticity" is expressed by a simple shape and craftsmanship.
-
"Presence" is expressed by the contrast between bold and refined structures.
-
"Elegance" is expressed by flowing surfaces and lines.
-
-
-
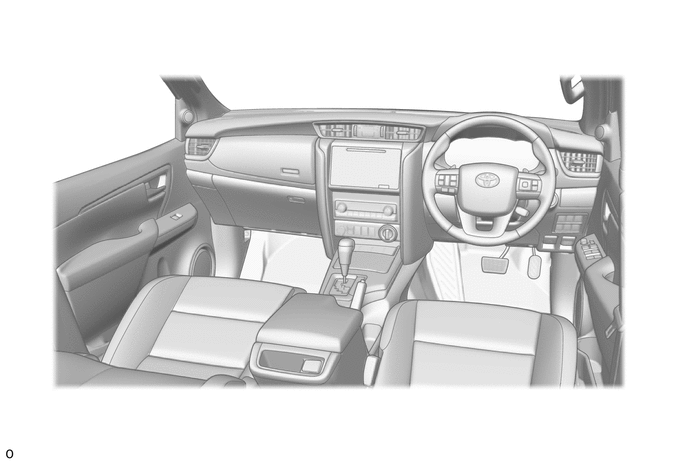
Instrument Panel
-
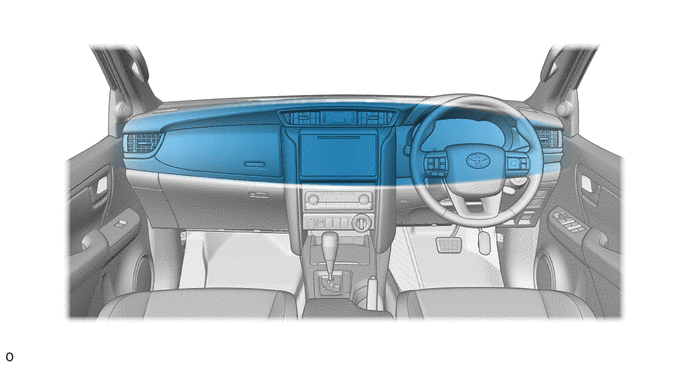
The instrument panel is composed with a simple yet confident posture, and finished components give the feeling of being hand-made with the aim of achieving unparalleled presence that exceeds its class.

-
A large storage compartment with a lid is provided for the front passenger seat area. Elegant dividing lines cut through the powerful overall structure define the rationally arranged functional components, and functional beauty that harmonizes shape and quality is expressed.
-
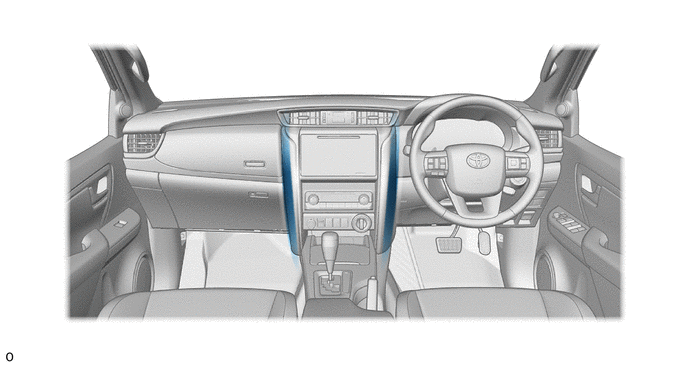
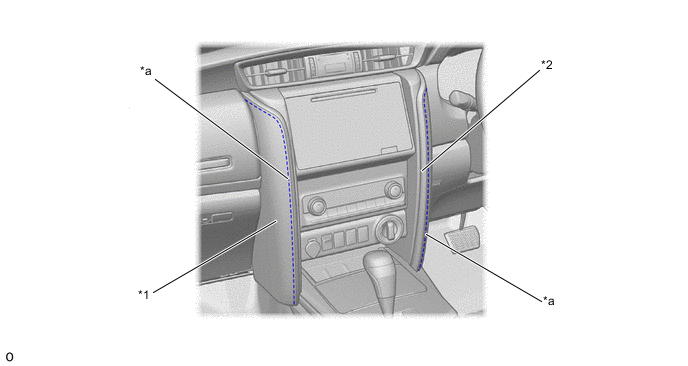
The center portion runs through vertically and has a structure with an imposing pillar wrapped in soft upholstery (synthetic upholstery) that seems to provide support from both sides, giving a strong sense of presence and finish, expressing authenticity.
-
A design with a large mass and flowing surfaces produce a powerful feel with a sense of luxury and elegantly line quality.
-
-
Side
-
Attention was paid to create an overall sense of integration through the surface continuity of the seams between the door trim board (front door trim board sub-assembly: *1 in illustration) and armrest (front armrest assembly: *2 in illustration), improving the quality feel of the materials. Comfort and power are expressed by this sense of unity.
-
Color stitching is provided to the armrest, producing a sense of luxury.
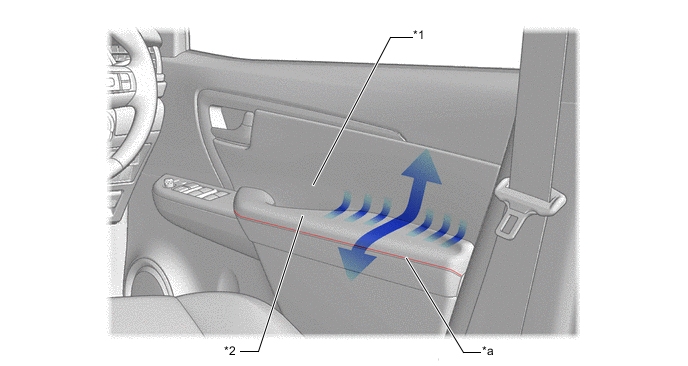
*1 Front Door Trim Board Sub-assembly *2 Front Armrest Assembly *a Color Stitch - -
-
-
Combination Meter Assembly
-
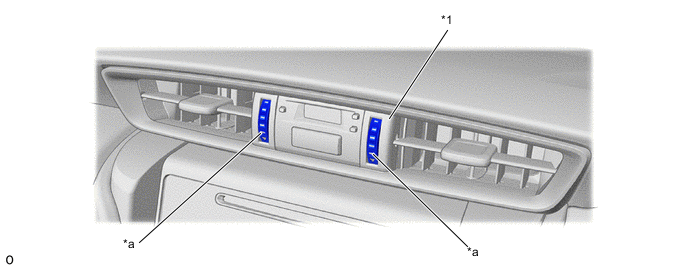
For models with a TFT multi-information display, the display is surrounded by ambient lighting. Furthermore, the needle of the meter is backlit to produce a feeling of high quality for the panel surface.
-
The ring ornamentation of the speedometer and tachometer is chrome plated to produce a sense of luxury. Also, by elongating the graduation line of the number area, the sense of width and visibility have been improved.
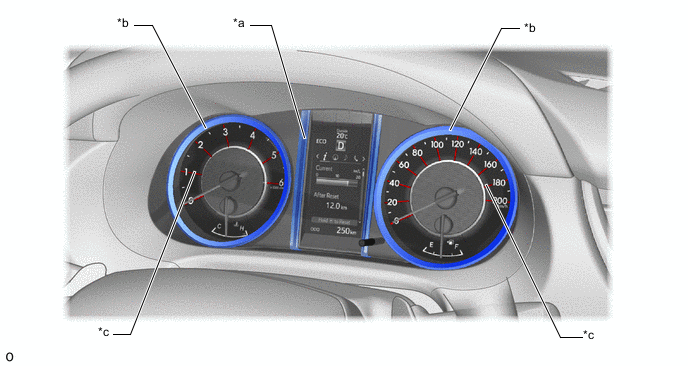
*a Ambient Lighting *b Ring Ornamentation *c Graduation Line - -
-
-
Console
-
The following types of consoles are provided depending on the model.
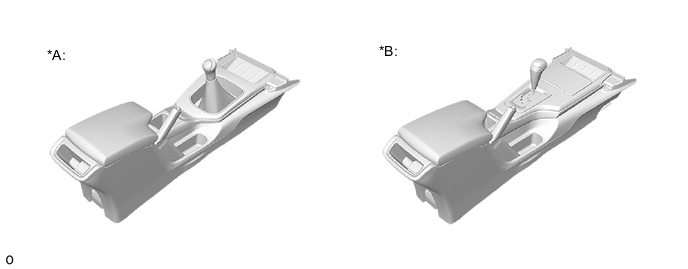
*A Models with Manual Transmission *B Models with Automatic Transmission -
The upper surface of the lid has been made flat and long, enhancing its usability as an armrest (*a in illustration).
-
The console has been widened to produce a sense of thickness (*b in illustration).
Figure 1. Console Lid (The illustration shows an example)

-
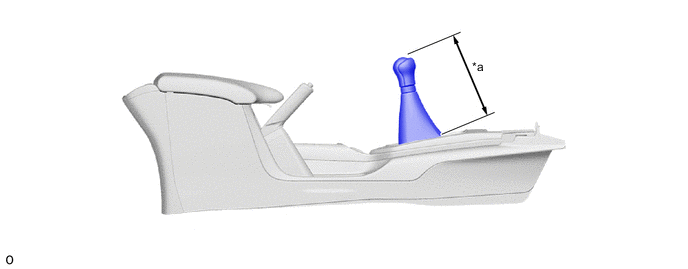
A low shift lever height has been provided to express a sense of private use similar to a passenger car (*a in illustration).
Figure 2. Shift Lever Height (The illustration shows an example)
-
-
Ornamentation/Surface Finish
-
Ornamentation such as that shown in the illustration is used for the instrument panel and console to wipes away the "truck" image and express the refined qualities of a passenger car which provides a sense of private use.
Figure 3. Models with Manual Transmission (The illustration shows an example)
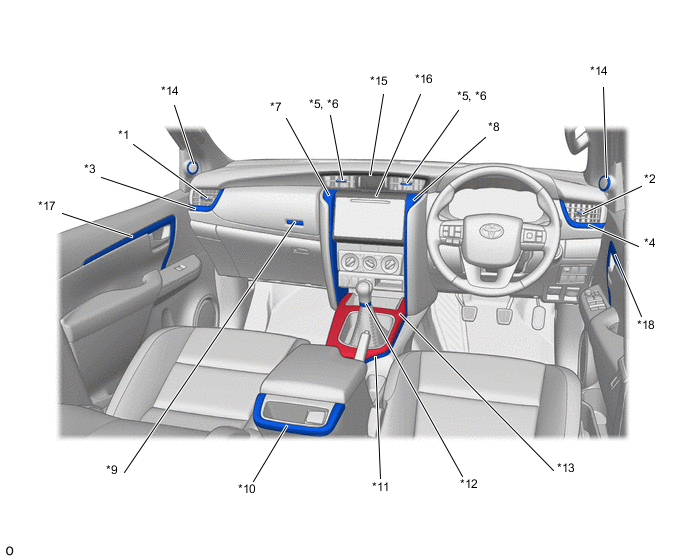
No. Location Ornament/Finishing Type Grade *1 Instrument Panel Register Assembly No. 2 Chromium Middle, Standard, Low Black Low *2 Instrument Panel Register Assembly No. 1 Chromium Middle, Standard, Low Black Low *3 Instrument Panel Register Bezel No. 2 Silver Paint Middle, Standard, Low *4 Instrument Panel Register Bezel No. 1 Black Paint Low *5 Instrument Panel Register Control Knob No. 2 Chromium Middle, Standard, Low Black Low *6 Instrument Panel Register Control Knob No. 3 Chromium Middle, Standard, Low Black Low *7 Instrument Panel Finish Panel LWR No. 2 Silver Paint Middle, Standard, Low *8 Instrument Panel Finish Panel LWR No. 1 Silver Paint Middle, Standard, Low *9 Instrument Panel Box Door Knob Push Button: Silver Paint
Bezel: High Gross Black Paint
Middle, Standard, Low *10 Console Rear End Panel Sub-assembly Silver Paint Middle, Standard Black Standard, Low *11 Console Upper Panel Garnish No. 2 Silver paint Middle, Standard, Black Paint Standard, Low *12 Shifting Hole Bezel Chromium All *13 Console Shift Hole Cover Hydrographic Middle, Standard Black Paint Standard, Low *14 Door Speaker Grille Base Black Metalic Paint Middle, Standard, Low Silver Paint All (Option) Without Speaker Black Low *15 Instrument Panel Register Bezel Garnish High Gloss Black Middle, Standard Standard Black Standard, Low *16 Instrument Cluster Finish Panel Sub-assembly High Gloss Black Paint Middle, Standard (Option) Black Paint Standard, Low *17 Front Door Trim Ornament LH Silver Paint Middle, Standard, Low Black Paint Low *18 Front Door Trim Ornament RH Silver Paint Middle, Standard, Low Black Paint Low Figure 4. Models with Automatic Transmission (The illustration shows an example)
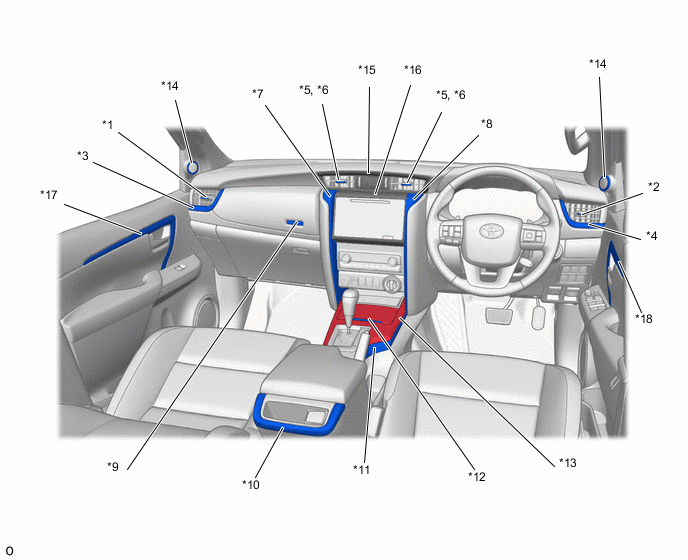
No. Location Ornament/Finishing Type Grade *1 Instrument Panel Register Assembly No. 2 Chromium High, Middle, Standard, Low Black Low *2 Instrument Panel Register Assembly No. 1 Chromium High, Middle, Standard, Low Black Low *3 Instrument Panel Register Bezel No. 2 Silver Paint High, Middle, Standard, Low *4 Instrument Panel Register Bezel No. 1 Black Paint Low *5 Instrument Panel Register Control Knob No. 2 Chromium High, Middle, Standard, Low Black Low *6 Instrument Panel Register Control Knob No. 3 Chromium High, Middle, Standard, Low Black Low *7 Instrument Panel Finish Panel LWR No. 2 Silver Paint High, Middle, Standard, Low *8 Instrument Panel Finish Panel LWR No. 1 Silver Paint High, Middle, Standard, Low *9 Instrument Panel Box Door Knob Push Button: Silver Paint
Bezel: High Gross Black Paint
High, Middle, Standard, Low *10 Console Rear End Panel Sub-assembly Silver Paint High, Middle, Standard Black Standard, Low *11 Console Upper Panel Garnish No. 2 Silver paint High, Middle, Standard Black Paint Standard, Low *12 Console Cup Holder Hydrographic High, Middle, Standard Black Paint Standard, Low *13 Console Shift Hole Cover Hydrographic High, Middle, Standard Black Paint Standard, Low *14 Door Speaker Grille Base Black Metalic Paint All (Option) Silver Paint All (Option) Without Speaker Black Low *15 Instrument Panel Register Bezel Garnish High Gloss Black High, Middle, Standard Standard Black Standard, Low *16 Instrument Cluster Finish Panel Sub-assembly High Gloss Black Paint All (Option) Black Paint All (Option) *17 Front Door Trim Ornament LH Silver Paint High, Middle, Standard, Low Black Paint Low *18 Front Door Trim Ornament RH Silver Paint High, Middle, Standard, Low Black Paint Low -
Soft skin is used for the dial knob of the instrument panel register assembly center.
Figure 5. Dial Knob (The illustration shows an example)
*1 Instrument Panel Register Assembly Center - - *a Dial Knob - - -
Depending on the models, a synthetic leather with stitch with soft touch feeling have been provided for the instrumentcluster finish panel assembly.
Figure 6. Instrument Cluster Finish Panel Assembly (The illustration shows an example)
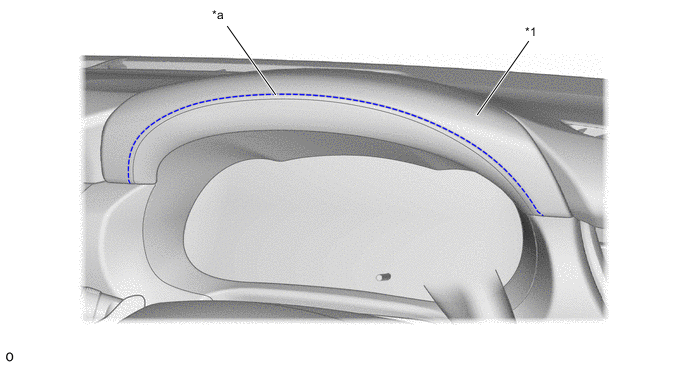
*1 Instrument Cluster Finish Panel Assembly - - *a Real Stitch - - -
Depending on the models, a synthetic leather with stitch with soft touch feeling have been provided for the instrument panel garnish sub-assembly No. 1/No. 2.
Figure 7. Instrument Panel Garnish Sub-assembly (The illustration shows an example)
*1 Instrument Panel Garnish Sub-assembly No. 2 *2 Instrument Panel Garnish Sub-assembly No. 1 *a Real Stitch - - -
Depending on the models, a synthetic leather with stitch with soft touch feeling have been provided for the instrument panel box door sub-assembly No. 1.
Figure 8. Instrument Panel Box Door Sub-assembly No. 1 (The illustration shows an example)

*1 Instrument Panel Box Door Sub-assembly No. 1 - - *a Real Stitch - - -
Depending on the models, a soft lid (synthetic leather) with stitch with soft touch feeling have been provided for the console compartment door sub-assembly.
Figure 9. Console Compartment Door Sub-assembly (The illustration shows an example)
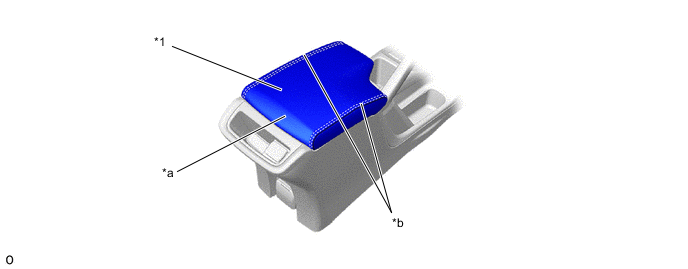
*1 Console Compartment Door Sub-assembly - - *a Synthetic Leather *b Real Stitch
-
-
Storage
-
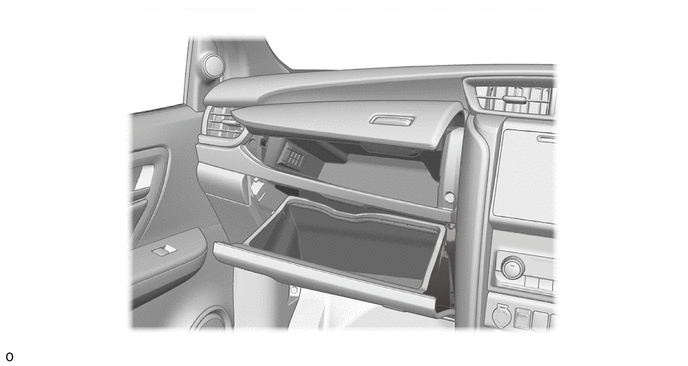
Glove Compartment
-
The opener button (Glove Compartment Door Lock Assembly) has been designed to improve appearance and passenger usability. Moreover, the opener button is positioned near the center of the vehicle for easy access by the driver.
Figure 10. Glove Compartment (The illustration shows an example)
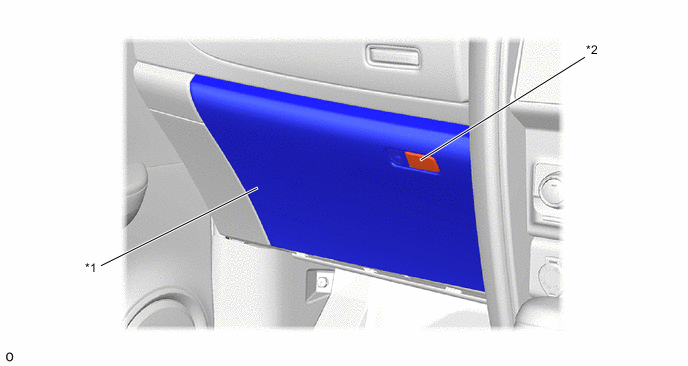
*1 Glove Compartment Door Assembly *2 Glove Compartment Door Lock Assembly
-
-
Upper Box
-
The opener button (instrument panel box door knob: *2 in illustration) has been designed to improve appearance and passenger usability. Moreover, the opener button is positioned near the center of the vehicle for easy access by the driver.
-
The door can be opened a large amount to increase visibility inside the storage compartment.
-
A ventilator function linked with the air conditioning is provided inside the upper box depending on the model. Opening and closing the instrument panel hole cover (*3 in illustration) makes it possible to maintain the temperature of drinks, etc. (however, this is not possible in extremely high or low temperatures).
Figure 11. Upper Box (The illustration shows an example)
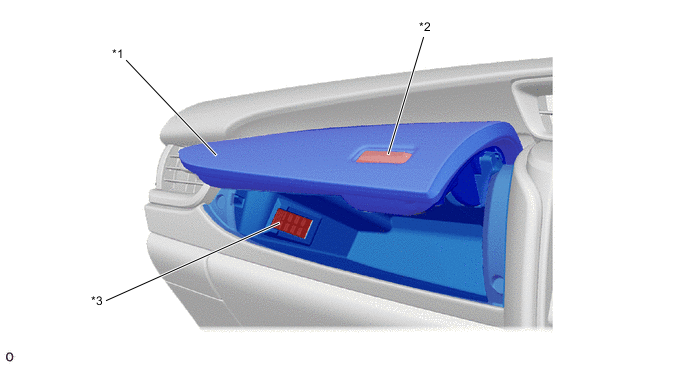
*1 Instrument Panel Box Door Sub-assembly No. 1 *2 Instrument Panel Box Door Knob *3 Instrument Panel Hole Cover - -
-
-
Cup Holder
-
A push type cup holder has been designed to improve appearance and passenger usability.
-
The cup holder has been designed to be in front of the side register to keep drinks cool or hot.
-
Open (*a in illustration): Push and slide the door out to open the cup holder (push manual open).
-
Close (*b in illustration): Push the door to close the cup holder (push manual close).
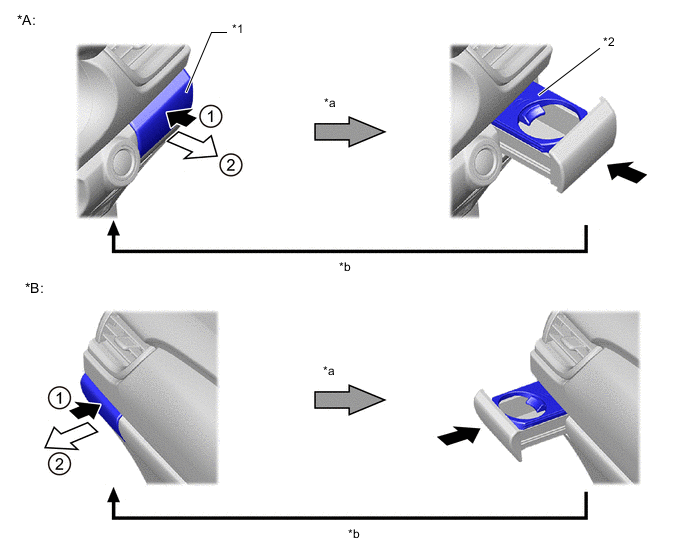
*A Driver Side *B Front Passenger Side *1 Instrument Panel Cup Holder Assembly *2 Instrument Panel Cup Holder Tray *a Open *b Close 
Push 
Pull
-
-
Console Area Storage
-
The design and positions of the tray, cup holder and accessory box have been optimized to maximize the storage space and utility of each part by considering the comfort and usability of each type of console.
Figure 12. Console Area Storage
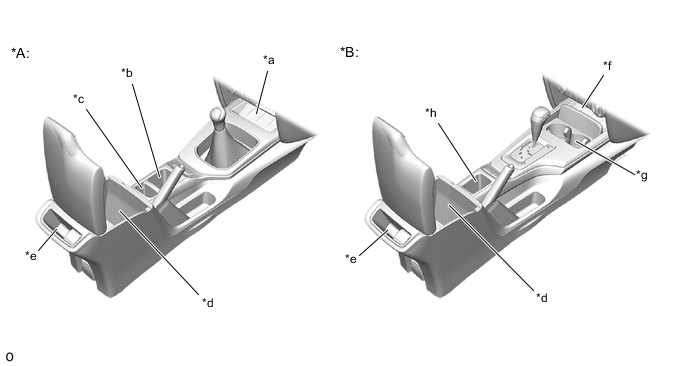
*A Models with Manual Transmission *B Models with Automatic Transmission *a Front Tray Box (Volume: 0.32 L) *b Cup Holder (Volume: 0.35 L) *c Accessory Box (Volume: 0.18 L) *d Console Box (Volume: 5.5 L) *e Accessory Box (Volume: 0.17 L) *f Front Tray Box (Volume: 0.22 L) *g Cup Holder (Volume: 0.83 L) *h Accessory Box (Volume: 0.22 L)
-
-
-
Equipment
-
An audio mini-jack (AUX/USB) and DC 12 V accessory socket have been positioned in the instrument panel console close to the console tray, where small items can be placed. As a result, portable music devices can be comfortably used.
Figure 13. Audio Mini-jack and Accessory Socket (The illustration shows an example)

*1 DC 12 V Accessory Socket *2 AUX/USB Port -
Depending on the models, an AC 220 V accessory socket and DC 12 V accessory socket have been used on the console rear end panel sub-assembly, where cell phones or cameras can be placed while charging.
Figure 14. Accessory Socket (The illustration shows an example)
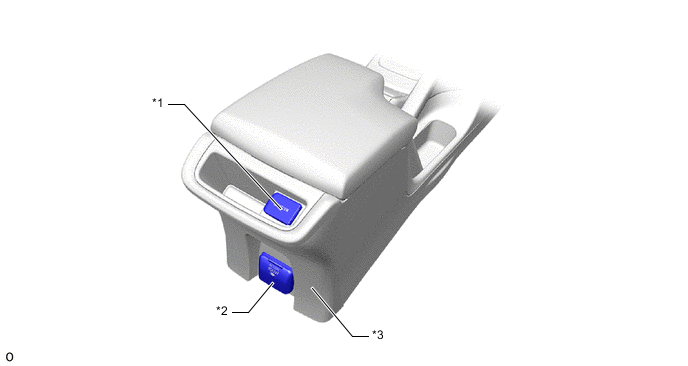
*1 DC 12 V Accessory Socket *2 AC 220 V Accessory Socket *3 Console Rear End Panel Sub-assembly - -
-
-
Sound Absorbing and Vibration Damping Material
-
The placement of sound absorbing materials on the back surface of the instrument panel and the back of the panel parts and the use of urethane foam on the front end of the instrument panel suppress the penetration of engine noise from the cowl portion and enhance quietness.
Figure 15. Around the Instrument Panel (The illustration shows an example)
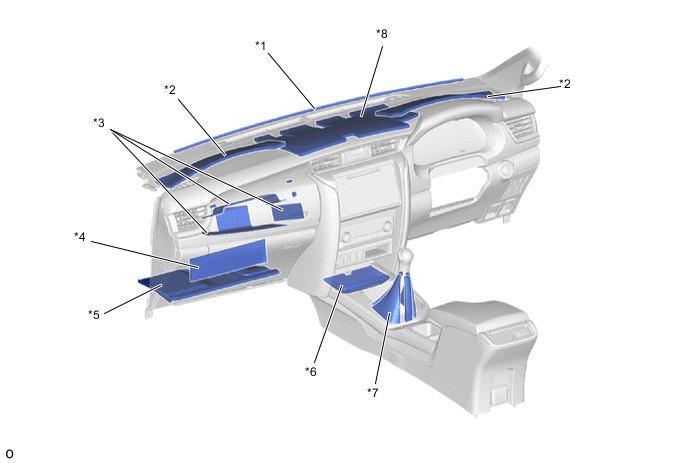
*1 Instrument Panel Cushion No. 5 *2 Instrument Panel Cushion No. 2 *3 Felt (Instrument Panel Box Door Sub-assembly No. 1) *4 Glove Compartment Door Silencer *5 Instrument Panel Under Silencer Pad No. 2 *6 Felt (Console Panel Sub-assembly Upper) *7 Felt (Shifting Hole Cover Assembly) *8 Instrument Panel Cushion No. 3 -
All the locations of acoustic insulating materials (sound insulation and absorption materials) in the cabin and luggage space have been optimized, thus creating a quiet drive.
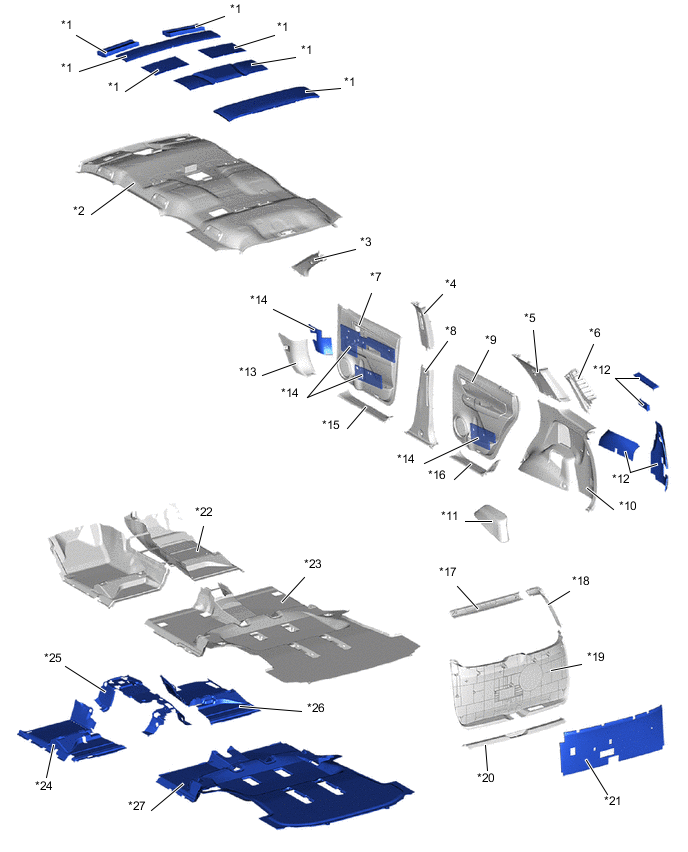
*1 Pad, Roof Silencer, No.2 *2 Roof Headlining Assembly *3 Front Pillar Garnish RH *4 Center Pillar Garnish Upper RH *5 Quarter Pillar Garnish RH *6 Rear Pillar Garnish Upper RH *7 Front Door Trim Board Sub-assembly RH *8 Center Pillar Garnish Lower RH *9 Rear Door Trim Board Sub-assembly RH *10 Quarter Inside Trim Board RH *11 Quarter Trim Cover Hole *12 Quarter Trim Pad *13 Cowl Side Trim Board RH *14 Felt *15 Front Door Scuff Plate RH *16 Rear Door Scuff Plate RH *17 Back Door Garnish Center *18 Back Door Side Garnish RH *19 Back Door Trim Board Assembly *20 Back Door Scuff Plate *21 Back Door Trim Silencer Pad No.1 *22 Floor Carpet Assembly Front *23 Rear Floor Carpet *24 Front Floor Silencer No. 4 *25 Front Floor Silencer Sheet *26 Front Floor Silencer No. 3 *27 Rear Floor Silencer - -
-
-