METER / GAUGE SYSTEM DETAILS
-
OPERATING CONDITION
-
Drive Mode Indicator
-
The ECO mode indicator illuminates when the following conditions are met:
Condition Power switch is on (IG). Hybrid system is operating. The drive mode select dial switch is turned to ECO mode. -
The SPORT mode*1 or SPORT S mode*2 indicator illuminates when the following conditions are met:
Condition Power switch is on (IG). Hybrid system is operating. The drive mode select dial switch is turned to SPORT mode.
-
*1: Models without AVS
-
*2: Models with AVS
-
-
The SPORT S+ mode indicator illuminates when the following conditions are met:*
Condition Power switch is on (IG). Hybrid system is operating. The drive mode select dial switch is turned to SPORT mode while the drive mode is in SPORT S mode.
-
*: Models with AVS
-
-
The drive mode indicator stops operating when the following conditions are met:
Condition Power switch is on (IG). Hybrid system is operating. The drive mode select dial switch is pushed.
-
-
SNOW Mode Indicator
-
The SNOW mode indicator illuminates when the following conditions are met:
Condition Power switch is on (IG). Hybrid system is operating. The drive mode select SNOW mode switch is pushed. -
The SNOW mode indicator stops operating when the following conditions are met:
Condition Power switch is on (IG). Hybrid system is operating. The drive mode select SNOW mode switch is pushed.
-
-
Meter Panel Illumination
-
The ECO lamp illuminates under each of the following conditions:
Condition The power switch is on (READY). The hybrid system is operating (the READY indicator light is illuminated). The shift lever is in D. The paddle shift is not being used. Normal mode or Eco mode is selected. EV drive mode is not selected. Hybrid system is normal. Hybrid system temperature is normal. The vehicle is traveling at a vehicle speed of approximately 130 km/h (80.6 mph) or less. The vehicle is being driven in an Eco-friendly manner. When Eco mode is selected, the ECO lamp illuminates even if the above conditions are not met. -
The SPORT lamp illuminates under the following condition:
Condition The drive mode is in SPORT mode*1, SPORT S mode*2 or SPORT S+ mode*2.
-
*1: Models without AVS
-
*2: Models with AVS
-
-
-
Hybrid System Indicator
-
Hybrid System Indicator linked meter panel illumination (ECO lamp) can begin to operate when all of following conditions are met:
Condition The power switch is on (READY). The hybrid system is operating (the READY indicator is illuminated). The vehicle is traveling with the shift lever in a position other than P, N or R.
-
-
-
FUNCTION
-
Buzzer
-
The table below shows the warning and reminder functions of the multi buzzer in the combination meter assembly:
Function
-
READY
-
Front Seat Belt Warning
-
Brake Warning
-
EPS Warning
-
Entry and Start System Warning
-
VSC
-
Hill-start Assist Control
-
Accelerator Depression with N Position Selected
-
Hybrid System Warning
-
HV Battery Low Warning
-
HV Battery Charge Request
-
Brake Hold Unreleased Warning
-
Dynamic Radar Cruise Control Warning*1
-
Lane-keeping Assist Cancel*2
-
Engine Immobiliser System
-
P Position Request
-
Speed Warning*3
-
Parking Brake Unreleased Warning
-
Door Open Driving Warning
-
SPORT Shift Reject Warning
-
Light Reminder
-
*1: Models with dynamic radar cruise control system
-
*2: Models with lane-keeping assist system
-
*3: Models for G.C.C. countries
-
-
-
Multi-information Display
-
The multi-information display can be switched by operating the DISP switch located on the steering pad.
-
The multi-information display indicates as follows:
Display Outline Cruise Information In the cruise information display, 7 types of information can be displayed:
-
Current Fuel Consumption
-
Average Fuel Consumption After Refueling
-
Average Fuel Consumption*
-
Average Vehicle Speed
-
Cruising Range*
-
Tire Pressure
-
Energy Monitor
Outside Temperature* The outside temperature is displayed. Warning If necessary, the warning display and advisory display will interrupt the multi-information display immediately. Customization The language, units, ECO lamp, drive monitor, tachometer settings, lamp brightness, SPORT lamp, EV driving indicator and default setting can be set up from this screen. The setting display is available only while the vehicle is stopped. If vehicle movement is detected during setup, the setup will be canceled automatically. Tech Tips
*: Will not be displayed on the cruise information display when selected through the driver monitor on the customization display.
-
-
The multi-information display undergoes the following transitions:
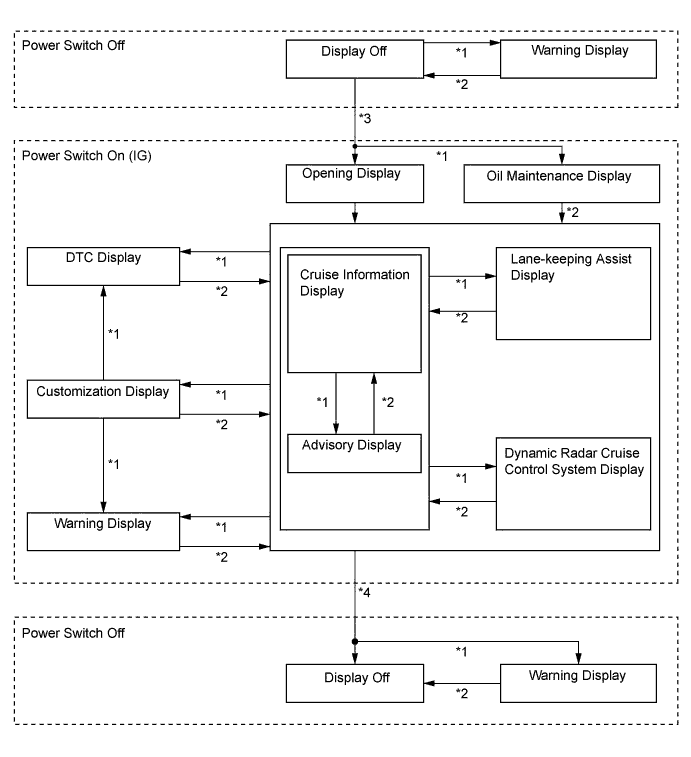
No. Condition *1 Conditions are met. *2 Conditions are not met. *3 Power switch is turned on (IG). *4 Power switch is turned off. -
The cruise information display is switched using the DISP switch on the steering wheel. The display switches in the following order each time the DISP switch is pressed:
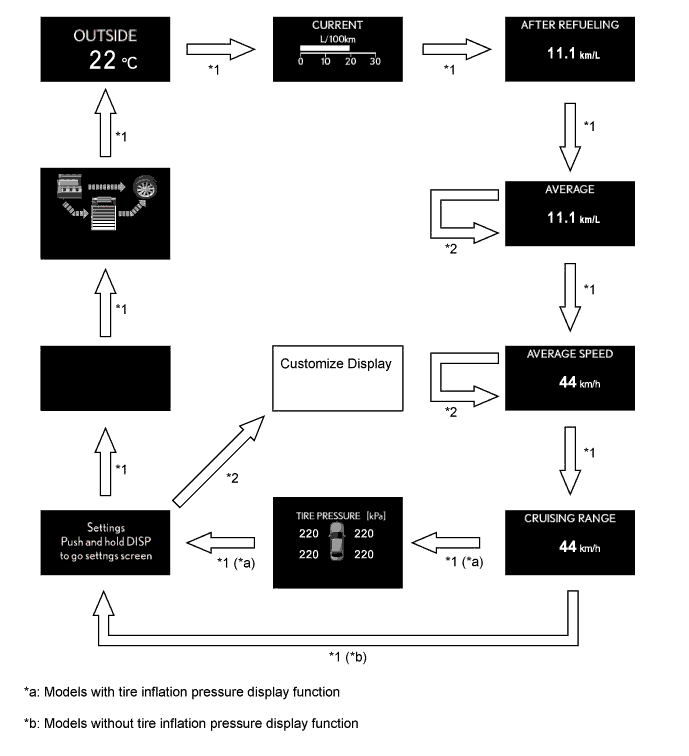
No. Condition *1 Pressing DISP switch for less than 0.8 seconds. *2 Pressing DISP switch for 0.8 seconds or more. Cruise Information Display Display Outline Outside Temperature 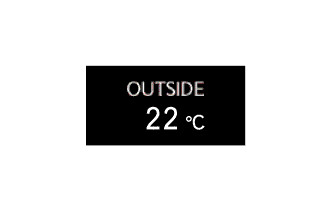
-
Displays the outside temperature.
-
The display updates every second.
Current Fuel Consumption 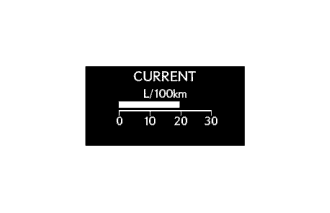
-
Displays the value that has been calculated by the meter ECU, which is based on the driven distance and the fuel consumption volume (fuel injection amount signal from the ECM via CAN), provided that the power switch is turned on (IG).
-
The display updates every 0.5 seconds.
Average Fuel Consumption After Refueling 
-
Displays the value that has been calculated by the meter ECU, which is based on the driven distance and the fuel consumption volume (fuel injection amount signal from the ECM via CAN) after refueling.
-
The display updates every 10 seconds.
Average Fuel Consumption 
-
Displays the value that has been calculated by the meter ECU, which is based on the driven distance and the fuel consumption volume (fuel injection amount signal from the ECM via CAN).
-
The display updates every 10 seconds.
Average Vehicle Speed 
-
Displays the value that has been calculated by the meter ECU, which is based on the elapsed time and driven distance since the counter was reset.
-
The display updates every 10 seconds.
Cruising Range 
-
Displays the value that has been calculated by the meter ECU, which is based on the fuel consumption data that the meter ECU continuously monitors and stores in its memory, and the residual fuel volume data, provided that the power switch is turned on (IG).
-
The display updates every 10 seconds.
Tire Pressure 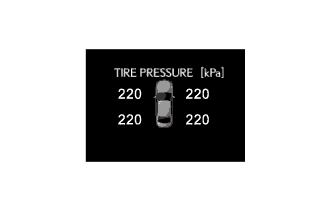
-
Displays the tire pressure.
-
The display updates every 1 seconds.
Energy Monitor 
-
Displays the energy transmission direction for checking the current drive method (engine, motor or both), whether the engine is being used to generate power or whether energy is being regenerated.
-
The energy flow, which appears in the form of an arrow, also shows the SOC of the HV battery in 9 levels.
-
This display is updated every 1 seconds.
-
-
Warning Display
-
The warning display and the advisory display interrupt the display in the multi-information display if the display conditions are met.
Priority Display Master Warning Light Multi Buzzer 1 VGRS Test Mode - - DRS Test Mode - - Adjusting LKA Camera - - Adjusting Front Radar Beam - - Checking Cruise Control C/D - - Checking Cruise Control Brake - - BRAKE! - - Maintenance Mode - - Certification Mode - - T/M LEARNING - - T/M ERROR - - 2 Warning for Collision with Vehicle Ahead - - Warning for lane departure - - Brake Malfunction Illuminates Sounds Stop the vehicle in a safe place
Shift to P position
Blinks Sounds 3 Door Open (While Driving) Blinks Sounds Door Open - - Lexus Parking Assist-sensor System - - Check Park Sonar System Illuminates - Clean Park Sonar Illuminates - 4 Auto Power OFF to Conserve Battery - - 5 Shift to P position (for Entry and Start System) Blinks - Shift to P position Blinks - Shift to P position when parked Blinks - N position Blinks - Traction battery preservation mode
Restart after shifting to the P position
Blinks - 6 Check Power Steering System Illuminates Sounds Release Parking Brake Blinks Sounds To park the vehicle, shift to P position Blinks Sounds Key not Detected Blinks Sounds Traction Battery Low
Charges when not in N position
Blinks - Depress the brake pedal
Check Brake Hold System
Illuminates Sounds Brake Hold not available on slope Blinks Sounds 7 LKA canceled Keep hands on steering wheel Illuminates - Parking Brake Overheat Blinks Sounds LKA not Available Illuminates Sounds Check Entry and Start System Blinks Sounds BSM not available Illuminates Sounds 8 Check SRS Airbag System Illuminates Sounds Check ABS - Sounds Clean Radar Sensor Illuminates Sounds Cruise Control not available Illuminates Sounds Check Cruise Control System Illuminates Sounds Check LKA System Illuminates Sounds Check PCS System Illuminates Sounds Check BSM System Illuminates Sounds Engine Oil Pressure Low Illuminates Sounds Check VGRS System Illuminates Sounds Check DRS System Illuminates Sounds Parking Brake Inoperable Illuminates Sounds Check Parking Brake System Illuminates Sounds Check Hybrid System Illuminates Sounds Cruise Control not available
Depress the brake pedal
- - Check Cruise Control System
Depress the brake pedal
Illuminates Sounds Check Brake System Illuminates Sounds Use on expressway only
Beware of stopping or merging vehicles!
- - 9 Turn power OFF (for Entry and Start System) Blinks - Turn power OFF Blinks Sounds Key detected in vehicle Blinks Sounds Turn Light Off Blinks Sounds Moon Roof opened Blinks Sounds Window opened Blinks Sounds Window/Moon Roof opened Blinks Sounds Depress brake pedal, touch POWER switch with key Blinks - Depress brake pedal and push POWER switch to start (for Entry and Start System) Blinks - Depress brake pedal and push POWER switch to start Blinks Sounds 10 Steering Lock active Blinks - The Parking Brake has been automatically locked Blinks Sounds Shift to P position when starting Blinks - Check Brake Hold System Blinks Sounds Be careful using Brake Hold on icy roads! - - Depress the brake pedal to release Brake Hold - - Close the door to use Brake Hold - - Fasten the seat belt to use Brake Hold - - Close the hood or the trunk to use Brake Hold - - Depress the brake pedal to continue Brake Hold - - Close the door to continue Brake Hold - - Fasten the seat belt to continue Brake Hold - - Warming Up Maximum Vehicle Speed: 110km/h Illuminates Sounds High oil temperature Power limited - - 11 Key Battery Low Illuminates - Check Headlight Leveling System Illuminates Sounds Check AFS Illuminates Sounds Engine Oil Level Low Illuminates Sounds Check Headlight System Blinks Sounds Check AHB System - - Turn on the high beam to activate AHB system - - Tire Pressure - - Hybrid System Overheat Illuminates Sounds 12 Washer Fluid Low - - Fuel Low - - TRC OFF - - Maintenance required soon Illuminates - Maintenance required Illuminates - Injector Maintenance required soon Illuminates - Injector Maintenance required Illuminates - Resetting Maintenance Data - - Resetting of Maintenance Data incomplete - - PCS temporarily not available - - Theft Sensor OFF - - Theft Sensor ON - - EV mode currently not available - - EV mode not available
Warming up
- - EV mode currently not available
Low battery
- - EV mode currently not available
Excessive speed
- - EV mode currently not available
Excessive acceleration
- - EV mode deactivated - - EV mode deactivated
Low battery
- - EV mode deactivated
Excessive speed
- - EV mode deactivated
Excessive acceleration
- - Tech Tips
The items displayed differ by vehicle specification.
-
-
Customize Display
-
The customization display can be switched by pressing and holding the DISP switch for 0.8 seconds or more while the setting display is shown on the cruise information display.
-
The customization item can be switched to by pressing the DISP switch for less than 0.8 seconds.
-
The setting display can be switched to by pressing the DISP switch for 0.8 seconds or more while a customization item is being displayed.
-
Settings can be changed by pressing the DISP switch for less than 0.8 seconds while the setting display is being shown.
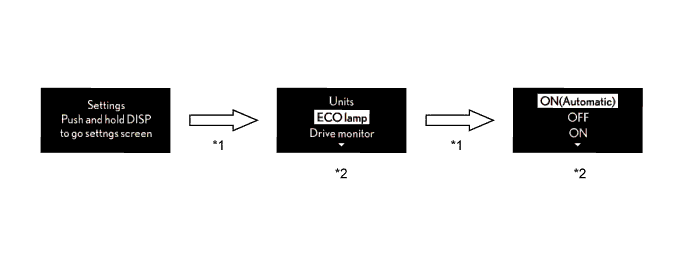
No. Condition *1 Pressing DISP switch for 0.8 seconds or more. *2 Pressing DISP switch for less than 0.8 seconds. -
-
-
ECO Lamp
-
The operating diagram of ECO lamp is as follows:
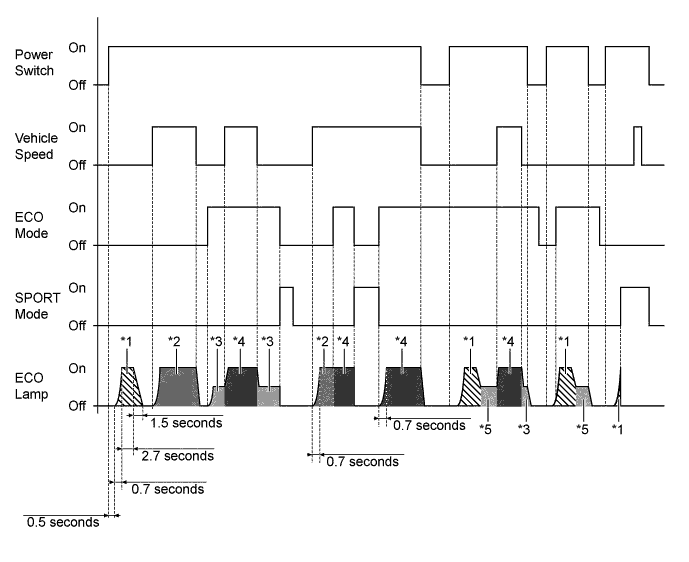
No. Condition *1 The opening illumination is turned on. *2 The ECO lamp illuminates 0% to 100% in accordance with driving conditions. *3 The ECO lamp illuminates 10%. *4 The ECO lamp illuminates 10% to 100% in accordance with driving conditions. *5 The ECO lamp illuminates 10% after the opening illumination is turned on.
-
-
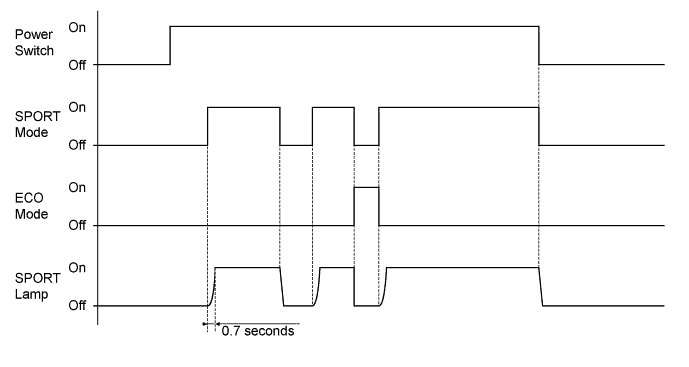
SPORT Lamp
-
The operating diagram of SPORT lamp is as follows:
-
-
Front Seat Belt Warning System
-
When the power switch is on (IG), this system detects the condition of the seat belts based on the signals from the front seat inner belt assembly LH or RH and the occupant classification sensor.
-
When the seat belt is unbuckled, the multi buzzer sounds 5 times 1.8 seconds after the power switch is turned on (IG). The multi buzzer sounds when the vehicle speed exceeds 20 km/h (12.4 mph) to emphasize the fact that the seat belt is unbuckled. After 9.6 seconds, the sound changes for emphasis. The sound continues for 20 seconds. Once the multi buzzer begins to sound, it will continue until the seat belt is buckled or the power switch is turned off.
Tech Tips
Upon receiving a request from a user who cannot wear a seat belt for a special reason, the multi buzzer warning can be canceled using a Global TechStream (GTS). For details, refer to the Repair Manual.
-
Occupant Detection Sensor
-
The occupant detection sensor, which is enclosed in the seat cushion of the front passenger seat, is used to detect whether or not the front passenger seat is occupied.
-
This sensor consists of a construction in which 2 electrode sheets sandwich a spacer. When the occupant is seated, the electrode sheets come in contact with each other through the hole provided in the spacer portion, thus enabling the current to flow.
-
The sensor detects whether or not an occupant is seated in the front passenger seat.
-
-
-
-
CONSTRUCTION
-
Headup Display
-
The headup display shows information on the windshield glass through the combination meter mirror ECU. The headup display gives the appearance of being displayed ahead of the vehicle.
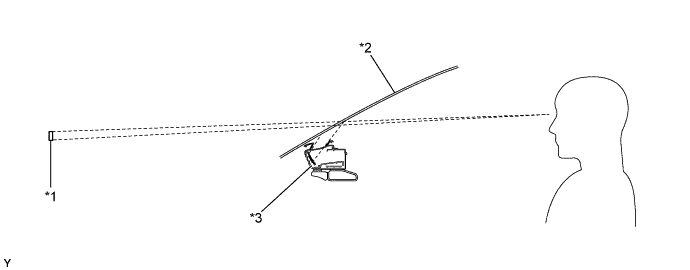
Text in Illustration *1 Display Area *2 Windshield Glass *3 Combination Meter Mirror ECU - - -
By changing the angle of the concave mirror, the position of the image displayed can be adjusted.
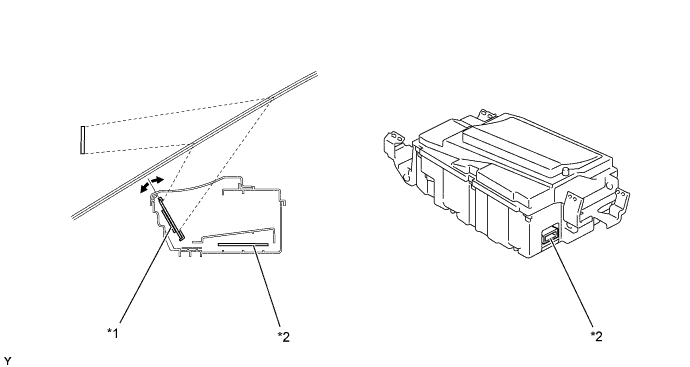
Text in Illustration *1 Concave Mirror *2 ECU -
The headup display indicates as follows:
Display Outline Hybrid System Indicator 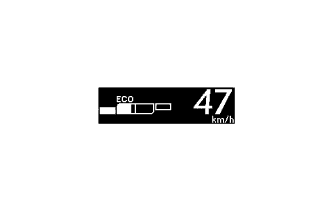
Hybrid System Indicator is shown on the display. Sport Mode 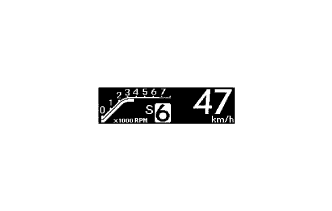
The tachometer and shift position are shown on the display. Vehicle Speed 
-
The vehicle speed is displayed.
-
The vehicle speed display can be switched between MPH and km/h by operating the HUD switch (headup display main switch).
Turn-by-turn Navigation 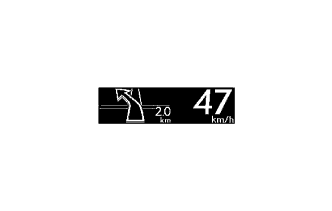
-
Turn-by-turn navigation information is displayed based on the signal from the display and navigation module display.
-
The turn-by-turn navigation display is changed on or off by operating the NAVI switch (turn-by-turn navigation display on/off switch).
Audio 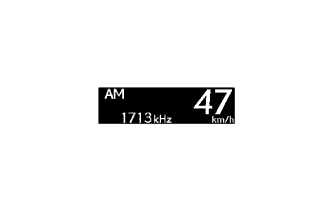
-
Audio information is displayed after the audio system is operated.
-
The audio mode can be turned on or off by using a customize function.
-
Press and hold the HUD switch (headup display main switch) for more than 3 seconds while the vehicle speed is 8 km/h (5 mph) or less.
-
Change the display to audio display on/off mode if necessary (press and hold the HUD switch (headup display main switch) again for more than 1.5 seconds).
-
Briefly press the HUD switch (headup display main switch) to turn the audio display on/off.
Dynamic Radar Cruise Control Warning 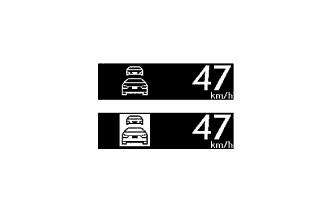
Dynamic radar cruise control warning display indicates when the vehicle is nearing the vehicle ahead during the vehicle-to-vehicle control. Pre-crash Safety Warning 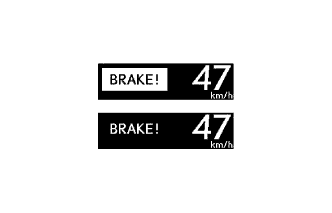
The pre-crash safety warning display will interrupt the current information immediately when a warning occurs. Lane-keeping Assist Warning 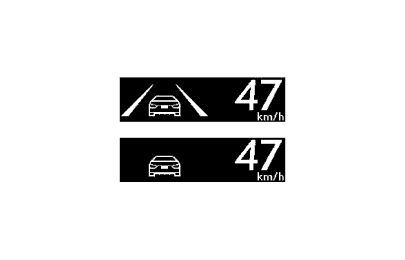
The lane-keeping assist warning is displayed when the vehicle is out of its lane. -
-
The headup display undergoes the following transitions:

No. Condition *1 Pre-crash safety warning display conditions from the driving support ECU assembly are not met. *2 Pre-crash safety warning display conditions from the driving support ECU assembly are met. *3 Display conditions of the dynamic radar cruise control warning from the driving support ECU assembly are not met. *4 Display conditions of the dynamic radar cruise control warning from the driving support ECU assembly are met. *5 Lane-keeping assist warning display conditions from the driving support ECU assembly are not met. *6 Lane-keeping assist warning display conditions from the driving support ECU assembly are met. *7 Pressing HUD switch (headup display main switch assembly) for less than 1.5 seconds. *8 Pressing DISP switch (headup display main switch assembly) for less than 1.5 seconds. *9 Pressing the DISP switch (headup display main switch assembly) for 1.5 seconds or more when the vehicle speed is 8 km/h (5 mph) or less. *10 The vehicle speed is 8 km/h (5 mph) or more, or the headup display has not been operated for 3 seconds, or pressing DISP switch (headup display main switch assembly) for 1.5 seconds or more. *11 The audio system is operated. *12 The audio system has not been operated for 3 seconds. *13 There is a display request from the multi-media module display assembly. *14 There is no display request from the multi-media module display assembly. -
Customize Display
-
By pressing and holding the DISP switch (headup display main switch assembly) for 1.5 minutes or more, the headup display will be changed from normal mode to customize function mode. The following transitions will occur after entering customize function mode:
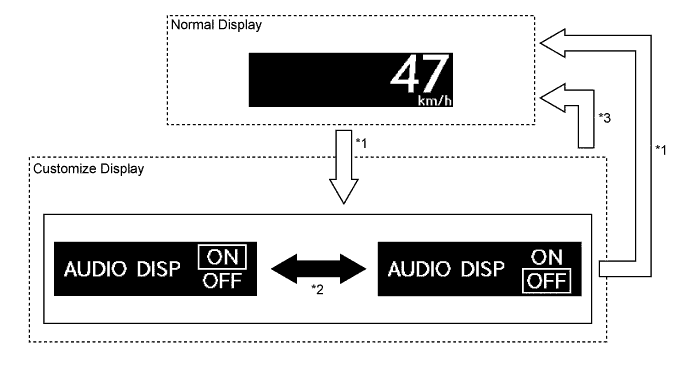
No. Condition *1 The DISP switch (headup display main switch assembly) is pressed for 1.5 seconds or more when the vehicle speed is 8 km/h (5 mph) or less. *2 The DISP switch (headup display main switch assembly) is pressed for less than 1.5 seconds when the vehicle speed is 8 km/h (5 mph) or less. *3 The vehicle speed is 8 km/h (5 mph) or more, or the headup display has not been operated for 3 seconds.
-
-
-
Windshield Glass for Headup Display
-
Windshield glass without a combiner treatment is used for the headup display.
-
This glass has a wedge-shaped inner PVC film. This film, with its varying thickness, is located between the outer and inner layers of glass.
-
The light that strikes the glass is reflected by the inner surface of the inner glass, and also by the inner side of the outer surface of outer layer of glass. With a conventional windshield, the light reflected from these 2 surfaces diverges due to the thickness of the glass, resulting in a double image.
-
The PVC film uses its wedge shape to eliminate the reflection angle difference between the outer glass and inner glass. As a result, the reflected light is displaced to reduce double images.
-
Thus, the reflected light from the headup display unit is recognized by the driver as a single display image.
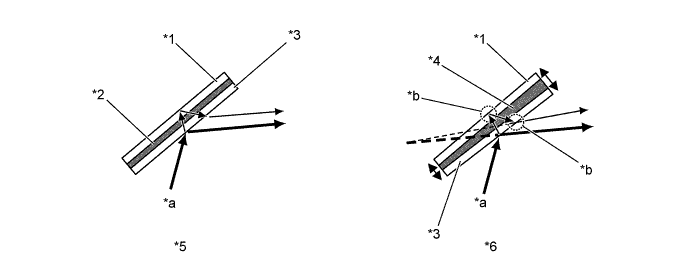
Text in Illustration *1 Outer Glass *2 PVC Film *3 Inner Glass *4 Wedge-shaped PVC Film *5 Windshield Glass with Normal PVC Film *6 Windshield Glass with Wedge-shaped PVC Film *a Visible Light Reflected by Inner Glass *b Reflection Angel Changed
-
-