NEW FEATURES
-
INTERIOR
-
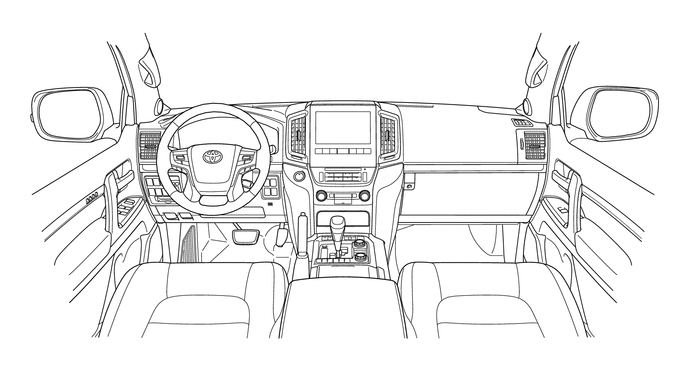
Instrument Panel
-
A new design and decoration have been adopted on the center of the instrument panel and the upper console panel.
-
Under the keyword "Advanced cockpit with user friendly layout," as well as under our new design theme, an SUV cockpit has been provided, bringing the image of "sophisticated design, further intuitive vehicle package" in reality.
-
The illumination color for each switch has been unified to clear blue.
-
Silver painted or hair-lined silver painted the following parts have been adopted.
-
Console Cup Holder Box Sub-assembly
-
Upper Console Panel
-
No. 2 Instrument Panel Register Bezel (No. 3 Instrument Panel Register Assembly)
-
No. 2 Instrument Panel Register Bezel (No. 4 Instrument Panel Register Assembly)
-
Multi-media Module Receiver Assembly
-
Lower Center Instrument Cluster Finish Panel Sub-assembly
-
-
Wood-grain decoration for some models has been adopted on the following parts.
-
No. 1 Instrument Cluster Finish Panel Garnish (No. 1 Instrument Panel Garnish Sub-assembly)
-
No. 2 Instrument Cluster Finish Panel Garnish (No. 2 Instrument Panel Garnish Sub-assembly)
-
No. 3 Instrument Cluster Finish Panel Garnish (Instrument Panel Moulding Sub-assembly)
-
-
Satin-like, plated decoration for some models has been adopted on the following parts.
-
No. 1 Instrument Cluster Moulding (No. 1 Instrument Panel Garnish Sub-assembly)
-
No. 2 Instrument Cluster Moulding (No. 2 Instrument Panel Garnish Sub-assembly)
-
No. 3 Instrument Cluster Moulding (Instrument Panel Moulding Sub-assembly)
-
No. 4 Instrument Panel Resister Bezel (No. 4 Instrument Panel Resister Assembly)
-
No. 3 Instrument Panel Resister Bezel (No. 3 Instrument Panel Resister Assembly)
-
-
A stitched cover or 2-tone forming method has been adopted on the following parts.
-
Lower Instrument Panel Pad Sub-assembly LH
-
Lower Instrument Panel Pad Sub-assembly RH
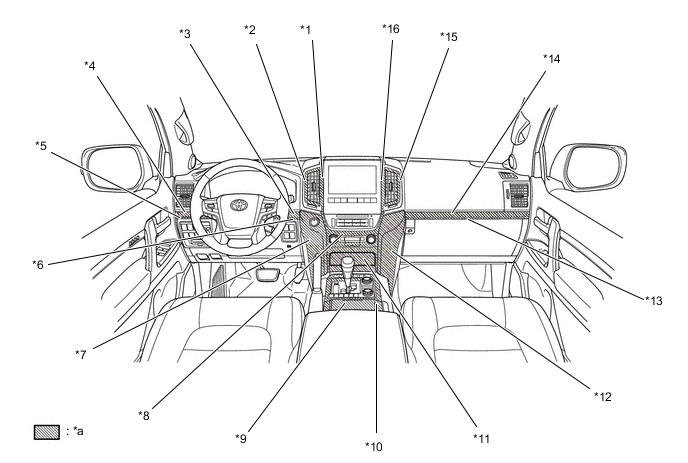
*1 No. 2 Instrument Panel Register Bezel (No. 3 Instrument Panel Register Assembly) *2 No. 3 Instrument Panel Register Bezel(No. 3 Instrument Panel Register Assembly) *3 No. 2 Instrument Cluster Finish Panel Garnish (No. 2 Instrument Panel Garnish Sub-assembly) *4 No. 1 Instrument Cluster Finish Panel Garnish (No. 1 Instrument Panel Garnish Sub-assembly) *5 No. 1 Instrument Cluster Moulding (No. 1 Instrument Panel Garnish Sub-assembly) *6 No. 2 Instrument Cluster Moulding (No. 2 Instrument Panel Garnish Sub-assembly) *7 Lower Instrument Panel Pad Sub-assembly LH *8 Multi-media Module Receiver Assembly *9 Console Cup Holder Box Sub-assembly *10 Upper Console Panel *11 Lower Center Instrument Cluster Finish Panel Sub-assembly *12 Lower Instrument Panel Pad Sub-assembly RH *13 No. 3 Instrument Cluster Moulding (Instrument Panel Moulding Sub-assembly) *14 No. 3 Instrument Cluster Finish Panel Garnish (Instrument Panel Moulding Sub-assembly) *15 No. 4 Instrument Panel Register Bezel (No. 4 Instrument Panel Register Assembly) *16 No. 2 Instrument Panel Register Bezel (No. 4 Instrument Panel Register Assembly) *a Decorated Area - -
-
< 2-tone Forming Method >
-
A 2-tone forming method is a technique showing the stitch color by exposing the material on the back side to the designed portion. A soft TPO material is used for the surface, while a hard PP material is used for the back, exhibiting a soft feel on the surface and the stitch color on the back.
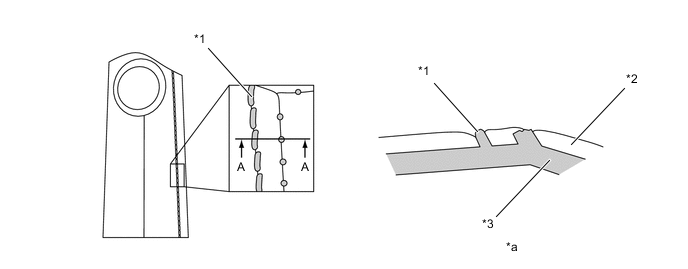
*1 Stitch *2 Surface Material *3 Back Side Material - - *a A - A Cross Section - -
-
-
A center lower pocket has been adopted on the center lower panel for expanding the storage areas.
-
A No. 1 stereo jack adapter assembly* and a No. 3 power outlet socket assembly have been arranged near the center lower pocket for higher convenience.
-
A No. 1 stereo jack adapter assembly* has been arranged near the wireless charging system for higher convenience to the vehicles equipped with the wireless charging system.
-
*: Models with No. 1 stereo jack adapter assembly
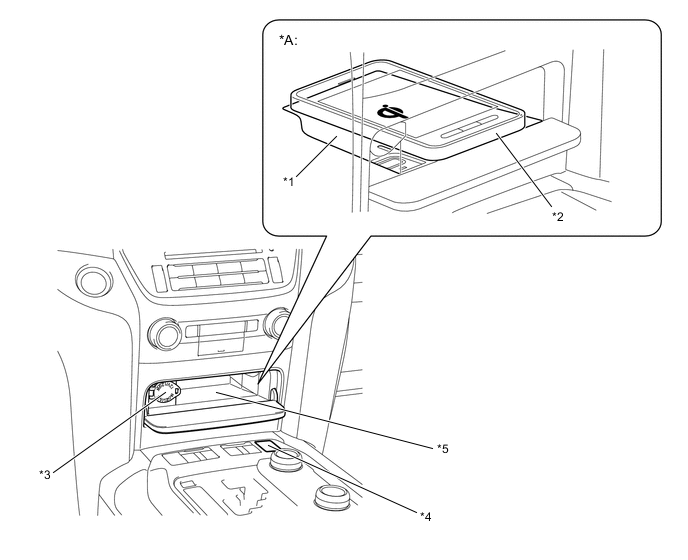
*A Models with Wireless Charging System - - *1 Mobile Wireless Charger Cradle Assembly *2 Qi-compatible Device *3 No. 3 Power Outlet Socket Assembly *4 No. 1 Stereo Jack Adapter Assembly* *5 Center Lower Pocket - - *: Models with No. 1 Stereo Jack Adapter Assembly
-
-
A shift indicator housing integrated with the upper console panel has been adopted for some specification models for providing an improved appearance, instead of the lever integrated shift indicator housing used in the previous models.
-
A newly designed shift lever knob sub-assembly has been adopted for some specification models.
Figure 1. Models with Shift Indicator Housing Integrated with the Upper Console Panel
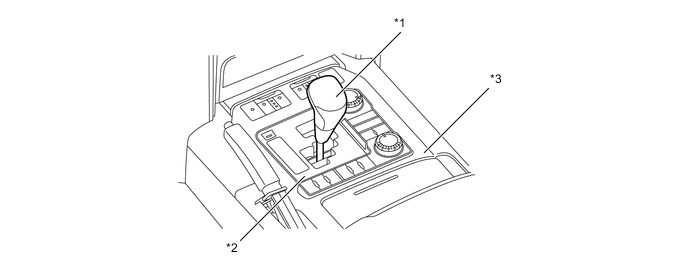
*1 Shift Lever Knob Sub-assembly *2 Shift Indicator Housing *3 Upper Console Panel - -
-
-
Door Trim
-
Satin-like, plated front door inside handle sub-assemblies and rear door inside handle sub-assemblies have been adopted and provided depending on the specifications.
-
A door ambient illumination for some models has been adopted on the front/rear door trim ornament sub-assembly for exhibiting a superior cabin area in the night time.
Figure 2. Models with Door Ambient Illumination
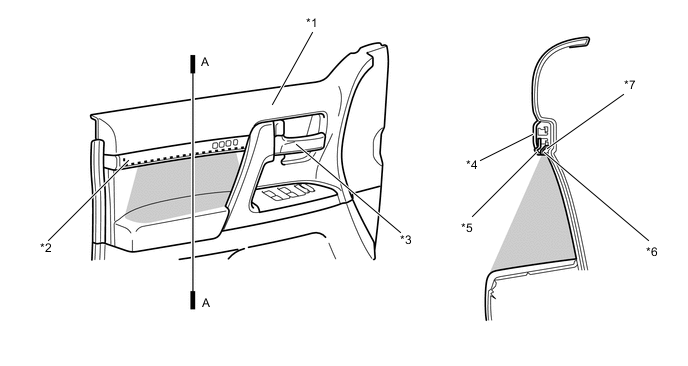
*1 Front Door Trim Panel Assembly *2 Front Door Trim Ornament Sub-assembly *3 Front Door Inside Handle Sub-assembly *4 Plating Ornament *5 Ornament Moulding *6 Lens Housing (No. 2 Interior Illumination Light Assembly) *7 Light Guide (No. 2 Interior Illumination Light Assembly) - -
-
-