MEASURING INFORMATION DIAGRAM DESCRIPTION
Tech Tips
-
There are two types of dimensions in the diagram.
-
In cases in which only one dimension is given, left and right are symmetrical.
-
For symbols, capital letters indicate right side of vehicle, small letters indicate left side of vehicle (seen from rear).
-
Three-Dimensional Distance

*a Distance between the centers of the measuring points
-
Straight-line distance between the centers of two measuring points.
-
-
Two-Dimensional Distance
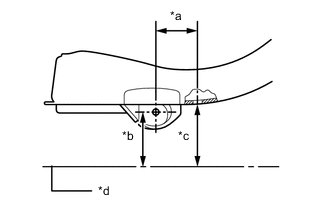
*a Center-to-center horizontal distance in forward/rearward *b Vertical distance to center *c Vertical distance to lower surface *d Imaginary Datum Line
-
Horizontal distance in forward/rearward between the centers of two measuring points.
-
Distance from the Imaginary Datum Line.
-
-
Imaginary Datum Line
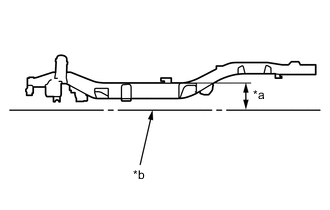
*a 300 mm (11.81 in.) *b Imaginary Datum Line
-
The imaginary datum line when measuring the height is below 300 mm (11.81 in.) from the upper face on the center of the flame.
-
-
Measurement

*a Tracking Gauge *b Master Gauge *c Pointer *d Wrong *e Correct
-
Basically, all measurements are to be done with a tracking gauge. For portions where it is not possible to use a tracking gauge, a tape measure should be used.
-
Use only a tracking gauge that has no looseness in the body, measuring plate, or pointers.
Tech Tips
-
The height of the left and right pointers must be equal.
-
Always calibrate the tracking gauge before measuring or after adjusting the pointer height.
-
Take care not to drop the tracking gauge or otherwise shock it.
-
Confirm that the pointers are securely in the holes.
-
-
When using a tape measure, avoid twists and bends in the tape.
-