WHEN REMOVING,INSTALLING,REPAIRING OR REPLACING PARTS REPAIR PROCEDURE OF HEADLIGHT ASSEMBLY
Tech Tips
-
Use the same procedure for both the RH and LH sides.
-
The procedure described below is for the LH side.
-
If only the installation area of the headlight assembly is damaged, the repairs described below can be performed inexpensively by using brackets for the repair. This may only be done if the other areas of the headlight assembly are not damaged.
-
INSTALL UPPER HEADLIGHT PROTECTOR RETAINER LH
Tech Tips
-
If only the installation area of the headlight assembly is damaged, use a repair bracket for a low-cost repair.
-
Ensure that other areas of the headlight assembly are not damaged.
-
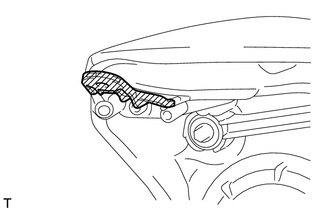
Cut off the portion indicated by the shaded portion in the illustration and smooth the surface with sandpaper.
Tech Tips
After cutting off the shaded portion, place the upper headlight protector retainer LH against the bosses and gradually file away the shaded portion until installation is possible.
-
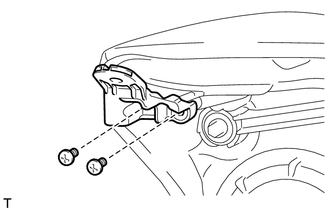
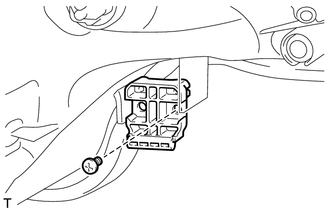
Install the upper headlight protector retainer LH with the 2 screws.
-
-
INSTALL LOWER HEADLIGHT PROTECTOR RETAINER LH
Tech Tips
-
If only the installation area of the headlight assembly is damaged, use a repair bracket for a low-cost repair.
-
Ensure that other areas of the headlight assembly are not damaged.
-

Cut off the portion indicated by the shaded portion in the illustration and smooth the surface with sandpaper.
Tech Tips
After cutting off the shaded portion, place the lower headlight protector retainer LH against the bosses and gradually file away the shaded portion until installation is possible.
-
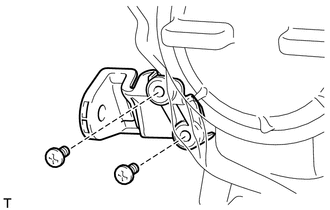
Install the lower headlight protector retainer LH with the 2 screws.
-
-
INSTALL LOWER HEADLIGHT BRACKET RH
Tech Tips
-
If only the installation area of the headlight assembly is damaged, use a repair bracket for a low-cost repair.
-
Ensure that other areas of the headlight assembly are not damaged.
-
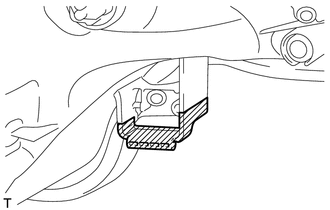
Cut off the portion indicated by the shaded portion in the illustration and smooth the surface with sandpaper.
Tech Tips
After cutting off the shaded portion, place the lower headlight bracket RH against the bosses and gradually file away the shaded portion until installation is possible.
-
Install the lower headlight bracket RH with the screw.
-