ROOF PANEL(for Carbon Fiber Reinforced Plastic Roof) ASSEMBLY REPLACEMENT
-

-
Work procedures for replacement of Carbon Fiber Reinforced Plastic Roof Panel
-
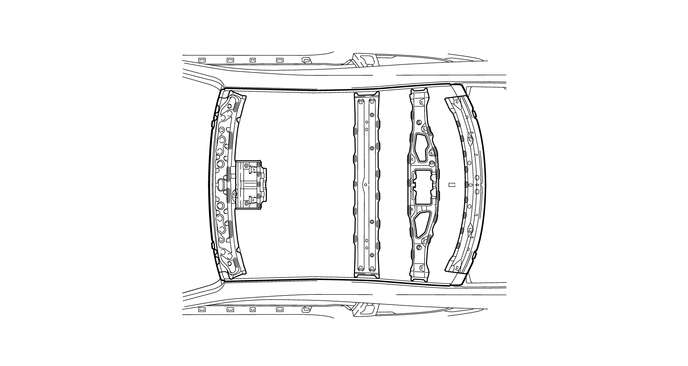
CARBON FIBER REINFORCED PLASTIC ROOF PANEL REMOVAL
-
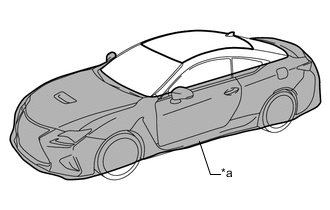
*a Protect Cover Vehicle protection
-
To prevent adhesion of adhesive etc., cover the outer panels (doors, hoods, etc.) and the entire interior with protection covers to protect them.
-
*a Masking 
Adhesive Mask the outer panels including vertical surfaces of the left and right roof side rails.
-
-
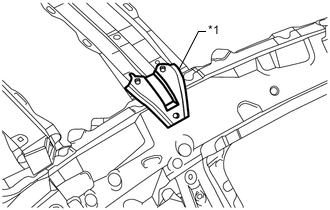
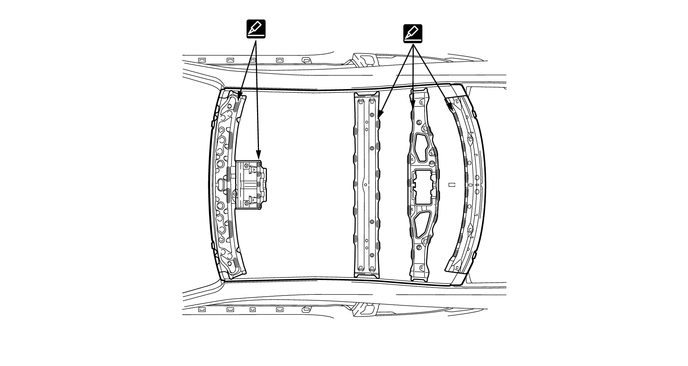
*1 ROOF PANEL REINFORCEMENT BRACKET NO.1 Remove the roof panel reinforcement bracket No.1.
Tech Tips
Remove the roof panel reinforcement bracket No.1 to improve workability.
-
Remove the 6 bolts.
-
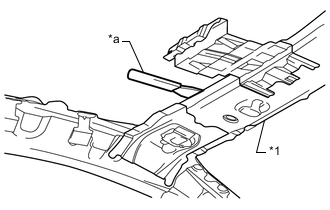
*1 WINDSHIELD HEADER PANEL SUB-ASSEMBLY *a Scraper Separate the mastic sealer.
-
Separate the mastic sealer between the windshield header panel and the carbon fiber reinforced plastic roof panel using a scraper or an equivalent tool.
-
Separate the mastic sealer between the back window frame and the carbon fiber reinforced plastic roof panel using a scraper or an equivalent tool.
-
Separate the mastic sealer between the roof panel reinforcement and the carbon fiber reinforced plastic roof panel using a scraper or an equivalent tool.
Tech Tips
Mastic sealerr application areas.
-
-
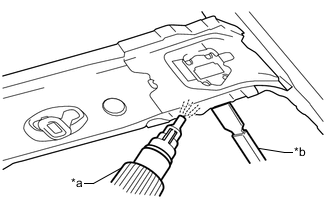
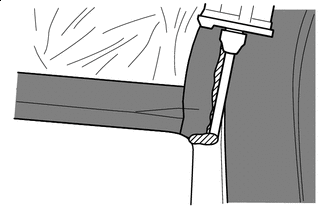
*a Industrial Heater Gun *b Scraper Separate the adhesive.
-
While heating the flange area of the carbon fiber reinforced plastic roof panel and the windshield header panel using an industrial heater gun from the inside, separate the adhesive using a scraper or an equivalent tool from the outside.
Note
Only insert the scraper. Do not pry it.
-
While heating the flange area of the carbon fiber reinforced plastic roof panel and the back window frame using an industrial heater gun from the inside, separate the adhesive using a scraper or an equivalent tool from the outside.
-
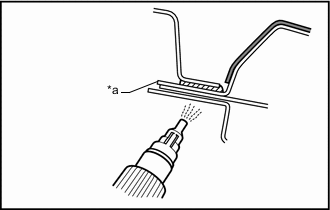
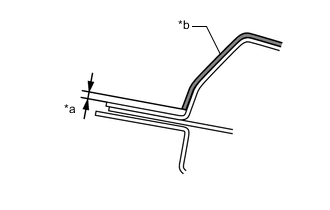
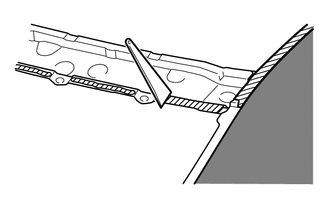
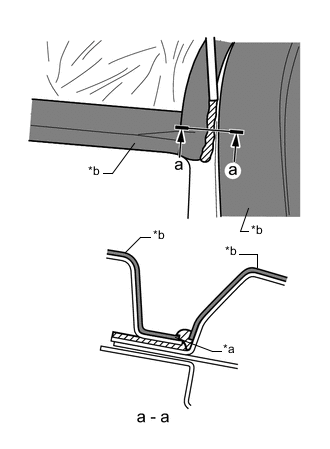
*a Flange edge Adhesive While heating the flange area of the carbon fiber reinforced plastic roof panel and the roof panel side rail using an industrial heater gun from the inside, separate the adhesive using a windshield knife or an equivalent tool from the outside.
Tech Tips
Use an industrial heater gun (160 to 200 °C) to apply heat.
*a Roof positioning rib Adhesive Note
Take care not to insert the scraper too deep, or the roof positioning rib may be broken.
-
-
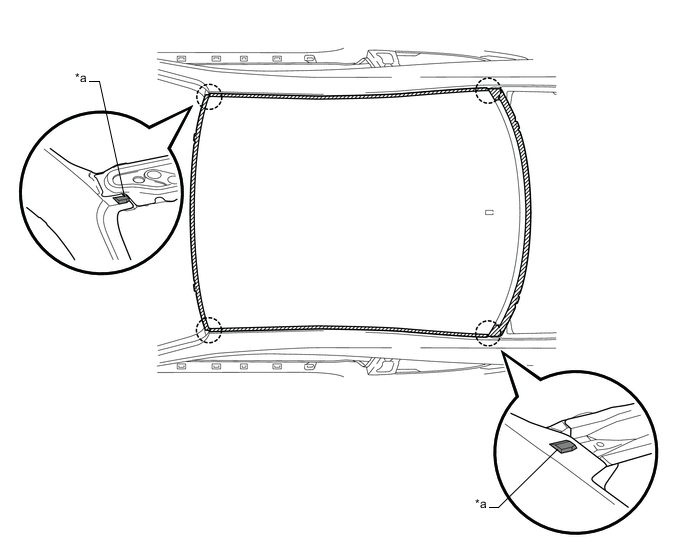
Separate the mastic sealer.
-
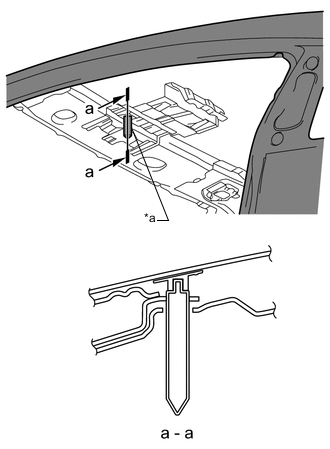
After separation of adhesive, lift the carbon fiber reinforced plastic roof panel and separate the mastic sealer at the two points hidden under the windshield header panel using a scraper or an equivalent tool.
-
-
-
INSTALLATION OF CARBON FIBER REINFORCED PLASTIC ROOF PANEL
-
Remove the adhesive.
-
Remove the adhesive remaining on the vehicle using a scraper or an equivalent tool while heating with an industrial heater gun.
-
-
Remove the mastic sealer.
-
Remove the mastic sealer remaining on the vehicle using a wire brush.
-
-
Scuff the adhesive application area.
-
Scuff the adhesive application area on the vehicle using a belt sander.
-
-
Scuff the mastic sealer application area.
-
Scuff the mastic sealer application area on the vehicle using a wire brush and a sanding paper (#320).
-
-
Repair the windshield header panel and the back window frame.
-
Repair deformation of the flange area using a wooden hammer and a dolly.
-
-
Apply primer surfacer.
Note
Do not apply primer surfacer to the adhesive application area because adhesive needs to be applied to a bare steel sheet area to maintain its adhering strength.
-
Scuff the primer surfacer application area using a sanding paper (#320).
-
Clean and degrease the scuffed area.
-
Mask the adhesive application area.
-
Mask the area other than the primer surfacer application area.
-
Make sure that the vehicle is appropriately protected. Apply primer surfacer.
Note
Apply primer surfacer to the area burned by the industrial heater gun.
-
-
Protect the carbon fiber reinforced plastic roof panel.
-
Protect the entire surface of the carbon panel using a vinyl sheet or an equivalent material.
-
-
Protect the vehicle.
-
Mask the outer panels including vertical surfaces of the left and right roof side rails.
Note
Do not masking the area within 2.0 mm (0.079 in.) above the flange edge.
-
-
Position the carbon fiber reinforced plastic roof panel.
-
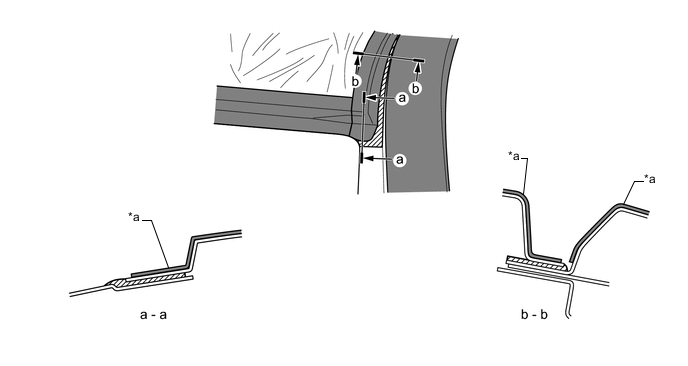
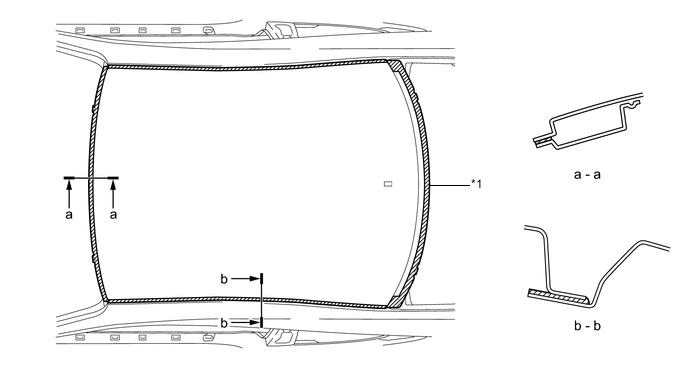
Temporarily install the new parts and measure each part of the new parts in accordance with the body dimension diagram. (See the body dimensions)
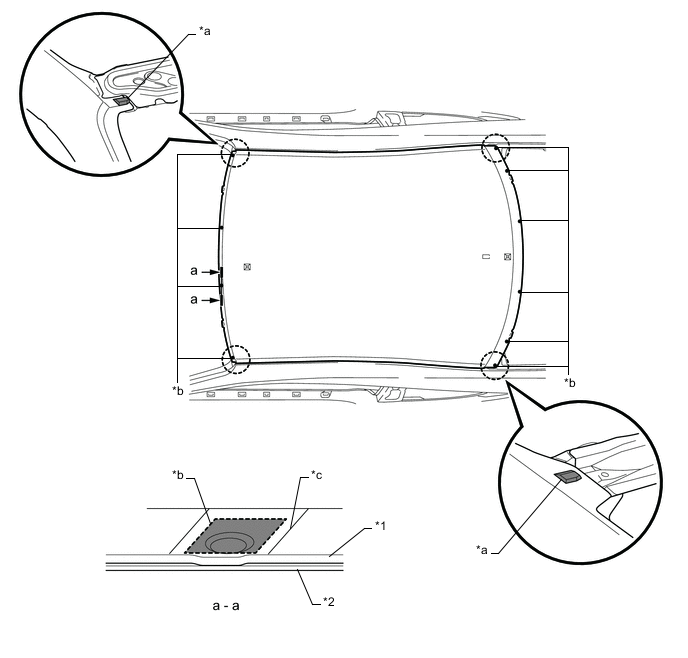
*1 ROOF PANEL *2 WINDSHIELD HEADER PANEL SUB-ASSEMBLY *a Roof Positioning Rib *b Vice Grip Fixing Position *c Mark-off line - - -
*a Guide Pin After installation of the front and rear guide pins, place the new part temporarily to check the position.
-
-
Remove the carbon fiber reinforced plastic roof panel.
-
Scuff, clean, and degrease the adhering surface and the sealer application area on the vehicle.
-
Scuff the application area of the carbon fiber reinforced plastic roof panel flange using a sanding paper (#320).
-
Clean and degrease the adhesive and body sealer application area.
-
-
Scuff, clean, and degrease the adhering surface and the sealer application area on the carbon fiber reinforced plastic roof panel.
-
Scuff the application area of the carbon fiber reinforced plastic roof panel flange using a sanding paper (#320).
-
Clean and degrease the adhesive and body sealer application area.
-
-
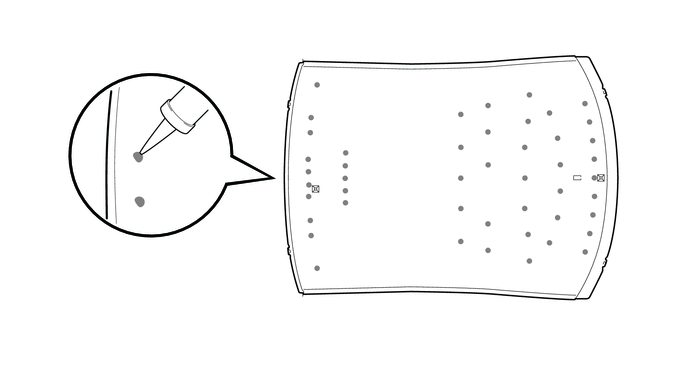
Apply body sealer.
-
Apply body sealer to the marking positions of the carbon fiber reinforced plastic roof panel.
Tech Tips
-
Apply sealer so that the applied sealer has the height of approximately 10 mm (0.39 in.) and the diameter of approximately 10 mm (0.39 in.).
-
Body sealerr application areas.
-
-
-
Apply adhesive to the vehicle.
-
Apply adhesive to the bare steel sheet area and use a spatula to make it uniform (primary coating of adhesive).
-
-
Apply adhesive to the carbon fiber reinforced plastic roof panel.
-
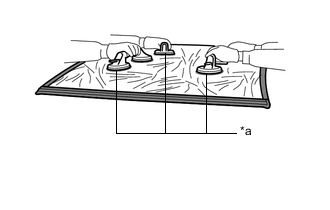
*a Sucker Grip Attach sucker grips on the carbon fiber reinforced plastic roof panel.
Note
-
Clean the sucking surface of the sucker grips before use in order to prevent damage of the carbon fiber reinforced plastic roof panel.
-
The sucker grip cannot stick to the vinyl surface. Make holes on the vinyl sheet and attach the sucker grips directly on the carbon fiber reinforced plastic roof panel.
-
Make sure that the sucker grips do not come off.
-
-
Apply adhesive to all around the flange.
Tech Tips
-
Apply adhesive to the front and back flanges so that the applied adhesive has the height of approximately 5 mm (0.20 in.) and the width of approximately 12 mm (0.47 in.).
-
Apply adhesive to the left and right flanges so that the applied adhesive has the height of approximately 4 mm (0.16 in.) and the width of approximately 9 mm (0.35 in.).
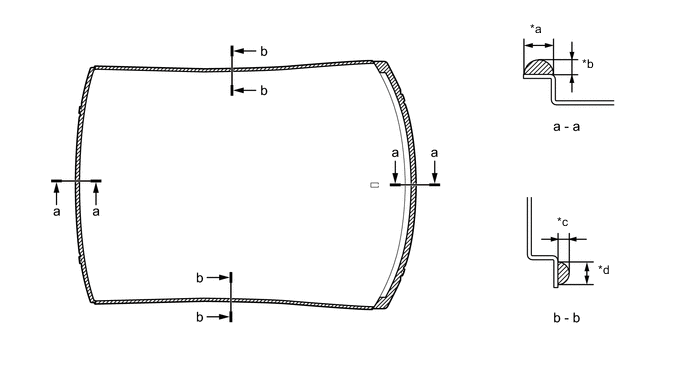
*a 12 mm (0.472 in.) *b 5.0 mm (0.197 in.) *c 4.0 mm (0.157 in.) *d 9.0 mm (0.354 in.) Adhesive - - -
-
-
Install the carbon fiber reinforced plastic roof panel.
-
*a Guide Pin Bring the carbon roof panel from the rear side of the vehicle. Install the roof to the vehicle horizontally after checking that the guide pins for longitudinal positioning have been inserted into the mounting holes.
-
Fix the carbon fiber reinforced plastic roof panel using vice grips.

*1 ROOF PANEL *2 WINDSHIELD HEADER PANEL SUB-ASSEMBLY *a Vice Grip Fixing Position *b Mark-off line -
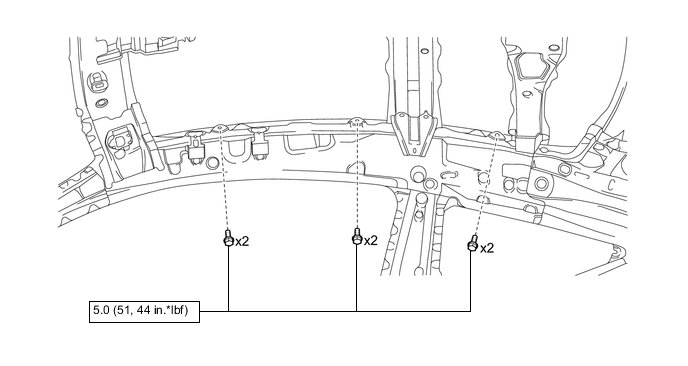
Install the 6 bolts.
- Torque:
- 5.0 N*m { 51 kgf*cm, 44 in.*lbf }
Tech Tips
Be sure to tighten the bolts in diametric order.
-
Remove the adhesive protruded from the carbon fiber reinforced plastic roof panel before it hardens.
-
Remove the masking tape before the adhesive hardens.
-
-
Dry and harden the adhesive.
-
Harden the adhesive completely.
Tech Tips
-
With dryer or equivalent (60°C): 60 minutes (complete hardening: 90 minutes)
-
Ambient temperature (25°C): 12 hours (complete hardening: 24 hours)
-
-
Remove the vice grips after the adhesive has hardened completely.
-
-
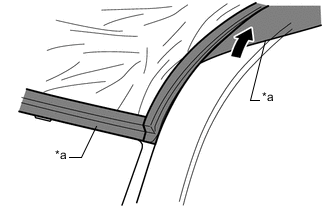
Finish-apply adhesive.
-
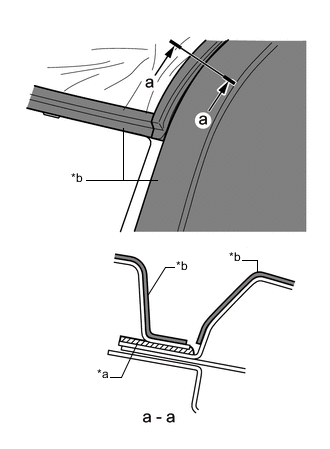
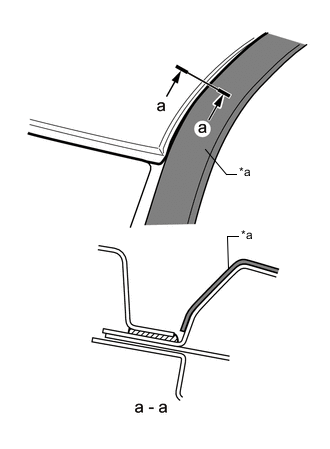
*b Masking Adhesive After the adhesive of the area *a has hardened, mask the outer panels including vertical surfaces of the left and right roof side rails again.
-
*b Masking Adhesive Apply adhesive on the mohican portions of the roof side rails indicated as *a.
-
Adhesive Apply adhesive on the front and back flanges of the carbon fiber reinforced plastic roof panel and the body.
-
Make the adhesive uniform.
*a Masking - - Adhesive - - -
*a Masking Remove the masking tape before the adhesive dries.
-
Make the adhesive uniform.
-
-
Dry and harden the adhesive.
-
Harden the adhesive completely.
Tech Tips
-
With dryer or equivalent (60°C): 60 minutes (complete hardening: 90 minutes)
-
Ambient temperature (25°C): 12 hours (complete hardening: 24 hours)
-
-
-
-
REMOVAL
-
Do not perform rough cutting of the carbon panel.
-
Separate the adhesive application area using a chisel, scraper, windshield knife, or an equivalent tool.
Tech Tips
Heat the adhering area using an industrial heater gun or an equivalent tool to the extent where no deformation occurs.
Adhesive - -
-
-
INSTALLATION
Symbol Meaning 
Body Sealer
-
Inspect the fitting of the related parts around the new parts before welding. This affects the appearance of the finish.
-
Temporarily install the new parts and measure each part of the new parts in accordance with the body dimension diagram. (See the body dimensions)
-
Before temporarily installing the new parts, apply body sealer to the windshield header panel, roof panel reinforcement and back door opening frame.
Tech Tips
Apply just enough body sealer for the new parts to make contact.
-
Apply adhesive (3MTMAutomixTMPanel Bonding Adhesive #8115).
Tech Tips
Apply enough adhesive to the panels.
*1 ROOF PANEL - - Adhesive - - -
Install the 6 bolts.

N*m (kgf*cm, ft.*lbf): Specified torque - -
-