BACK DOOR PAINT REPAIR
-
STRUCTURE
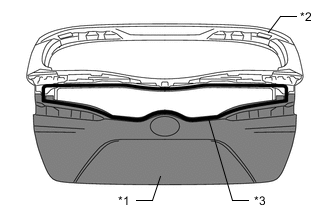
*1 OUTER PANEL *2 INNER PANEL *3 Glass adhesive line Material Notes OUTER PANEL TSOP Body color (painted) Adhesion (not decomposable) INNER PANEL CFRP Substrate color (unpainted) -
SUPPLY PARTS SPECIFICATION
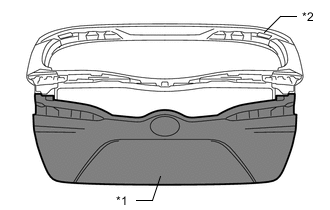
*1 OUTER PANEL *2 INNER PANEL
-
The same top coat paint (excluding the color base) as the new car is painted on the outer panel (including the glass adhesive line).The reason is to ensure the adhesion quality of the glass.
<Surface treatment structure> Clear Primer (gray) Substrate Note
TSOP is a material with poor adhesive quality. As a result, the glass adhesive line on the outer panel becomes unusable when the substrate is exposed.
-
-
POINTS TO CONSIDER WHEN PERFORMING BODY REPAIRS AND PAINTING
-
The glass adhesive line on the substrate is exposed.
-
The inner panel is damaged.
Replace the assembly in the following cases
Assembly replacement (supply part) Spot repair Body repair - Be careful not to damage the glass adhesive line on the outer panel. Masking
<Illustration 1>
-
Make sure to apply masking tape to the glass adhesive line to prevent paint from sticking and ensure the glass adhesive quality. (Illustration 1 a-a)
-
The inner panel is unpainted. Therefore, make sure to properly apply masking tape to prevent paint from contacting the inner panel. Pay special attention to the edges. (Illustration 1 b-b)
Painting and drying
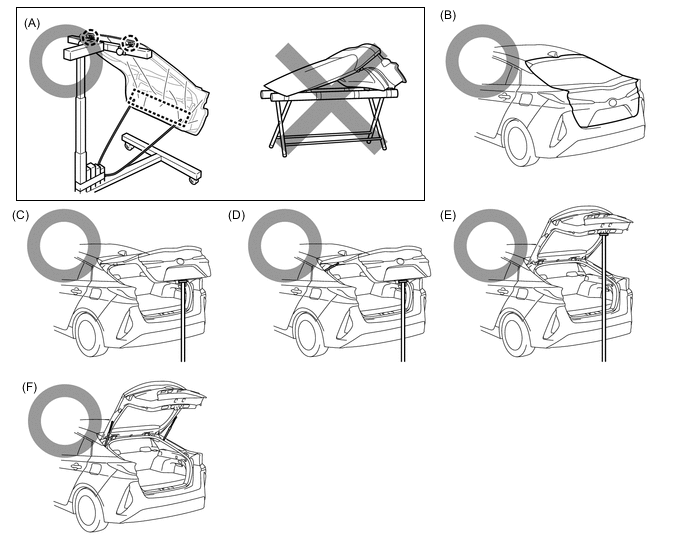
<Illustration 2>
Back door condition Work method Drying temperature Single - Secure it in the same position and condition as when it is installed on the vehicle, and support it so that the load is not concentrated in one area. (A)
Note
Take care when removing the glass as it is easily deformed.
Tech Tips
Support the panel at the hinge on the upper part of the panel and a secure location on the lower part of the panel.
80°C or less On-vehicle Fully closed None (B) Half open Remove the left and right damper stays and secure them with the supports. (C) Install the left and right damper stays and secure them with the supports. (D)
Note
The back door may twist due to the force of the damper stay. Therefore, do not perform work with only one damper stay removed.
Fully open Remove the left and right damper stays and secure them with the supports. (E) Left and right damper stays installed. (F)
Note
The back door may twist due to the force of the damper stay. Therefore, do not perform work with only one damper stay removed.
-
<Illustration 1>
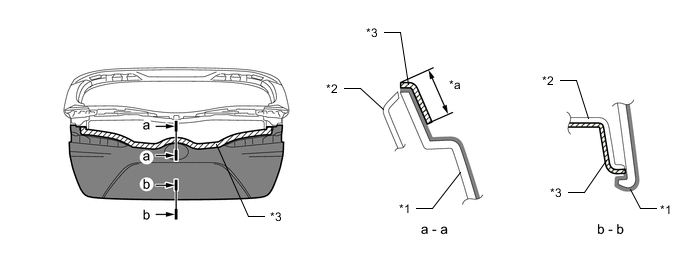
*1 OUTER PANEL *2 INNER PANEL *3 MASKING TAPE - - *a 11 mm (0.43 in.)
(From outer panel end)
- -
-
<Illustration 2>
-