-
Use the same procedure for the RH and LH sides.
-
The procedure listed below is for the LH side.
-
Click here
REMOVE TONNEAU COVER ASSEMBLY (w/ Tonneau Cover)
-
Remove the tonneau cover.
-
-
Click here
REMOVE NO. 1 DECK BOARD (w/o Rear No. 2 Seat)
-
Remove the No. 1 deck board.
-
-
Click here
REMOVE NO. 2 DECK BOARD (w/o Rear No. 2 Seat)
-
Detach the 5 clips and remove the No. 2 deck board.
-
-
Click here
REMOVE FRONT DECK FLOOR BOX (w/o Rear No. 2 Seat)
-
Remove the 3 bolts and front deck floor box.
-
-
Click here
REMOVE LOWER DECK TRIM SIDE BOARD LH (w/o Rear No. 2 Seat)
-
Detach the claw and 2 guides, and remove the lower deck trim side board.
-
- Click here
REMOVE LOWER DECK TRIM SIDE BOARD RH (w/o Rear No. 2 Seat)
Tip:Use the same procedure described for the LH side.
-
Click here
REMOVE DECK FLOOR BOX LH (w/o Rear No. 2 Seat)
-
w/o Rear No. 2 Seat:
-
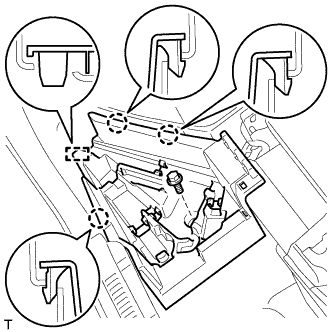
Detach the 4 claws and remove the deck floor box.
-
-
w/ Rear No. 2 Seat:
-
Remove the bolt.
-
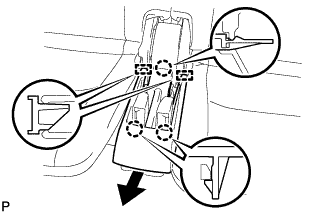
Detach the 3 claws and guide, and remove the deck floor box.
-
-
-
Click here
REMOVE DECK FLOOR BOX RH (w/o Rear No. 2 Seat)
-
w/o Rear No. 2 Seat:
-
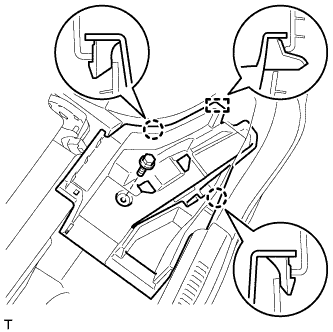
Detach the 2 claws and guide, and remove the deck floor box.
-
-
w/ Rear No. 2 Seat:
-
Remove the bolt.
-
Detach the 2 claws and guide, and remove the deck floor box.
-
-
- Click here
REMOVE REAR DECK FLOOR BOX (w/o Rear No. 2 Seat, w/ Spare Tire)
-
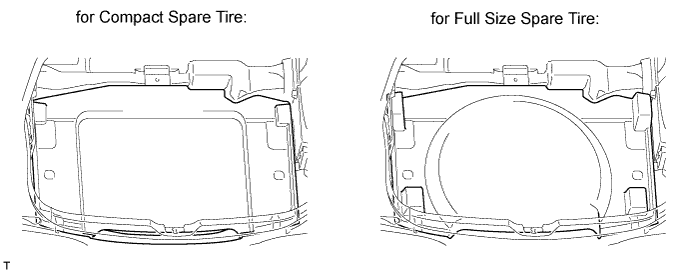
Remove the rear deck floor box.
-
-
Click here
REMOVE DECK BOARD ASSEMBLY (w/ Rear No. 2 Seat)
-
Detach the 4 claws and 6 clips, and remove the deck board.
-
-
Click here
REMOVE LUGGAGE COMPARTMENT TRAY (w/ Rear No. 2 Seat, w/ Spare Tire)
-
Remove the luggage compartment tray.
-
-
Click here
REMOVE DECK RAIL COVER (w/ Rear No. 2 Seat, w/o Spare Tire)
-
Remove the clip.
-
Detach the 2 claws and 2 guides, and remove the deck rail cover.
-
-
Click here
REMOVE DECK FLOOR BOX LH (w/ Rear No. 2 Seat)
-
w/o Rear No. 2 Seat:
-
Detach the 4 claws and remove the deck floor box.
-
-
w/ Rear No. 2 Seat:
-
Remove the bolt.
-
Detach the 3 claws and guide, and remove the deck floor box.
-
-
-
Click here
REMOVE DECK FLOOR BOX RH (w/ Rear No. 2 Seat)
-
w/o Rear No. 2 Seat:
-
Detach the 2 claws and guide, and remove the deck floor box.
-
-
w/ Rear No. 2 Seat:
-
Remove the bolt.
-
Detach the 2 claws and guide, and remove the deck floor box.
-
-
-
Click here
REMOVE DECK TRIM SIDE BELT HOLE COVER LH (w/ Rear No. 2 Seat)
-
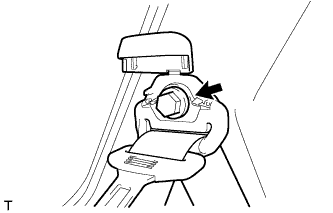
Detach the 2 claws and 6 guides, and remove the deck trim side belt hole cover in the direction indicated by the arrow in the illustration.
-
- Click here
REMOVE DECK TRIM SIDE BELT HOLE COVER RH (w/ Rear No. 2 Seat)
Tip:Use the same procedure described for the LH side.
- Click here
REMOVE REAR NO. 2 SEAT TRACK BRACKET COVER (w/ Rear No. 2 Seat)
Tip:Use the same procedure to remove the cover on the other side.
-
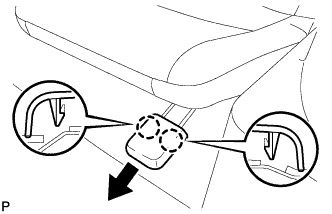
Detach the 2 claws and remove the cover.
-
- Click here
REMOVE REAR NO. 2 SEAT TRACK COVER (w/ Rear No. 2 Seat)
-
Detach the 3 claws and 2 guides, and then remove the cover.
-
- Click here
REMOVE REAR NO. 2 SEAT ASSEMBLY (w/ Rear No. 2 Seat)
-
Disconnect the connector under the seat.
-
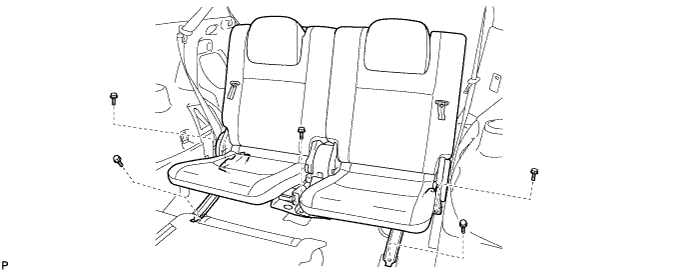
Remove the 5 bolts.
-
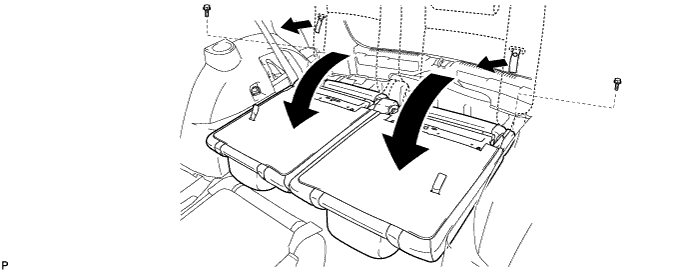
Pull the 2 straps and fold down the 2 seatbacks.
-
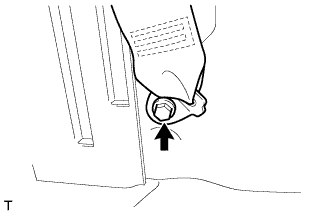
Remove the 2 bolts.
-
Remove the rear No. 2 seat assembly from the vehicle.
Note:Be careful not to damage the vehicle body.
-
-
Click here
REMOVE REAR DECK TRIM COVER
-
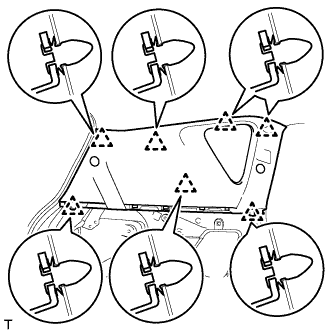
Detach the 6 claws and 4 guides, and remove the rear deck trim cover.
-
-
Click here
REMOVE REAR DOOR SCUFF PLATE LH
-
Detach the 9 claws and 2 clips, and remove the rear door scuff plate.
-
-
Click here
REMOVE REAR DOOR OPENING TRIM WEATHERSTRIP LH
-
Remove the rear door opening trim weatherstrip.
-
-
Click here
REMOVE FRONT DECK SIDE TRIM COVER LH
-
Using a screwdriver, detach the 2 claws and remove the front deck side trim cover.
Tip:Tape the screwdriver tip before use.
Table 1. Text in Illustration *1 Protective Tape
-
-
Click here
REMOVE DECK TRIM SIDE SERVICE HOLE COVER
Tip:Use the same procedure to remove the deck trim side service hole cover on the other side.
-
Using a screwdriver, detach the 4 claws and 2 guides, and remove the deck trim side service hole cover.
Tip:Tape the screwdriver tip before use.
Table 2. Text in Illustration *1 Protective Tape
-
-
Click here
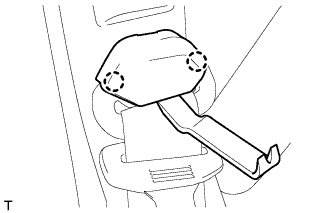
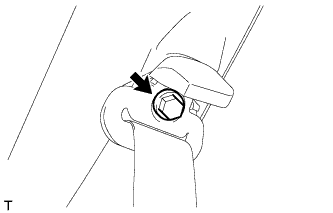
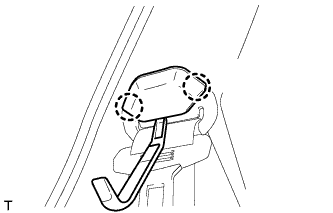
REMOVE LUGGAGE HOLD BELT STRIKER ASSEMBLY
Tip:Use the same procedure for all the luggage hold belt strikers.
-
Remove the bolt and luggage hold belt striker.
-
-
Click here
REMOVE DECK TRIM SIDE PANEL ASSEMBLY LH
-
w/ Rear No. 1 Seat:
Remove the bolt and rear No. 1 seat belt anchor.
-
w/ Rear No. 2 Seat:
Remove the bolt and rear No. 2 seat belt anchor
-
Remove the 2 bolts.
-
Detach the 6 clips and 7 claws.
-
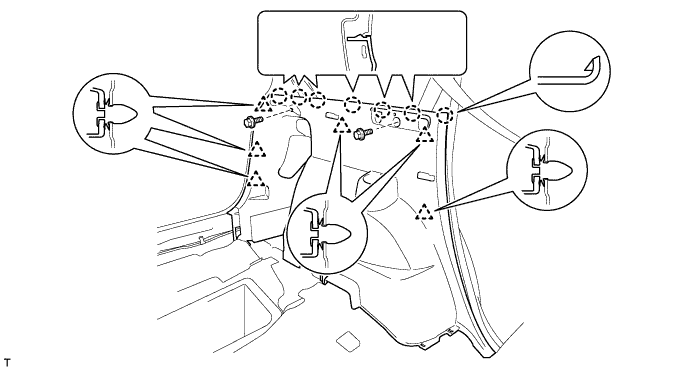
Disconnect the connector and remove the deck trim side panel.
-
- Click here
REMOVE INNER ROOF SIDE GARNISH ASSEMBLY LH
-
w/ Rear No. 1 Seat:
-
Using a moulding remover, detach the 2 claws and open the rear No. 1 seat belt shoulder anchor cover.
-
Remove the bolt and rear No. 1 seat belt shoulder anchor.
-
-
w/ Rear No. 2 Seat:
-
Using a moulding remover, detach the 2 claws and open the rear No. 2 seat belt shoulder anchor cover.
-
Remove the bolt and rear No. 2 seat belt shoulder anchor.
-
-
Detach the 7 clips and remove the inner roof side garnish.
-
-
Click here
REMOVE QUARTER WINDOW ASSEMBLY LH
Tip:Apply protective tape to the outer surface of the vehicle body to prevent scratches.
Table 3. Text in Illustration *1 Protective Tape Note:When separating the quarter window from the vehicle, be careful not to damage the vehicle paint or interior/exterior ornaments.
-
Disconnect the connectors.
-
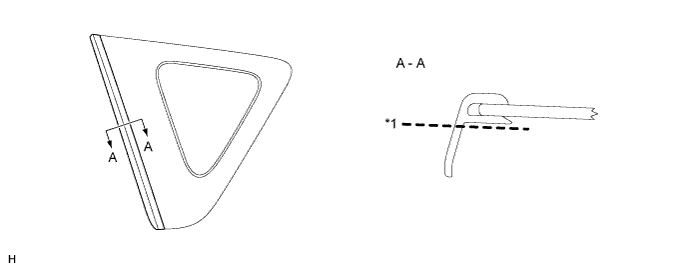
Using a knife, cut off the moulding as shown in the illustration.
Table 4. Text in Illustration *1 Cut - - Note:Be careful not to damage the vehicle body.
-
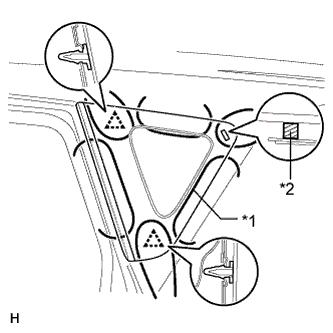
From the interior, insert a piano wire between the vehicle body and quarter window as shown in the illustration.
-
Tie objects that can serve as handles (for example, wooden blocks) to both wire ends.
-
Cut through the adhesive by pulling the piano wire around the quarter window.
Note:Leave as much adhesive on the vehicle body as possible when removing the quarter window.
-
Detach the 2 clips and remove the quarter window.
Table 5. Text in Illustration *1 Piano Wire *2 Spacer
-
- Click here
REMOVE QUARTER WINDOW MOULDING LH
-
Using a scraper, remove the moulding.
Note:
-
Be careful not to damage the quarter window.
-
Be sure to replace the quarter window moulding with a new one.
-
-
- Click here
REMOVE QUARTER WINDOW GLASS LH SPACER
-
Using a scraper, remove the spacer.
Note:
-
Be careful not to damage the quarter window.
-
Be sure to replace the quarter window spacer with new one.
-
-
- Click here
CLEAN VEHICLE BODY
-
Clean and shape the contact surface of the vehicle body.
-
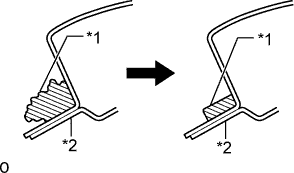
On the contact surface of the vehicle body, use a knife to cut away excess adhesive as shown in the illustration.
Note:Be careful not to damage the vehicle body.
Tip:Leave as much adhesive on the vehicle body as possible.
-
Clean the contact surface of the vehicle body with cleaner.
Table 6. Text in Illustration *1 Adhesive *2 Vehicle Body
-
-