Wear protective gloves. Sharp areas on the parts may injure your hands.
- Click here
INSTALL REAR NO. 2 SEAT PROTECTOR
-
Clean the rear No. 2 seat leg sub-assembly surface.
-
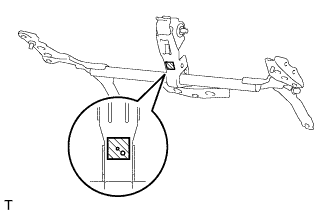
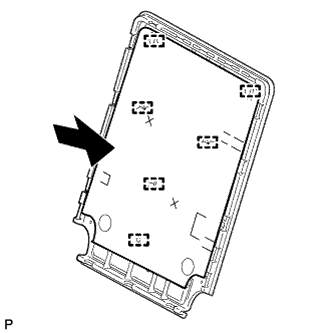
Attach a new rear No. 2 seat protector in the position shown in the illustration.
-
-
Click here
INSTALL REAR NO. 2 SEAT INNER BELT SUB-ASSEMBLY
-
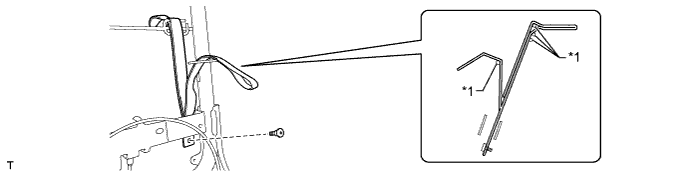
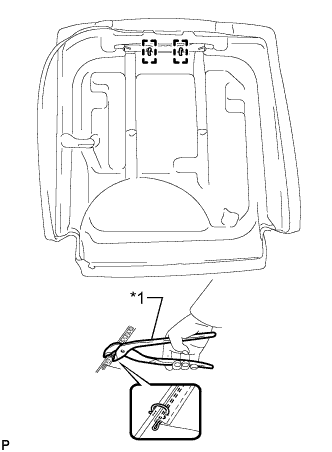
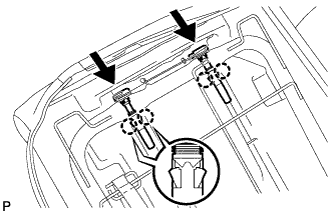
Install the inner belt sub-assembly with the 2 bolts.
42 N*m 428 kgf*cm 31 ft.*lbf -
Install a new cable tie.
-
Attach the 3 clamps.
Table 1. Text in Illustration *1 Cable Tie
-
- Click here
INSTALL SEAT SPRING SILENCER LH
-
Clean the No. 2 seatback frame sub-assembly LH surface.
-
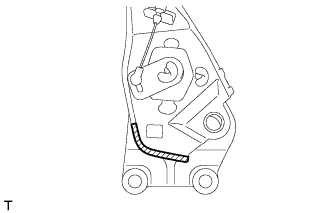
Attach a new seat spring silencer LH in the position shown in the illustration.
-
- Click here
INSTALL SEAT SPRING SILENCER RH
Tip:Use the same procedure described for the LH side.
- Click here
INSTALL REAR SEAT RECLINING CONTROL CABLE LH
-
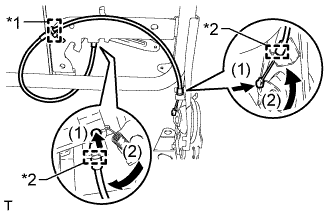
Install the rear seat reclining control cable LH in the order shown in the illustration.
-
Attach the 2 clamps of the cable ends.
-
Install a new cable tie.
Table 2. Text in Illustration *1 Cable Tie *2 Clamp -
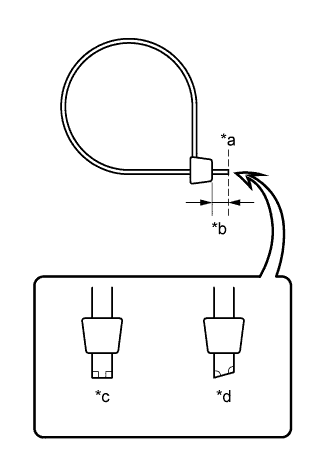
Cut off the end of the cable tie as shown in the illustration.
Table 3. Text in Illustration *a Cut Here *b 5 mm (0.20 in.) *c Correct *d Incorrect Tip:Make sure that the end of the cable tie faces the seatback board.
-
- Click here
INSTALL REAR SEAT RECLINING CONTROL CABLE RH
Tip:Use the same procedure described for the LH side.
- Click here
INSTALL 3RD SEAT STRAP LH
-
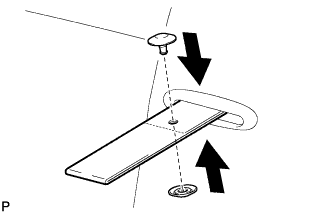
Install the 3rd seat strap LH with the screw.
Table 4. Text in Illustration *1 Seatback Frame Wire - -
-
- Click here
INSTALL 3RD SEAT STRAP RH
Tip:Use the same procedure described for the LH side.
- Click here
INSTALL NO. 2 SEAT CUSHION COVER SUB-ASSEMBLY LH
-
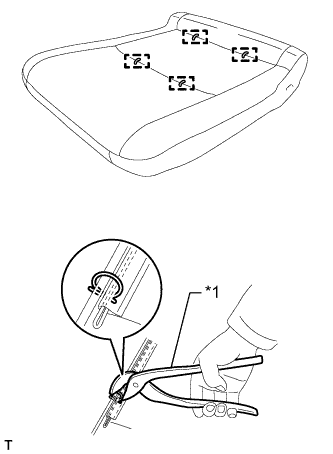
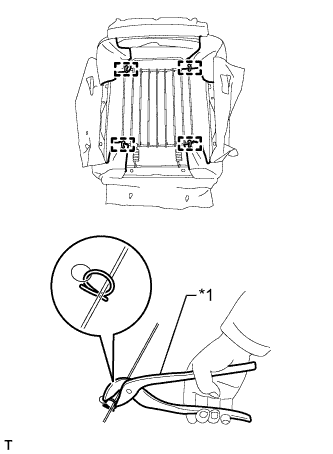
Using hog ring pliers, install the No. 2 seat cushion cover sub-assembly LH to the rear No. 2 seat cushion pad LH with new hog rings.
Table 5. Text in Illustration *1 Hog Ring Pliers Note:
-
Be careful not to damage the cover.
-
When installing the hog rings, avoid wrinkling the cover.
-
-
- Click here
INSTALL NO. 2 SEAT CUSHION COVER SUB-ASSEMBLY RH
Tip:Use the same procedure described for the LH side.
- Click here
INSTALL NO. 2 SEAT CUSHION FRAME SUB-ASSEMBLY LH
-
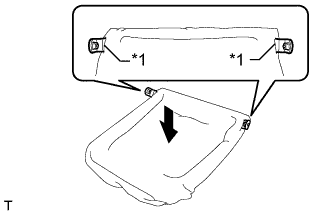
Pass the No. 2 seat cushion frame sub-assembly LH through the slits in the rear seat cushion under cloth LH and install the rear seat cushion under cloth LH.
Table 6. Text in Illustration *1 Slit -
Pass the No. 2 seat cushion frame sub-assembly LH through the slits in the No. 2 seat cushion cover sub-assembly LH and install the No. 2 seat cushion frame sub-assembly LH.
Table 7. Text in Illustration *1 Slit -
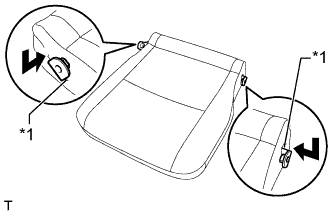
Attach the hooks.
-
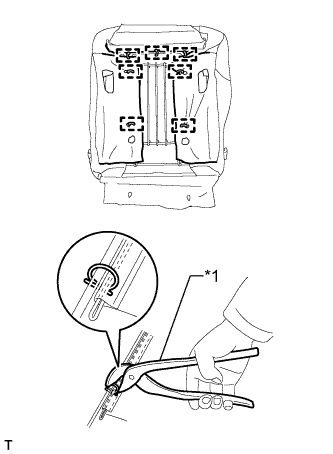
Using hog ring pliers, attach the No. 2 seat cushion cover sub-assembly LH to the No. 2 seat cushion frame sub-assembly LH with new hog rings.
Table 8. Text in Illustration *1 Hog Ring Pliers Note:
-
Be careful not to damage the cover.
-
When installing the hog rings, avoid wrinkling the cover.
-
-
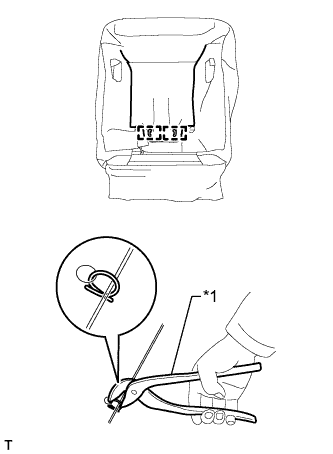
Using hog ring pliers, attach the No. 2 seat cushion cover sub-assembly LH to the No. 2 seat cushion frame sub-assembly LH with new hog rings.
Table 9. Text in Illustration *1 Hog Ring Pliers Note:
-
Be careful not to damage the cover.
-
When installing the hog rings, avoid wrinkling the cover.
-
-
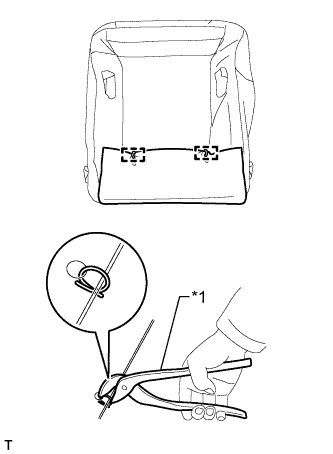
Using hog ring pliers, attach the No. 2 seat cushion cover sub-assembly LH to the No. 2 seat cushion frame sub-assembly LH with new hog rings.
Table 10. Text in Illustration *1 Hog Ring Pliers Note:
-
Be careful not to damage the cover.
-
When installing the hog rings, avoid wrinkling the cover.
-
-
Using hog ring pliers, attach the No. 2 seat cushion cover sub-assembly LH to the No. 2 seat cushion frame sub-assembly LH with new hog rings.
Table 11. Text in Illustration *1 Hog Ring Pliers Note:
-
Be careful not to damage the cover.
-
When installing the hog rings, avoid wrinkling the cover.
-
-
- Click here
INSTALL NO. 2 SEAT CUSHION FRAME SUB-ASSEMBLY RH
Tip:Use the same procedure described for the LH side.
- Click here
INSTALL REAR SEAT LOWER CUSHION HINGE COVER RH
-
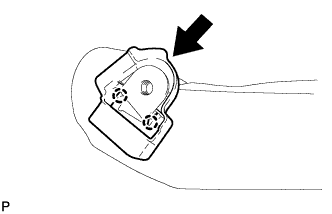
Attach the 2 claws to install the rear seat lower cushion hinge cover RH.
-
- Click here
INSTALL REAR SEAT LOWER CUSHION HINGE COVER LH
-
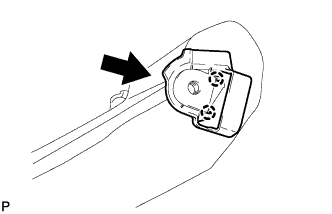
Attach the 2 claws to install the rear seat lower cushion hinge cover LH.
-
- Click here
INSTALL REAR NO. 2 SEAT CUSHION ASSEMBLY LH
-
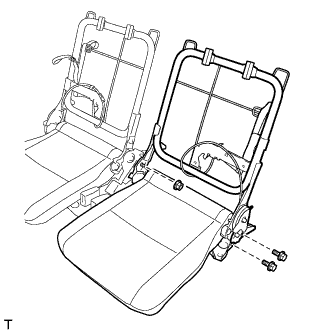
Using a T45 "TORX" socket wrench, install the rear No. 2 seat cushion assembly LH and 2 spacers with the 2 "TORX" bolts to the No. 2 seatback frame assembly LH.
14 N*m 143 kgf*cm 10 ft.*lbf -
When reusing the nut:
-
Clean the threads of the nut with non-residue solvent.
-
Apply adhesive to the threads of the nut.
Adhesive Toyota Genuine Adhesive 1324, Three Bond 1324 or equivalent -
Temporarily install the nut and 2 bolts.
-
-
When using a new nut:
-
Temporarily install a new nut and the 2 bolts.
-
-
Tighten the nut and 2 bolts.
for Nut 20 N*m 204 kgf*cm 15 ft.*lbf for Bolt 42 N*m 428 kgf*cm 31 ft.*lbf -
Install the No. 2 seat No. 2 suspension link and spacer.
-
Install the spacer with the bolts.
42 N*m 428 kgf*cm 31 ft.*lbf -
Install a new E-ring.
-
Install the No. 2 seat No. 1 suspension link and spacer.
-
Install the spacer with the bolts.
42 N*m 428 kgf*cm 31 ft.*lbf -
Install a new E-ring.
-
- Click here
INSTALL REAR NO. 2 SEAT CUSHION ASSEMBLY RH
Tip:Use the same procedure described for the LH side.
- Click here
INSTALL REAR SEAT CUSHION SPACER LH
-
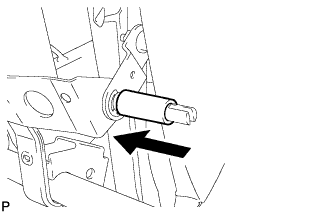
Install the rear seat cushion spacer LH.
-
- Click here
INSTALL REAR SEAT CUSHION SPACER RH
Tip:Use the same procedure described for the LH side.
- Click here
INSTALL REAR NO. 2 SEAT CUSHION SPRING LH
-
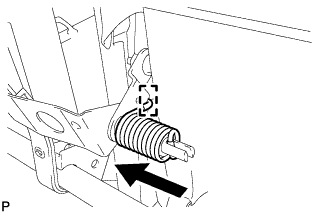
Attach the hook to install the rear No. 2 seat cushion spring LH.
-
- Click here
INSTALL REAR NO. 2 SEAT CUSHION SPRING RH
Tip:Use the same procedure described for the LH side.
- Click here
INSTALL REAR SEAT INNER RECLINING COVER LH
-
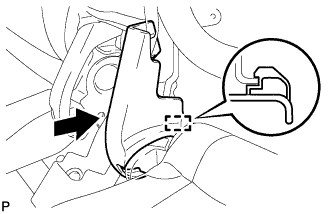
Attach the hook to install the rear seat inner reclining cover LH.
-
- Click here
INSTALL REAR SEAT INNER RECLINING COVER RH
Tip:Use the same procedure described for the LH side.
- Click here
INSTALL REAR SEAT SIDE HINGE MALE COVER LH
-
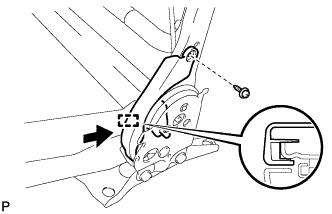
Attach the hook to install the rear seat side hinge male cover LH.
-
Install the screw.
-
- Click here
INSTALL REAR SEAT SIDE HINGE MALE COVER RH
Tip:Use the same procedure described for the LH side.
- Click here
INSTALL NO. 2 SEATBACK COVER SUB-ASSEMBLY LH
-
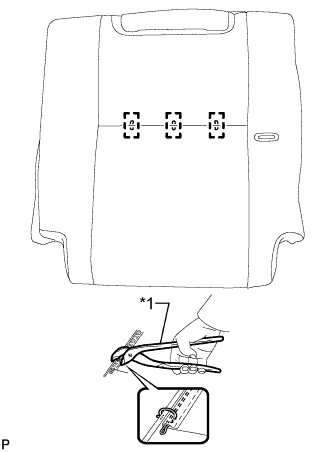
Using hog ring pliers, install the center of the No. 2 seatback cover sub-assembly LH to the No. 2 seatback pad LH with new hog rings.
Table 12. Text in Illustration *1 Hog Ring Pliers Note:
-
Be careful not to damage the cover.
-
When installing the hog rings, avoid wrinkling the cover.
-
-
Using hog ring pliers, install the upper part of the No. 2 seatback cover sub-assembly LH to the No. 2 seatback pad LH with new hog rings.
Table 13. Text in Illustration *1 Hog Ring Pliers Note:
-
Be careful not to damage the cover.
-
When installing the hog rings, avoid wrinkling the cover.
-
-
- Click here
INSTALL NO. 2 SEATBACK COVER SUB-ASSEMBLY RH
Tip:Use the same procedure described for the LH side.
- Click here
INSTALL REAR NO. 2 SEATBACK COVER WITH PAD LH
-

Install the rear No. 2 seatback cover with pad LH.
-
Pass the 3rd seat strap through the hole of the rear No. 2 seatback cover with pad LH to the surface.
-
- Click here
INSTALL REAR NO. 2 SEATBACK COVER WITH PAD RH
Tip:Use the same procedure described for the LH side.
- Click here
INSTALL REAR SEATBACK LOCK HOOK LH
-
Install the rear seatback lock hook LH.
-
- Click here
INSTALL REAR SEATBACK LOCK HOOK RH
Tip:Use the same procedure described for the LH side.
- Click here
INSTALL REAR NO. 2 SEAT HEADREST SUPPORT ASSEMBLY LH
-
Attach the 4 claws to install the 2 rear No. 2 seat headrest supports assemblies.
-
- Click here
INSTALL REAR NO. 2 SEAT HEADREST SUPPORT ASSEMBLY RH
Tip:Use the same procedure described for the LH side.
-
Click here
INSTALL SEATBACK FELT LH
-
Clean the rear seatback board sub-assembly LH surface.
-
Attach a new seatback felt LH in the position shown in the illustration.
Table 14. Text in Illustration *1 Seatback Felt
-
- Click here
INSTALL SEATBACK FELT RH
Tip:Use the same procedure described for the LH side.
- Click here
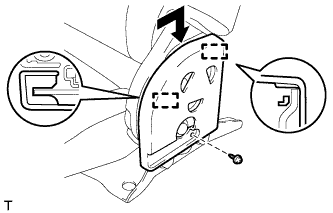
INSTALL REAR SEATBACK BOARD SUB-ASSEMBLY LH
-
Attach the 6 hooks to install the rear seatback cloth LH to the rear seatback board sub-assembly LH.
-

Attach the 2 hooks.
-
Pass the 3rd seat strap through the hole of the rear seatback board sub-assembly LH to the surface.
Table 15. Text in Illustration *1 3rd Seat Strap *2 Seatback Felt -
Attach the 3 claws.
-
Install the 2 screws.
-
Remove the peeling paper from the seatback felt LH while being careful not to touch the exposed adhesive.
-
Attach the hooks to install the rear seatback board sub-assembly LH.
-
- Click here
INSTALL REAR SEATBACK BOARD SUB-ASSEMBLY RH
Tip:Use the same procedure described for the LH side.
- Click here
INSTALL REAR NO. 2 SEAT RECLINING COVER LH
-
Attach the 2 hooks to install the rear No. 2 seat reclining cover LH.
-
Install the screw.
-
- Click here
INSTALL REAR NO. 2 SEAT RECLINING COVER RH
Tip:Use the same procedure described for the LH side.
- Click here
INSTALL REAR SEAT CUSHION HINGE COVER
-
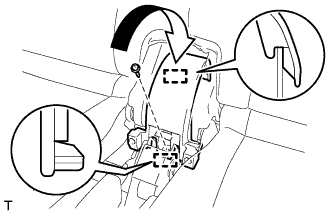
Attach the 2 guides to install the rear seat cushion hinge cover.
-
Install the screw.
-
Install the screw.
-
- Click here
INSTALL NO. 2 SEAT HEADREST ASSEMBLY LH
-
Install the No. 2 seat headrest assembly LH.
-
- Click here
INSTALL NO. 2 SEAT HEADREST ASSEMBLY RH
Tip:Use the same procedure described for the LH side.