-
Use the same procedure for the RH and LH sides.
-
The procedure listed below is for the LH side.
- Click here
INSTALL REAR AIRBAG SENSOR LH
-
Turn the ignition switch off.
-
Disconnect the cable from the negative (-) battery terminal.
CAUTION:Wait at least 90 seconds after disconnecting the cable from the negative (-) battery terminal to disable the SRS system.
Note:
-
w/ Navigation System (for HDD):
After the ignition switch is turned off, the HDD navigation system requires approximately a minute to record various types of memory and settings. As a result, after turning the ignition switch off, wait a minute or more before disconnecting the cable from the negative (-) battery terminal.
-
When disconnecting the cable, some systems need to be initialized after the cable is reconnected (Click here).
-
-
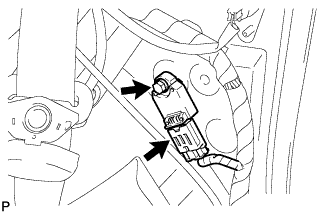
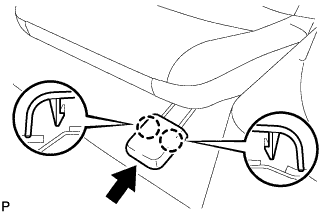
Install the rear airbag sensor with the bolt.
9.0 N*m 92 kgf*cm 80 in.*lbf Note:
-
If the rear airbag sensor has been dropped, or there are any cracks, dents or other defects in the case, bracket or connector, replace it with a new one.
-
When installing the rear airbag sensor, be careful that the SRS wiring does not interfere with other parts and that it is not pinched between other parts.
-
-
Check that the rear airbag sensor is not loose.
-
Connect the connector.
-
- Click here
INSTALL DECK TRIM SIDE PANEL ASSEMBLY LH
-
Connect the connector.
-
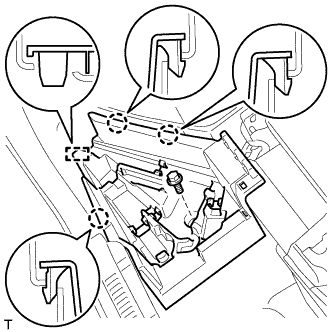
Attach the 6 clips and 7 claws to install the deck trim side panel.
-
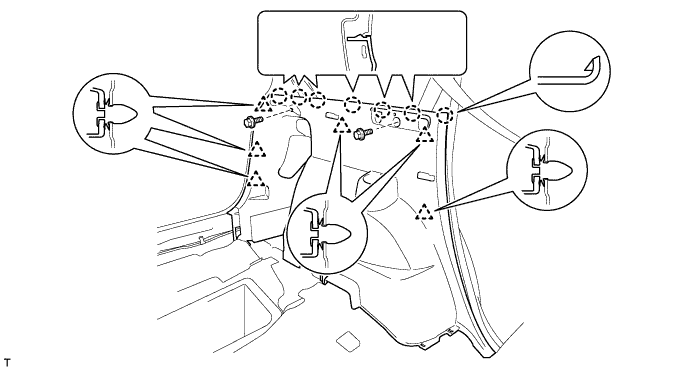
Install the 2 bolts.
-
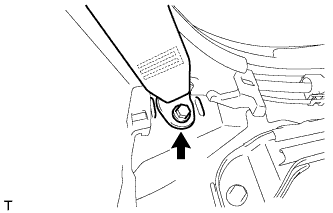
w/ Rear No. 1 Seat:
Install the rear No. 1 seat belt anchor with the bolt.
42 N*m 428 kgf*cm 31 ft.*lbf -
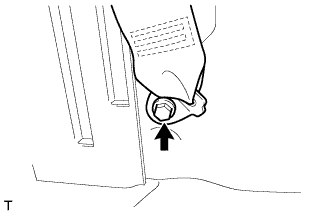
w/ Rear No. 2 Seat:
Install the rear No. 2 seat belt anchor with the bolt.
42 N*m 428 kgf*cm 31 ft.*lbf
-
-
Click here
INSTALL LUGGAGE HOLD BELT STRIKER ASSEMBLY
Tip:Use the same procedure for all the luggage hold belt strikers.
-
Install the luggage hold belt striker with the bolt.
-
-
Click here
INSTALL DECK TRIM SIDE SERVICE HOLE COVER
Tip:Use the same procedure to install the deck trim side service hole cover on the other side.
-
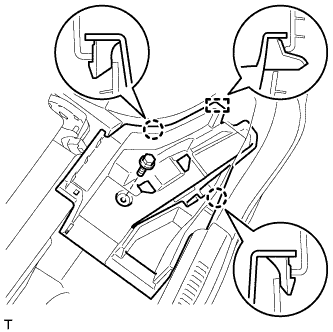
Attach the 4 claws and 2 guides to install the deck trim side service hole cover.
-
-
Click here
INSTALL FRONT DECK SIDE TRIM COVER LH
-
Attach the 2 claws to install the front deck side trim cover.
-
-
Click here
INSTALL REAR DOOR OPENING TRIM WEATHERSTRIP LH
-
Align the paint mark on the rear door opening trim weatherstrip with the mark position on the vehicle and install the weatherstrip as shown in the illustration.
Table 1. Text in Illustration *1 Paint Mark *2 Mark Position
-
-
Click here
INSTALL REAR DOOR SCUFF PLATE LH
-
Attach the 9 claws and 2 clips to install the rear door scuff plate.
-
-
Click here
INSTALL REAR DECK TRIM COVER
-
Attach the 6 claws and 4 guides to install the rear deck trim cover.
-
- Click here
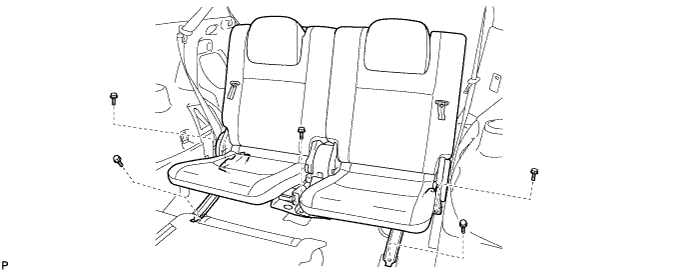
INSTALL REAR NO. 2 SEAT ASSEMBLY
-
Place the rear No. 2 seat assembly in the cabin.
Note:Be careful not to damage the vehicle body.
-
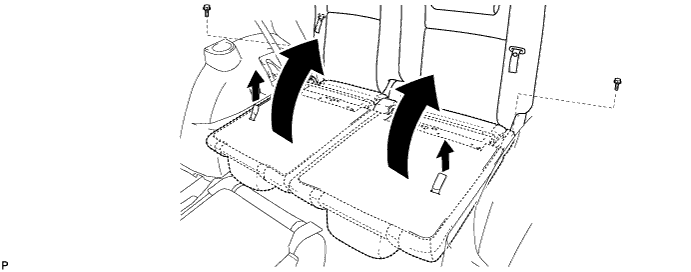
Temporarily install the 2 bolts.
-
Pull the 2 straps and raise the 2 seatbacks.
-
Temporarily install the 5 bolts.
-
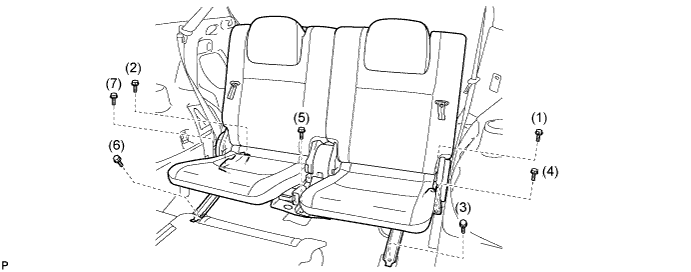
Tighten the bolts in the order shown in the illustration.
37 N*m 377 kgf*cm 27 ft.*lbf -
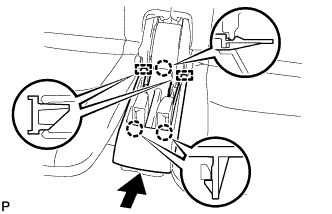
Connect the connector under the seat.
-
- Click here
INSTALL REAR NO. 2 SEAT TRACK COVER
-
Attach the 2 guides and claw.
-
Attach the 2 claws to install the cover.
-
- Click here
INSTALL REAR NO. 2 SEAT TRACK BRACKET COVER
Tip:Use the same procedure to install the cover on the other side.
-
Attach the 2 claws to install the cover.
-
-
Click here
INSTALL DECK TRIM SIDE BELT HOLE COVER LH
-
Slide the deck trim side belt hole cover in the direction indicated by the arrow in the illustration and attach the 2 claws and 6 guides to install it.
-
- Click here
INSTALL DECK TRIM SIDE BELT HOLE COVER RH
Tip:Use the same procedure described for the LH side.
-
Click here
INSTALL DECK FLOOR BOX LH
-
w/o Rear No. 2 Seat:
-
Attach the 4 claws to install the deck floor box.
-
-
w/ Rear No. 2 Seat:
-
Attach the 3 claws and guide to install the deck floor box.
-
Install the bolt.
-
-
-
Click here
INSTALL DECK FLOOR BOX RH
-
w/o Rear No. 2 Seat:
-
Attach the 2 claws and guide to install the deck floor box.
-
-
w/ Rear No. 2 Seat:
-
Attach the 2 claws and guide to install the deck floor box.
-
Install the bolt.
-
-
-
Click here
INSTALL LUGGAGE COMPARTMENT TRAY (w/ Spare Tire)
-
Install the luggage compartment tray.
-
-
Click here
INSTALL DECK RAIL COVER (w/o Spare Tire)
-
Attach the 2 claws and 2 guides to install the deck rail cover.
-
Install the clip.
-
-
Click here
INSTALL DECK BOARD ASSEMBLY
-
Attach the 4 claws and 6 clips to install the deck board.
-
-
Click here
INSTALL TONNEAU COVER ASSEMBLY (w/ Tonneau Cover)
-
Install the tonneau cover.
-
- Click here
CONNECT CABLE TO NEGATIVE BATTERY TERMINAL
CAUTION:When disconnecting the cable, some systems need to be initialized after the cable is reconnected (Click here).
- Click here
INSTALL BATTERY SERVICE HOLE COVER
-
Install the battery service hole cover with the clip.
-
- Click here
CHECK SRS WARNING LIGHT
-
Check the SRS warning light (Click here).
-