CENTER AIRBAG SENSOR ASSEMBLY INSTALLATION

-
INSTALL CENTER AIRBAG SENSOR ASSEMBLY
-
Turn the ignition switch off.
-
Disconnect the cable from the negative (-) battery terminal.
CAUTION:
Wait at least 90 seconds after disconnecting the cable from the negative (-) battery terminal to disable the SRS system.
Note
-
w/ Navigation System (for HDD):
After the ignition switch is turned off, the HDD navigation system requires approximately a minute to record various types of memory and settings. As a result, after turning the ignition switch off, wait a minute or more before disconnecting the cable from the negative (-) battery terminal.
-
When disconnecting the cable, some systems need to be initialized after the cable is reconnected Click here.
-
-
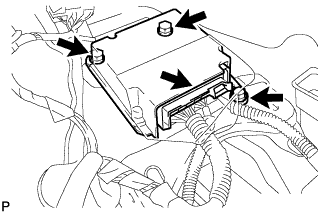
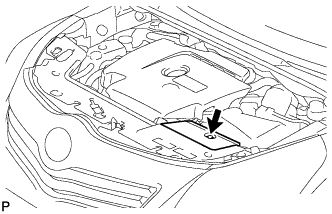
Install the center airbag sensor with the 3 bolts.
- Torque:
- 18 N*m { 184 kgf*cm, 13 ft.*lbf }
Note
-
If the center airbag sensor has been dropped, or there are any cracks, dents or other defects in the case, bracket or connector, replace it with a new one.
-
When installing the center airbag sensor, be careful that the SRS wiring does not interfere with other parts and that it is not pinched between other parts.
-
Check that the center airbag sensor is not loose.
-
Connect the connector.
-
-
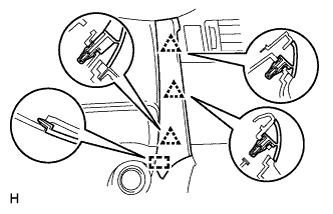
INSTALL LOWER NO. 1 INSTRUMENT PANEL FINISH PANEL
-
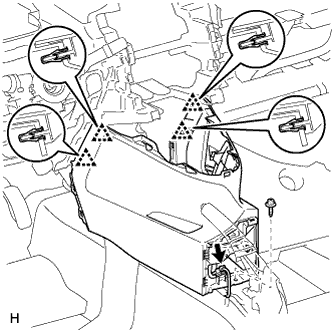
Attach the 4 clips to install the lower No. 1 instrument panel finish panel.
-
Connect the connector.
-
Install the screw <D>.
-
-
INSTALL FRONT NO. 2 CONSOLE BOX INSERT
-
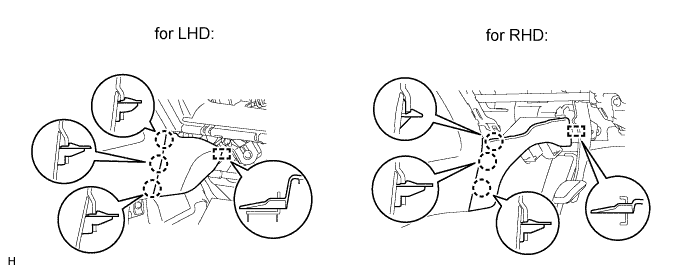
Attach the 3 claws and guide to install the front No. 2 console box insert.
-
-
INSTALL FRONT NO. 1 CONSOLE BOX INSERT
-
Attach the 3 claws and guide to install the front No. 1 console box insert.
-
-
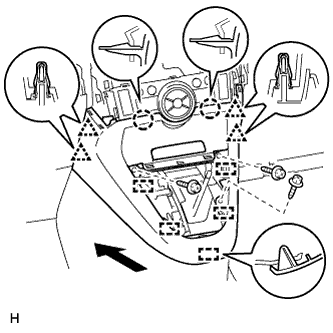
INSTALL LOWER CENTER INSTRUMENT PANEL FINISH PANEL (except Manual Transaxle)
-
for Automatic Air Conditioning System:
-
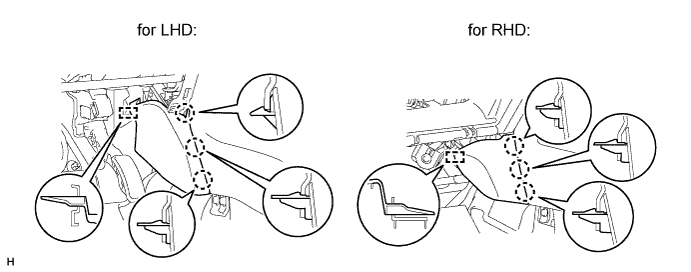
Attach the 2 claws, 4 clips and 5 guides to install the lower center instrument panel finish panel.
-
Install the 3 screws <C>.
-
-
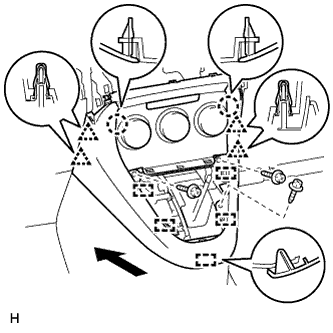
for Manual Air Conditioning System:
-
Attach the 4 clips, 2 claws and 5 guides to install the lower center instrument panel finish panel.
-
Install the 3 screws <C>.
-
-
-
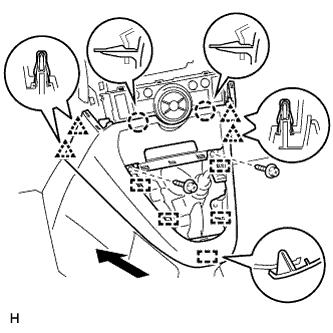
INSTALL LOWER CENTER INSTRUMENT PANEL FINISH PANEL (for Manual Transaxle)
-
for Automatic Air Conditioning System:
-
Attach the 2 claws, 4 clips and 5 guides to install the lower center instrument panel finish panel.
-
Install the 2 screws <C>.
-
-
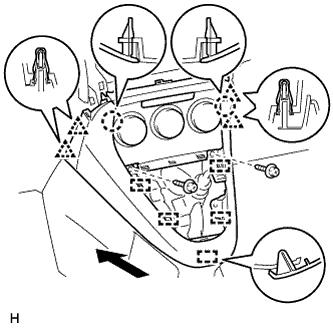
for Manual Air Conditioning System:
-
Attach the 4 clips, 2 claws and 5 guides to install the lower center instrument panel finish panel.
-
Install the 2 screws <C>.
-
-
-
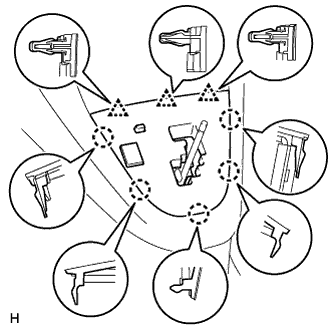
INSTALL SHIFTING HOLE COVER (for Manual Transaxle)
Text in Illustration *1 T Washer
-
Attach the 5 claws and 3 clips to install the shifting hole cover.
-
Install the knob spring.
-
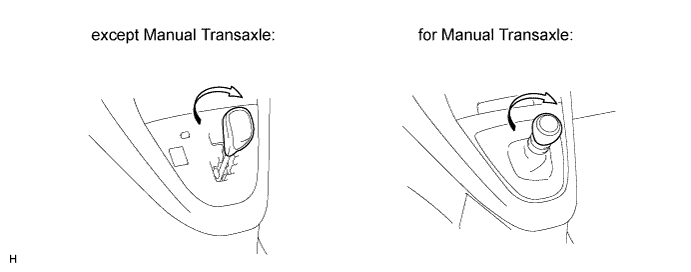
Install the T washer and twist it in the direction indicated by the arrow.
-
-
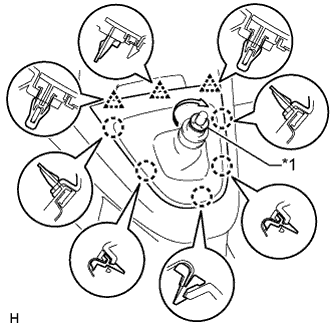
INSTALL POSITION INDICATOR HOUSING ASSEMBLY (except Manual Transaxle)
-
Connect the connector.
-
Attach the 5 claws and 3 clips to install the position indicator housing.
-
-
INSTALL SHIFT LEVER KNOB SUB-ASSEMBLY
-
Install the shift lever knob and twist it in the direction indicated by the arrow.
-
-
INSTALL RADIO RECEIVER ASSEMBLY (w/ Audio)
-
Install the radio receiver assembly Click here.
-
-
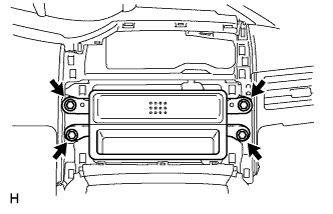
INSTALL STEREO OPENING COVER WITH BRACKET (w/o Audio)
-
Install the stereo opening cover with the 4 bolts.
-
-
INSTALL CENTER INSTRUMENT CLUSTER FINISH PANEL SUB-ASSEMBLY (w/o Audio)
-
Connect the connector.
-
Attach the 8 claws and 4 guides to install the center instrument panel register.
-
-
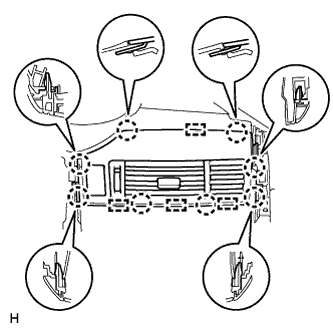
INSTALL CENTER INSTRUMENT PANEL REGISTER ASSEMBLY
-
Connect the connector.
-
Attach the 8 claws and 4 guides to install the center instrument panel register.
-
-
INSTALL INSTRUMENT PANEL FINISH PANEL END RH
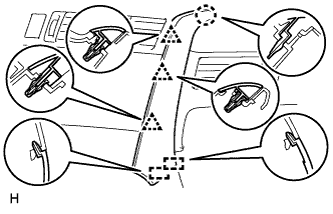
-
for Automatic Air Conditioning System:
Attach the 3 clips, claw and 2 guides to install the instrument panel finish panel end.
-
for Manual Air Conditioning System:
Attach the 3 clips, claw and guide to install the instrument panel finish panel end.
-
-
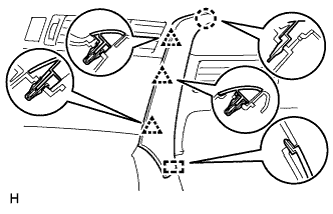
INSTALL INSTRUMENT PANEL FINISH PANEL END LH
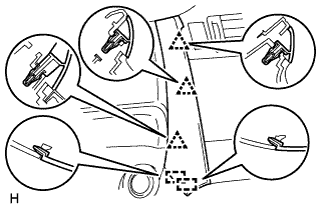
-
for Automatic Air Conditioning System:
Attach the 3 clips and 2 guides to install the instrument panel finish panel end.
-
for Manual Air Conditioning System:
Attach the 3 clips and guide to install the instrument panel finish panel end.
-
-
INSTALL REAR CONSOLE BOX SUB-ASSEMBLY
-
Install the rear console box sub-assembly Click here.
-
-
CONNECT CABLE TO NEGATIVE BATTERY TERMINAL
Note
When disconnecting the cable, some systems need to be initialized after the cable is reconnected Click here.
-
INSTALL BATTERY SERVICE HOLE COVER
-
Install the battery service hole cover with the clip.
-
-
CHECK SRS WARNING LIGHT
-
Check the SRS warning light Click here.
-