INSPECTION PROCEDURE
PROCEDURE
- Click here
CONFIRM PROBLEM SYMPTOM
-
Confirm the problem symptom.
Result Symptom Proceed to Noise occurs from V-ribbed belt assembly A Noise occurs from generator assembly B
-
- Click here
CHECK V-RIBBED BELT FOR WEAR
-
Check the V-ribbed belt for wear or damage.
OK The V-ribbed belt is not worn or damaged.
- OKClick here
- NGClick here
-
- Click here
CHECK GENERATOR PULLEY WITH CLUTCH FOR WEAR
-
Check the generator pulley with clutch grooves for wear or damage.
OK The generator pulley with clutch grooves are not worn or damaged. Result Result Proceed to OK A NG (for 130 A Type) B NG (for 100 A Type) C
-
- Click here
CHECK FOR NOISE WHILE CLUTCH PULLEY IS OPERATING
-
Start the engine and check the generator pulley with clutch for looseness.
OK The generator pulley with clutch is not loose.
- OKClick here
- NGClick here
-
- Click here
INSPECT GENERATOR PULLEY WITH CLUTCH (UNIT INSPECTION)
-
Remove the generator assembly.
-
for 130 A Type: (Click here)
-
for 100 A Type: (Click here)
-
-
Check the installation condition of the generator pulley cap.
OK The generator pulley cap is not loose or missing. -
Check for grease leaks (for wet pulley) or particle formation due to friction (for dry pulley).
OK No grease leaks (for wet pulley) or large build-up of particles (for dry pulley). -
Check the generator pulley with clutch for misalignment (interference with the generator assembly).
OK The generator pulley with clutch is correctly aligned (no interference with the generator assembly). -
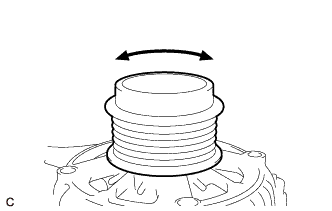
Turn the generator pulley with clutch clockwise and counterclockwise by hand and check for noise.
OK Noise does not occur when turned in both directions. -
Turn the generator pulley with clutch clockwise and counterclockwise by hand and visually check for runout.
OK The generator pulley with clutch does not have runout. -
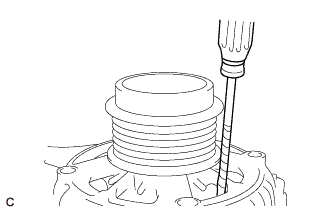
Using a screwdriver, hold the fan of the generator rotor assembly located inside the generator assembly in place and check that the generator pulley with clutch locks when turned clockwise and turns freely when turned counterclockwise.
OK The generator pulley with clutch locks when turned clockwise and turns freely when turned counterclockwise. Result Result Proceed to OK A NG (for 130 A Type) B NG (for 100 A Type) C
-
- Click here
INSPECT PULLEY OTHER THAN GENERATOR ASSEMBLY PULLEY
- Click here
REPLACE OR ADJUST V-RIBBED BELT
- Click here
REPLACE GENERATOR PULLEY WITH CLUTCHClick here
- Click here
TIGHTEN GENERATOR PULLEY WITH CLUTCH TO SPECIFIED TORQUE
- Click here
REPLACE GENERATOR PULLEY WITH CLUTCHClick here
- Click here
CHECK FOR NOISE WHEN ROTOR IS TURNING FREELY
-
Perform a road test and check that noise does not occur when decelerating.
OK Noise does not occur. -
Turn the engine off and check that no noise is produced by the generator with clutch pulley as the engine stops.
OK Noise does not occur. Result Result Proceed to OK A NG (for 130 A Type) B NG (for 100 A Type) C
-
- Click here
CHECK ENGAGEMENT OF GENERATOR PULLEY WITH CLUTCH
-
Remove the generator assembly.
-
for 130 A Type: (Click here)
-
for 100 A Type: (Click here)
-
-
Using a screwdriver, hold the fan in the generator rotor assembly located inside the generator assembly in place and check that the generator pulley with clutch locks when turned clockwise (locking direction).
OK The generator pulley with clutch locks. Result Result Proceed to OK A NG (for 130 A Type) B NG (for 100 A Type) C
-
- Click here
REPAIR OR REPLACE GENERATOR ASSEMBLYClick here