-
Use the same procedure for the RH and LH sides.
-
The procedure listed below is for the LH side.
- Click here
INSTALL REAR COMBINATION LIGHT LENS AND BODY LH
-
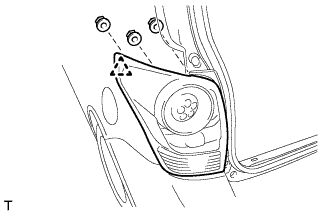
Attach the clip to install the rear combination light lens and body.
-
Install the 3 nuts.
-
Connect the connector.
-
- Click here
INSTALL DECK TRIM SIDE PANEL ASSEMBLY LH
-
Connect the connector.
-
Attach the 6 clips and 7 claws to install the deck trim side panel.
-
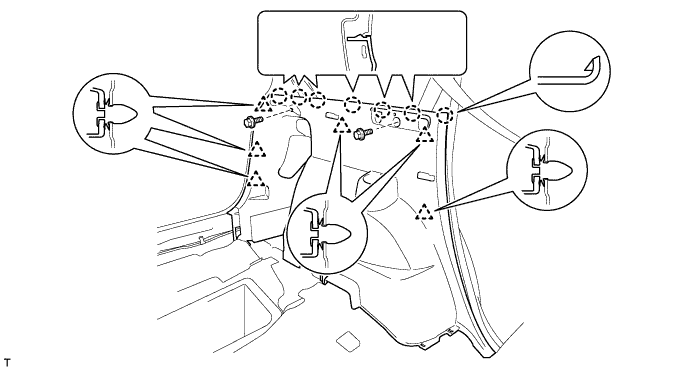
Install the 2 bolts.
-
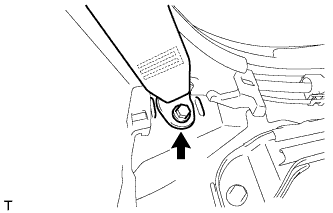
w/ Rear No. 1 Seat:
Install the rear No. 1 seat belt anchor with the bolt.
42 N*m 428 kgf*cm 31 ft.*lbf -
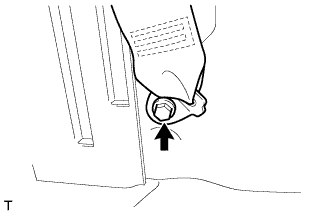
w/ Rear No. 2 Seat:
Install the rear No. 2 seat belt anchor with the bolt.
42 N*m 428 kgf*cm 31 ft.*lbf
-
-
Click here
INSTALL LUGGAGE HOLD BELT STRIKER ASSEMBLY
Tip:Use the same procedure for all the luggage hold belt strikers.
-
Install the luggage hold belt striker with the bolt.
-
-
Click here
INSTALL DECK TRIM SIDE SERVICE HOLE COVER
Tip:Use the same procedure to install the deck trim side service hole cover on the other side.
-
Attach the 4 claws and 2 guides to install the deck trim side service hole cover.
-
-
Click here
INSTALL FRONT DECK SIDE TRIM COVER LH
-
Attach the 2 claws to install the front deck side trim cover.
-
-
Click here
INSTALL REAR DOOR OPENING TRIM WEATHERSTRIP LH
-
Align the paint mark on the rear door opening trim weatherstrip with the mark position on the vehicle and install the weatherstrip as shown in the illustration.
Table 1. Text in Illustration *1 Paint Mark *2 Mark Position
-
-
Click here
INSTALL REAR DOOR SCUFF PLATE LH
-
Attach the 9 claws and 2 clips to install the rear door scuff plate.
-
-
Click here
INSTALL REAR DECK TRIM COVER
-
Attach the 6 claws and 4 guides to install the rear deck trim cover.
-
- Click here
INSTALL REAR DECK FLOOR BOX (w/ Spare Tire)
-
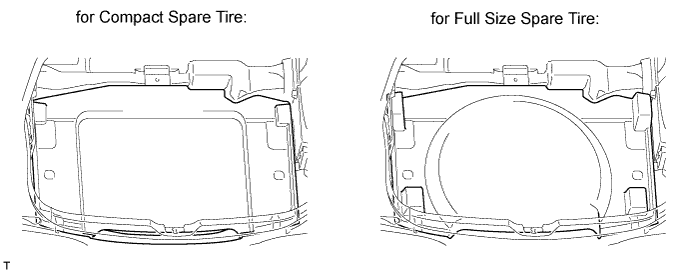
Install the rear deck floor box.
-
-
Click here
INSTALL DECK FLOOR BOX LH
-
w/o Rear No. 2 Seat:
-
Attach the 4 claws to install the deck floor box.
-
-
w/ Rear No. 2 Seat:
-
Attach the 3 claws and guide to install the deck floor box.
-
Install the bolt.
-
-
-
Click here
INSTALL DECK FLOOR BOX RH
-
w/o Rear No. 2 Seat:
-
Attach the 2 claws and guide to install the deck floor box.
-
-
w/ Rear No. 2 Seat:
-
Attach the 2 claws and guide to install the deck floor box.
-
Install the bolt.
-
-
-
Click here
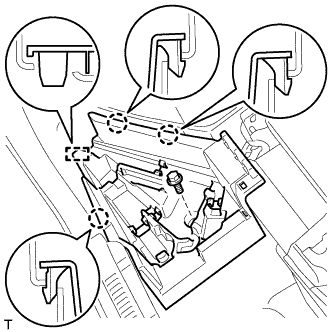
INSTALL LOWER DECK TRIM SIDE BOARD LH
-
Attach the claw and 2 guides to install the lower deck trim side board.
-
- Click here
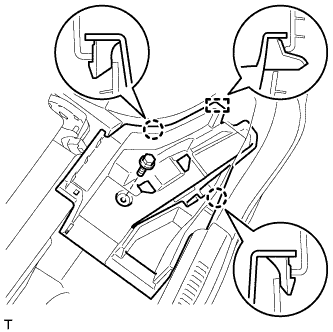
INSTALL LOWER DECK TRIM SIDE BOARD RH
Tip:Use the same procedure described for the LH side.
-
Click here
INSTALL FRONT DECK FLOOR BOX
-
Install the front deck floor box with the 3 bolts.
-
-
Click here
INSTALL NO. 2 DECK BOARD
-
Attach the 5 clips to install the No. 2 deck board.
-
-
Click here
INSTALL NO. 1 DECK BOARD
-
Install the No. 1 deck board.
-
-
Click here
INSTALL TONNEAU COVER ASSEMBLY (w/ Tonneau Cover)
-
Install the tonneau cover.
-