A bolt without a torque specification is shown in the standard bolt chart (Click here).
- Click here
INSTALL FUEL FILLER OPENING LID LOCK RETAINER
-
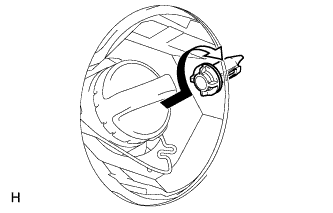
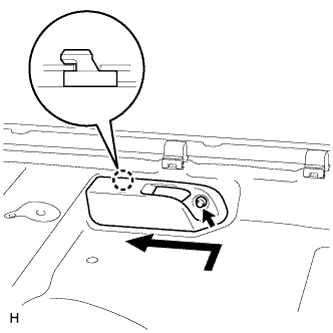
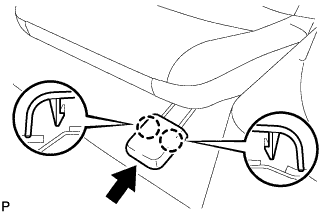
Install the fuel filler opening lid lock retainer by rotating it as shown in the illustration.
-
- Click here
INSTALL FUEL LID LOCK CONTROL CABLE SUB-ASSEMBLY
-
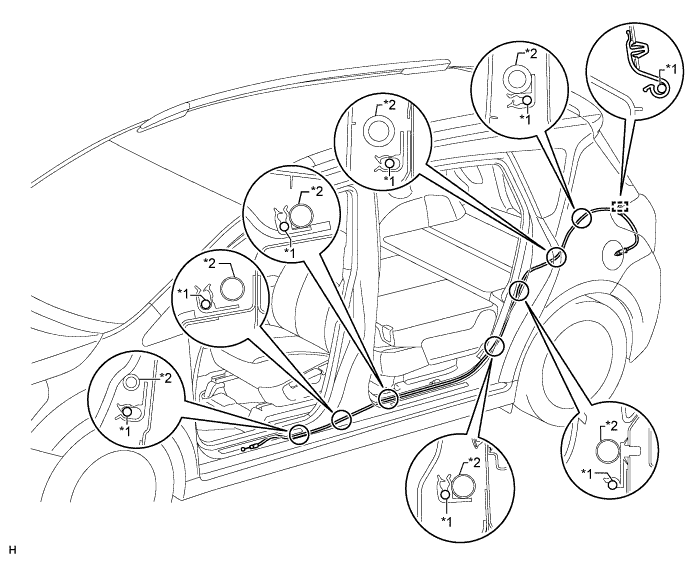
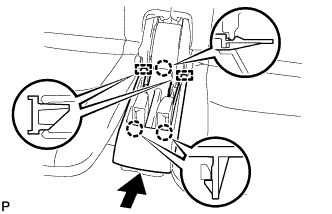
Attach the clamps to install the fuel lid lock control cable.
Table 1. Text in Illustration *1 Fuel Lid Lock Control Cable *2 Wire Harness -
Attach the 2 claws to install the fuel lid lock control cable to the fuel filler opening lid lock retainer.
-
- Click here
INSTALL FRONT FLOOR FRONT CARPET ASSEMBLY
-
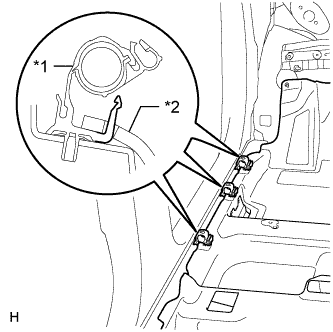
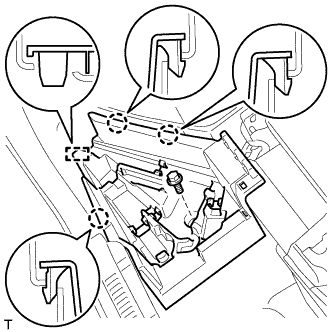
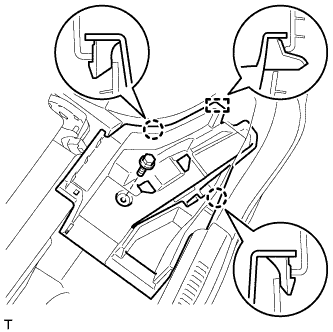
Return the floor front carpet to its original position and attach the 3 clamps.
Table 2. Text in Illustration *1 Floor Carpet Hook *2 Front Floor Front Carpet
-
- Click here
INSTALL FUEL LID LOCK OPEN LEVER SUB-ASSEMBLY
-
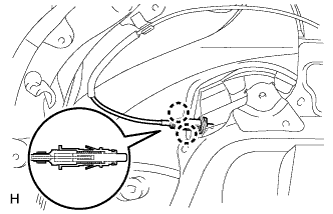
Attach the grommet.
-
Connect the fuel lid lock control cable.
-
Move the fuel lid lock open lever in the direction indicated by the arrow in the illustration to attach the claw and install the lever.
-
Install the screw.
5.5 N*m 56 kgf*cm 49 in.*lbf
-
-
Click here
INSTALL FRONT DOOR SCUFF PLATE LH
-
Attach the 8 claws and 2 clips to install the front door scuff plate.
-
- Click here
INSTALL DECK TRIM SIDE PANEL ASSEMBLY LH
-
Connect the connector.
-
Attach the 6 clips and 7 claws to install the deck trim side panel.
-
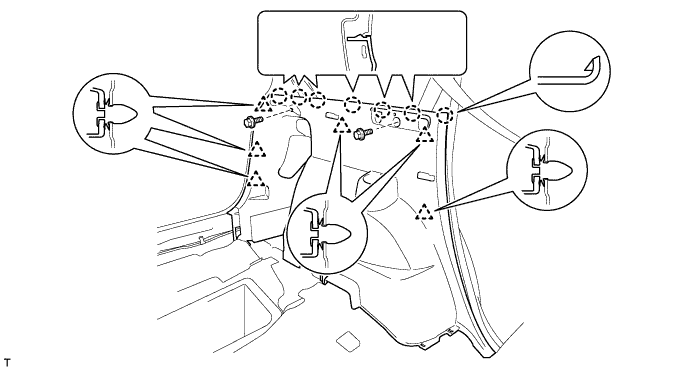
Install the 2 bolts.
-
w/ Rear No. 1 Seat:
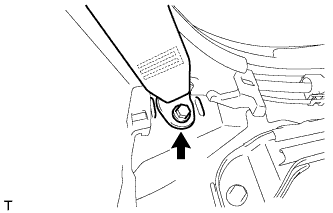
Install the rear No. 1 seat belt anchor with the bolt.
42 N*m 428 kgf*cm 31 ft.*lbf -
w/ Rear No. 2 Seat:
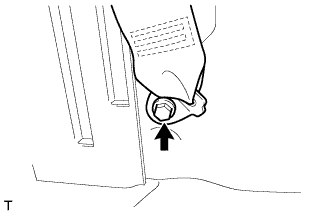
Install the rear No. 2 seat belt anchor with the bolt.
42 N*m 428 kgf*cm 31 ft.*lbf
-
-
Click here
INSTALL LUGGAGE HOLD BELT STRIKER ASSEMBLY
Tip:Use the same procedure for all the luggage hold belt strikers.
-
Install the luggage hold belt striker with the bolt.
-
-
Click here
INSTALL DECK TRIM SIDE SERVICE HOLE COVER
Tip:Use the same procedure to install the deck trim side service hole cover on the other side.
-
Attach the 4 claws and 2 guides to install the deck trim side service hole cover.
-
-
Click here
INSTALL FRONT DECK SIDE TRIM COVER LH
-
Attach the 2 claws to install the front deck side trim cover.
-
-
Click here
INSTALL REAR DOOR OPENING TRIM WEATHERSTRIP LH
-
Align the paint mark on the rear door opening trim weatherstrip with the mark position on the vehicle and install the weatherstrip as shown in the illustration.
Table 3. Text in Illustration *1 Paint Mark *2 Mark Position
-
-
Click here
INSTALL REAR DOOR SCUFF PANEL LH
-
Attach the 5 claws and guide to install the rear door scuff panel.
-
-
Click here
INSTALL REAR DOOR SCUFF PLATE LH
-
Attach the 9 claws and 2 clips to install the rear door scuff plate.
-
-
Click here
INSTALL REAR DECK TRIM COVER
-
Attach the 6 claws and 4 guides to install the rear deck trim cover.
-
- Click here
INSTALL REAR DECK FLOOR BOX (w/o Rear No. 2 Seat)
-
Install the rear deck floor box.
-
- Click here
INSTALL REAR NO. 2 SEAT ASSEMBLY (w/ Rear No. 2 Seat)
-
Place the rear No. 2 seat assembly in the cabin.
Note:Be careful not to damage the vehicle body.
-
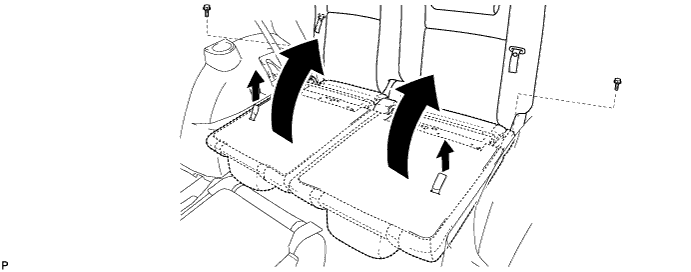
Temporarily install the 2 bolts.
-
Pull the 2 straps and raise the 2 seatbacks.
-
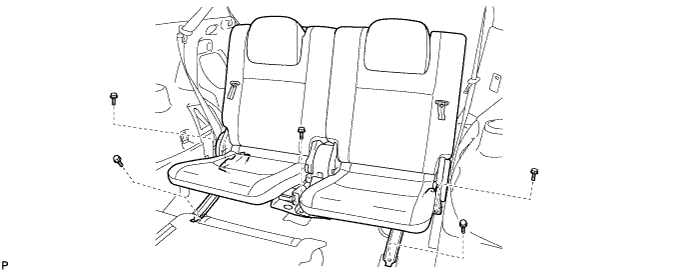
Temporarily install the 5 bolts.
-
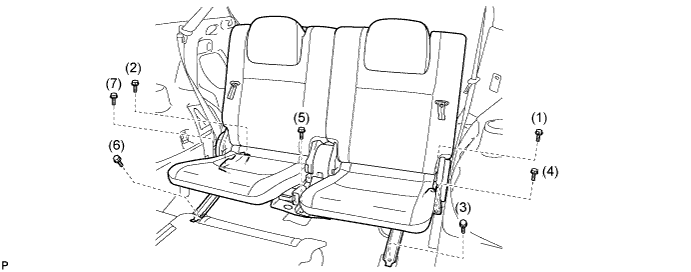
Tighten the bolts in the order shown in the illustration.
37 N*m 377 kgf*cm 27 ft.*lbf -
Connect the connector under the seat.
-
- Click here
INSTALL REAR NO. 2 SEAT TRACK COVER (w/ Rear No. 2 Seat)
-
Attach the 2 guides and claw.
-
Attach the 2 claws to install the cover.
-
- Click here
INSTALL REAR NO. 2 SEAT TRACK BRACKET COVER (w/ Rear No. 2 Seat)
Tip:Use the same procedure to install the cover on the other side.
-
Attach the 2 claws to install the cover.
-
-
Click here
INSTALL DECK TRIM SIDE BELT HOLE COVER LH (w/ Rear No. 2 Seat)
-
Slide the deck trim side belt hole cover in the direction indicated by the arrow in the illustration and attach the 2 claws and 6 guides to install it.
-
- Click here
INSTALL DECK TRIM SIDE BELT HOLE COVER RH (w/ Rear No. 2 Seat)
Tip:Use the same procedure described for the LH side.
-
Click here
INSTALL DECK FLOOR BOX LH
-
w/o Rear No. 2 Seat:
-
Attach the 4 claws to install the deck floor box.
-
-
w/ Rear No. 2 Seat:
-
Attach the 3 claws and guide to install the deck floor box.
-
Install the bolt.
-
-
-
Click here
INSTALL DECK FLOOR BOX RH
-
w/o Rear No. 2 Seat:
-
Attach the 2 claws and guide to install the deck floor box.
-
-
w/ Rear No. 2 Seat:
-
Attach the 2 claws and guide to install the deck floor box.
-
Install the bolt.
-
-
-
Click here
INSTALL LOWER DECK TRIM SIDE BOARD LH (w/o Rear No. 2 Seat)
-
Attach the claw and 2 guides to install the lower deck trim side board.
-
- Click here
INSTALL LOWER DECK TRIM SIDE BOARD RH (w/o Rear No. 2 Seat)
Tip:Use the same procedure described for the LH side.
-
Click here
INSTALL DECK RAIL COVER (w/ Rear No. 2 Seat, w/o Spare Tire)
-
Attach the 2 claws and 2 guides to install the deck rail cover.
-
Install the clip.
-
-
Click here
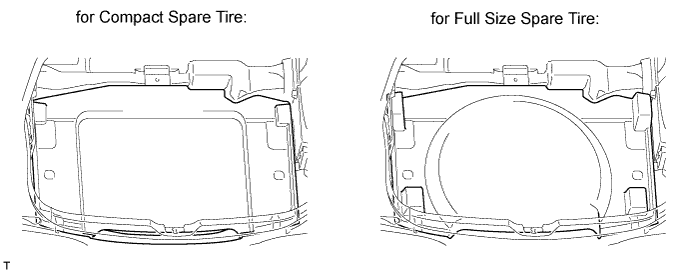
INSTALL LUGGAGE COMPARTMENT TRAY (w/ Rear No. 2 Seat, w/ Spare Tire)
-
Install the luggage compartment tray.
-
-
Click here
INSTALL FRONT DECK FLOOR BOX (w/o Rear No. 2 Seat)
-
Install the front deck floor box with the 3 bolts.
-
-
Click here
INSTALL DECK BOARD ASSEMBLY (w/ Rear No. 2 Seat)
-
Attach the 4 claws and 6 clips to install the deck board.
-
-
Click here
INSTALL NO. 2 DECK BOARD (w/o Rear No. 2 Seat)
-
Attach the 5 clips to install the No. 2 deck board.
-
-
Click here
INSTALL NO. 1 DECK BOARD (w/o Rear No. 2 Seat)
-
Install the No. 1 deck board.
-
-
Click here
INSTALL TONNEAU COVER ASSEMBLY (w/ Tonneau Cover)
-
Install the tonneau cover.
-