BACK DOOR OUTSIDE GARNISH REASSEMBLY

Tech Tips
When installing the back door outside garnish pad, back door outside garnish protector and back door garnish side protector, heat the back door outside garnish surface using a heat light.
| Standard | ||||
|---|---|---|---|---|
|
Note
Do not heat the back door outside garnish sub-assembly excessively.
-
INSTALL NO. 2 BACK DOOR OUTSIDE GARNISH
-
Install the No. 2 back door outside garnish with 2 new spring nuts.
-
Install the 2 screws.
-
-
INSTALL BACK DOOR OUTSIDE GARNISH PROTECTOR
Tech Tips
Use the same procedure for the other back door outside garnish protector.
-
Clean the back door outside garnish sub-assembly surface.
-
Using a heat light, heat the back door outside garnish sub-assembly surface.
-
Remove the double-sided tape from the back door outside garnish sub-assembly surface.
-
Wipe off any tape adhesive residue with cleaner.
-
-
Install a new back door outside garnish protector.
-
-
INSTALL BACK DOOR GARNISH SIDE PROTECTOR LH
-
Clean the back door outside garnish sub-assembly surface.
-
Using a heat light, heat the back door outside garnish sub-assembly surface.
-
Remove the double-sided tape from the back door outside garnish sub-assembly surface.
-
Wipe off any tape adhesive residue with cleaner.
-
-
Install a new back door garnish side protector.
-
-
INSTALL BACK DOOR GARNISH SIDE PROTECTOR RH
Tech Tips
Use the same procedure described for the LH side.
-
INSTALL BACK DOOR OUTSIDE GARNISH PAD
-
Clean the back door outside garnish sub-assembly surface.
-
Using a heat light, heat the back door outside garnish sub-assembly surface.
-
Remove the double-sided tape from the back door outside garnish sub-assembly surface.
-
Wipe off any tape adhesive residue with cleaner.
-
-
Install a new back door outside garnish pad.
-
-
INSTALL SYMBOL EMBLEM
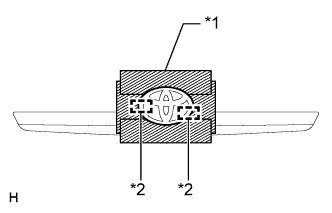
Text in Illustration *1 Protective Tape *2 Boss
-
Clean the vehicle body surface.
-
Using a heat light, heat the vehicle body surface.
-
Remove the double-sided tape from the vehicle body.
-
Wipe off any tape adhesive residue with cleaner.
-
-
Install a new symbol emblem.
-
Using a heat light, heat the vehicle body and a new symbol emblem.
-
Remove the peeling paper from the face of the symbol emblem.
Tech Tips
After removing the peeling paper, keep the exposed adhesive free from foreign matter.
-
Align the boss positions and install the symbol emblem.
Tech Tips
Press the symbol emblem firmly to install it.
-
-
-
INSTALL REAR TELEVISION CAMERA ASSEMBLY (w/ Rear View Monitor System)
-
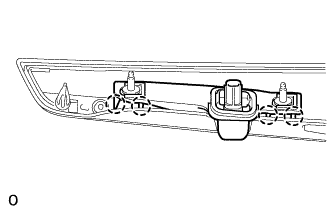
Attach the 4 claws to install the rear television camera.
-