- Click here
REMOVE FRONT EXHAUST PIPE ASSEMBLY
-
Remove the front exhaust pipe assembly (Click here).
-
- Click here
PRECAUTION
Note:After turning the ignition switch off, waiting time may be required before disconnecting the cable from the battery terminal. Therefore, make sure to read the disconnecting the cable from the battery terminal notice before proceeding with work (Click here)
- Click here
DISCONNECT CABLE FROM NEGATIVE BATTERY TERMINAL
Note:When disconnecting the cable, some systems need to be initialized after the cable is reconnected (Click here).
- Click here
DISCONNECT CABLE FROM POSITIVE BATTERY TERMINAL
- Click here
REMOVE NO. 1 ENGINE COVER
-
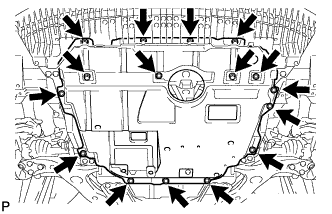
Remove the 6 bolts and 10 clips.
-
Remove the No. 1 engine under cover.
-
- Click here
REMOVE BATTERY CLAMP SUB-ASSEMBLY
-
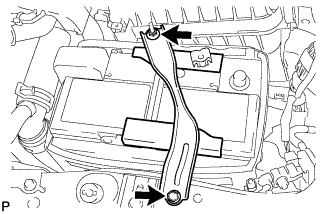
Remove the bolt and loosen the nut.
-
Detach the hook of the battery clamp sub-assembly from the battery carrier, and then remove the battery clamp sub-assembly.
-
- Click here
REMOVE BATTERY INSULATOR
- Click here
REMOVE BATTERY
- Click here
REMOVE BATTERY TRAY
- Click here
REMOVE BATTERY CARRIER
-
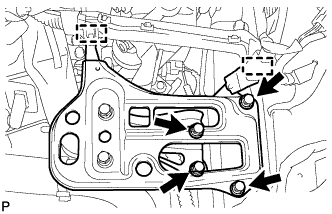
Detach the 2 clamps and disconnect the wire harness.
-
Remove the 4 bolts and battery carrier.
-
- Click here
REMOVE AIR CLEANER CAP SUB-ASSEMBLY
-
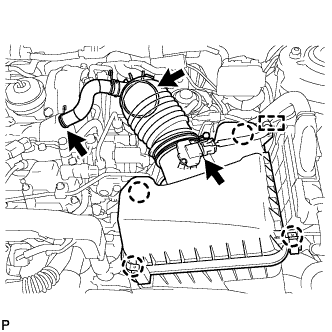
Detach the clamp and disconnect the mass air flow meter connector.
-
Slide the clamp and disconnect the PCV hose from the cylinder head cover sub-assembly.
-
Slide the clamp and disconnect the air cleaner hose assembly from the turbocharger sub-assembly.
-
Detach the 4 clamps and remove the air cleaner cap sub-assembly.
-
- Click here
REMOVE AIR CLEANER FILTER ELEMENT SUB-ASSEMBLY
- Click here
REMOVE AIR CLEANER CASE
-
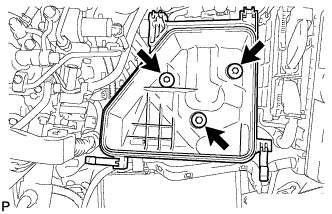
Remove the 3 bolts and air cleaner case.
-
- Click here
REMOVE LOWER NO. 1 INSTRUMENT PANEL FINISH PANEL
-
Click here
REMOVE FRONT NO. 1 FLOOR HEAT INSULATOR
-
Remove the 3 nuts and front No. 1 floor heat insulator.
-
- Click here
REMOVE TRANSMISSION CONTROL CABLE ASSEMBLY
-
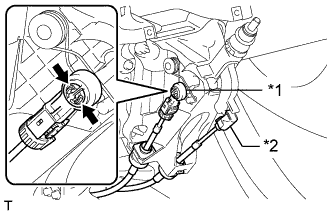
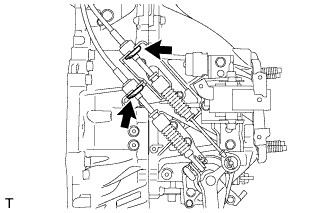
Disconnect the control shift cable from the shift lever assembly.
Table 1. Text in Illustration *1 Select Cable *2 Shift Cable -
Pinch the areas indicated by the arrows and disconnect the control select cable.
-
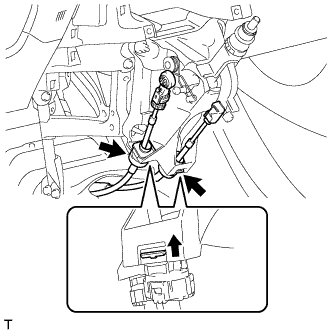
Detach the 2 claws and disconnect the control cable assembly.
-
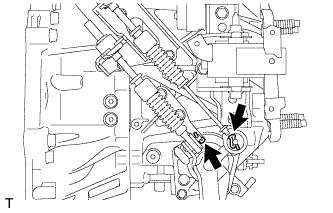
Remove the 2 clips and disconnect the 2 cables from the transaxle.
-
Remove the 2 clips and disconnect the 2 cables from the control cable bracket.
-
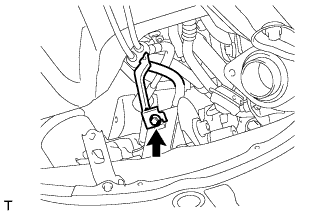
Remove the bolt and detach the bracket of the control cable assembly.
-
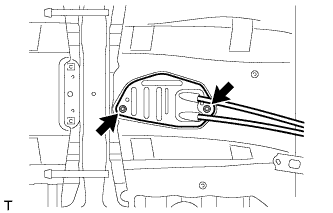
Remove the 2 nuts and detach the grommet of the control cable assembly.
-