- Click here
INSTALL NO. 1 GLOW PLUG CONTROLLER BRACKET
-
Install the No. 1 glow plug controller bracket to the glow plug controller with the 2 screws.
3.0 N*m 31 kgf*cm 27 in.*lbf
-
- Click here
INSTALL GLOW PLUG CONTROLLER ASSEMBLY
-
Connect the 4 connectors.
-
Install the glow plug controller assembly with the 2 bolts.
20 N*m 204 kgf*cm 15 ft.*lbf
-
- Click here
INSTALL NO. 2 AIR CLEANER INLET
-
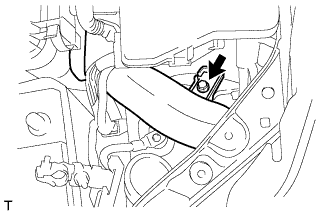
Install the No. 2 air cleaner inlet with the bolt.
7.0 N*m 71 kgf*cm 62 in.*lbf
-
- Click here
INSTALL NO. 1 AIR CLEANER INLET
-

Attach the 2 claws to install the No. 1 air cleaner inlet.
-
Install the clip.
-
- Click here
INSTALL AIR CLEANER CASE SUB-ASSEMBLY
-
Install the air cleaner case with the 3 bolts.
7.0 N*m 71 kgf*cm 62 in.*lbf
-
- Click here
INSTALL AIR CLEANER FILTER ELEMENT SUB-ASSEMBLY
- Click here
INSTALL AIR CLEANER CAP SUB-ASSEMBLY
-
Connect the air cleaner hose assembly to the turbocharger sub-assembly, and slide the clamp secure it.
-
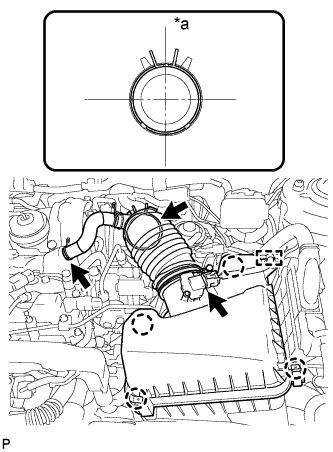
Attach the 4 clamps to install the air cleaner cap sub-assembly.
Table 1. Text in Illustration *a Upper -
Connect the PCV hose to the cylinder head cover sub-assembly, and slide the clamp secure it.
-
Attach the clamp and connect the mass air flow meter connector.
-
- Click here
INSTALL BATTERY
- Click here
INSTALL BATTERY INSULATOR
- Click here
INSTALL BATTERY CLAMP SUB-ASSEMBLY
-
Attach the hook of the battery clamp sub-assembly to the battery carrier.
-
Partially tighten the nut and temporarily install the bolt.
-
Adjust the battery clamp sub-assembly position.
-
Tighten the nut and bolt.
for bolt 17 N*m 168 kgf*cm 12 ft.*lbf for nut 3.5 N*m 36 kgf*cm 31 in.*lbf
-
- Click here
CONNECT CABLE TO POSITIVE BATTERY TERMINAL
- Click here
CONNECT CABLE TO NEGATIVE BATTERY TERMINAL
Note:When disconnecting the cable, some systems need to be initialized after the cable is reconnected (Click here).