OIL PUMP INSTALLATION

-
INSTALL OIL PUMP COVER
-
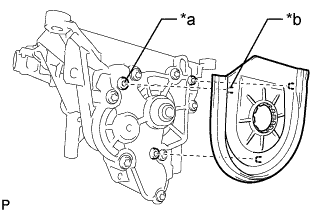
Text in Illustration *a Hole *b Protrusion Align the protrusion of the oil pump cover with the hole of the oil pump with vacuum pump assembly and attach the claw to install the oil pump cover.
-
-
INSTALL OIL PUMP DRIVE SHAFT GEAR
-
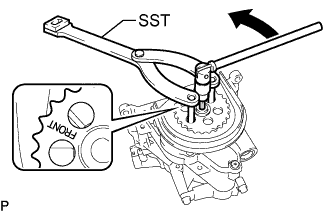
Install the oil pump drive shaft gear with the bolt so that the front mark is as shown in the illustration.
Tech Tips
The bolt of the oil pump drive shaft gear is tightened in 2 progressive steps.
-
Step 1:
-
Using SST and a T45 "TORX" socket wrench, install the oil pump drive shaft gear with the bolt.
- SST
- 09960-10010 ( 09962-01000, 09963-01000 )
- Torque:
- 5.0 N*m { 51 kgf*cm, 44 in.*lbf }
-
-
Step 2:
-
Mark the top of the bolt with paint.
-
Tighten the bolt 90°.
-
Check that the paint mark is now at a 90° angle to the top.
-
-
-
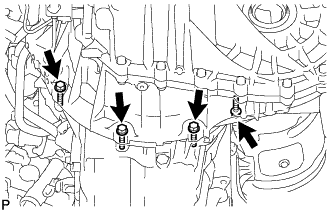
INSTALL OIL PUMP WITH VACUUM PUMP ASSEMBLY
-
Install the oil pump drive chain sub-assembly to the oil pump drive shaft gear, and then install the oil pump with vacuum pump assembly.
-
Using an E10 "TORX" socket wrench, install the oil pump with vacuum pump assembly with the 4 bolts.
- Torque:
- 20 N*m { 204 kgf*cm, 15 ft.*lbf }
-
-
INSTALL OIL STRAINER SUB-ASSEMBLY
-
Install the oil strainer sub-assembly with the 2 bolts.
Tech Tips
Refer to "SPECIFICATIONS - STANDARD BOLT" for the tightening torque.
-
-
INSTALL OIL PAN SUB-ASSEMBLY
-
Remove any old seal packing material.
-
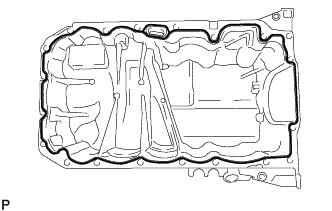
Apply seal packing to the oil pan sub-assembly as shown in the illustration.
Standard seal packing diameter 2.0 to 2.5 mm (0.0787 to 0.0984 in.) Note
-
Remove any oil from the contact surface.
-
After applying seal packing, install the oil pan sub-assembly within 3 minutes and tighten the bolts.
-
-
Using an E10 "TORX" socket wrench, temporarily install the oil pan sub-assembly with the 24 bolts.
- Torque:
- 5.0 N*m { 51 kgf*cm, 44 in.*lbf }
-
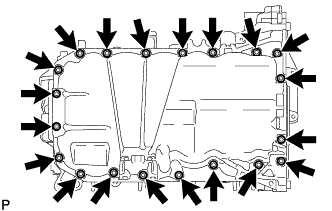
Tighten the 20 bolts.
- Torque:
- 20 N*m { 204 kgf*cm, 15 ft.*lbf }
-
Tighten the 4 bolts.
- Torque:
- 24 N*m { 245 kgf*cm, 18 ft.*lbf }
-
-
INSTALL ENGINE OIL LEVEL DIPSTICK GUIDE
-
Install a new O-ring to the engine oil level dipstick guide.
-
Using a T25 "TORX" socket wrench, install the engine oil level dipstick guide with the bolt.
Tech Tips
Refer to "SPECIFICATIONS - STANDARD BOLT" for the tightening torque.
-
Attach the clamp and connect the fuel feed pipe sub-assembly to the engine oil level dipstick guide.
-
Install the engine oil level dipstick.
-
-
ADD ENGINE OIL
-
Add new engine oil.
Standard engine oil Toyota recommends the use of approved "Toyota Genuine Motor Oil 5W-30 Premium Fuel Economy for 1WW/2WW engines" or equivalent. Standard capacity (Drain and refill with oil filter change) 5.2 liters (5.5 US qts, 4.6 Imp. qts)
-
-
INSPECT FOR OIL LEAK
-
Start the engine. Make sure that there are no oil leaks from the areas that were worked on.
-
-
INSTALL NO. 1 ENGINE UNDER COVER
-
Install the No. 1 engine under cover with the 11 clips and 6 bolts.
-