OIL AND OIL FILTER REPLACEMENT

CAUTION:
-
Prolonged and repeated contact with engine oil will result in the removal of natural oils from the skin, leading to dryness, irritation and dermatitis. In addition, used engine oil contains potentially harmful contaminants which may cause skin cancer.
-
Precautions should be taken when replacing engine oil to minimize the risk of your skin making contact with used engine oil. Protective clothing and gloves that cannot be penetrated by oil should be worn. The skin should be washed with soap and water, or use waterless hand cleaner to remove any used engine oil thoroughly. Do not use gasoline, thinners or solvents.
-
In order to protect the environment, used oil and used oil filters must be disposed of at designated disposal sites.
-
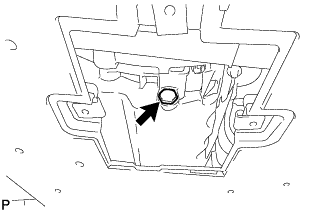
REMOVE ENGINE SERVICE HOLE COVER
-

Remove the 3 screws and engine service hole cover from the No. 1 engine under cover.
-
-
DRAIN ENGINE OIL
-
Remove the oil filler cap sub-assembly.
-
Remove the oil pan drain plug and gasket, and then drain the engine oil into a container.
-
Install a new gasket and the oil pan drain plug.
- Torque:
- 25 N*m { 255 kgf*cm, 18 ft.*lbf }
-
-
REMOVE NO. 1 ENGINE COVER
-
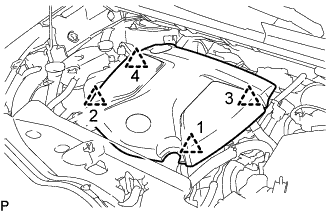
Lift the No. 1 engine cover to detach the 4 clips in the order shown in the illustration and remove the No. 1 engine cover.
Note
Attempting to disengage both front and rear clips at the same time may cause the No. 1 engine cover to break.
-
-
REMOVE RADIATOR SUPPORT OPENING COVER
-
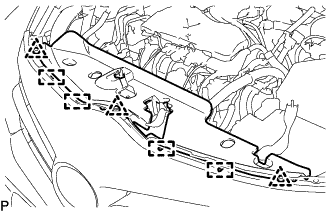
Remove the 3 clips.
-
Detach the 4 hooks and remove the radiator support opening cover.
-
-
REMOVE OIL FILTER SUB-ASSEMBLY
-

Using a 27 mm socket wrench, remove the oil filter cover.
-
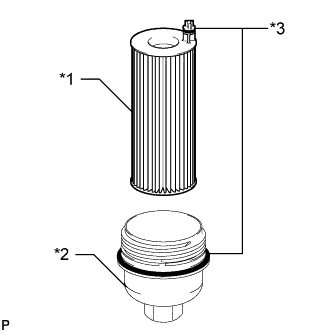
Text in Illustration *1 Oil Filter Sub-assembly *2 Oil Filter Cover *3 O-Ring Remove the 2 O-rings from the oil filter sub-assembly and the oil filter cover.
Note
Be sure to remove the O-ring by hand without using any tools to prevent damage to the O-ring groove.
-
Remove the oil filter sub-assembly from the oil filter cover.
-
-
INSTALL OIL FILTER SUB-ASSEMBLY
-
Clean the inside of the oil filter cover, its threads and its O-ring.
-
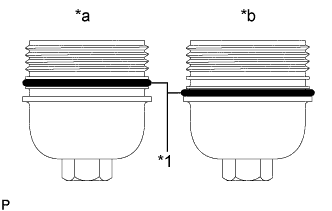
Text in Illustration *1 O-Ring *a CORRECT *b INCORRECT Apply a small amount of engine oil to a new O-ring and install it to the oil filter cover.
Note
-
Be sure to install the O-ring in the proper location, otherwise oil may leak.
-
Do not twist the O-ring.
-
-
Apply a light coat of engine oil to a new O-ring.
-
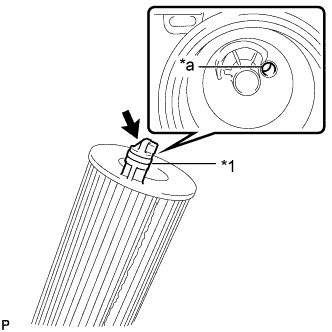
Text in Illustration *1 O-Ring *a Oil Filter Assembly Hole 
Protrusion Install the O-ring to the oil filter sub-assembly.
-
Set a new oil filter sub-assembly in the oil filter assembly.
Note
Insert the protrusion of the oil filter sub-assembly into the oil filter assembly hole.
-
Apply a small amount of engine oil to the O-ring again and temporarily install the oil filter cover.
-
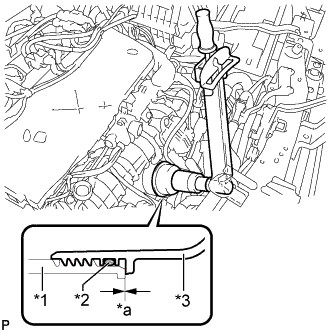
Text in Illustration *1 Oil Filter Assembly *2 O-Ring *3 Oil Filter Cover *a No Gap Using a 27 mm socket wrench, tighten the oil filter cover.
- Torque:
- 25 N*m { 255 kgf*cm, 18 ft.*lbf }
Note
After tightening the oil filter cover, make sure that there is no gap and that the O-ring is not protruding.
-
-
ADD ENGINE OIL
-
Add new engine oil.
Standard engine oil Toyota recommends the use of approved "Toyota Genuine Motor Oil 5W-30 Premium Fuel Economy for 1WW/2WW engines" or equivalent. Standard capacity (Drain and refill with oil filter change) 5.2 liters (5.5 US qts, 4.6 Imp. qts)
-
-
INSPECT FOR OIL LEAK
-
Start the engine. Make sure that there are no oil leaks from the areas that were worked on.
-
-
INSPECT ENGINE OIL LEVEL
-
Warm up the engine, stop the engine and wait 5 minutes. The engine oil level should be between the engine oil level dipstick low level mark and full level mark.
If low, check for leakage and add oil up to the full level mark.
Note
Do not fill engine oil above the full level mark.
Tech Tips
A certain amount of engine oil will be consumed while driving. In the following situations, oil consumption may increase, and engine oil may need to be refilled in between oil maintenance intervals.
-
When the engine is new, for example directly after purchasing the vehicle or after replacing the engine.
-
If low quality oil or oil of an inappropriate viscosity is used.
-
When driving at high engine speed or with a heavy load (when towing), or when driving while accelerating or decelerating frequently.
-
When leaving the engine idling for a long time, or when driving frequently through heavy traffic.
When judging the amount of oil consumption, keep in mind that the oil may have become diluted, making it difficult to judge the true level accurately.
-
-
-
INSTALL RADIATOR SUPPORT OPENING COVER
-
Attach the 4 hooks and install the radiator support opening cover.
-
Install the 3 clips.
-
-
INSTALL NO. 1 ENGINE COVER
-
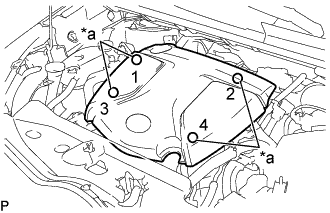
Text in Illustration *a Installation Points Attach the 4 clips to install the No. 1 engine cover.
Tech Tips
When attaching the clips, press the protrusions on the top of the No. 1 engine cover at the clip installation points.
-
-
INSTALL ENGINE SERVICE HOLE COVER
-
Install the engine service hole cover with the 3 screws to the No. 1 engine under cover.
-