OIL PRESSURE SWITCH REMOVAL

-
REMOVE NO. 1 ENGINE UNDER COVER
-
Remove the 9 clips and fold back the No. 1 engine under cover.
Tech Tips
It is not necessary to fully remove the No. 1 engine under cover. Partially remove it so that the oil can be replaced in a later step.
-
-
DRAIN ENGINE OIL
-
Remove the oil filler cap sub-assembly.
-
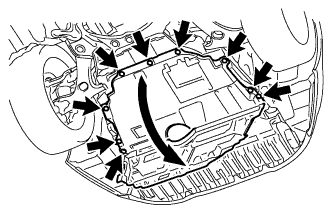
Remove the oil pan drain plug and gasket, and then drain the engine oil into a container.
-
Install a new gasket and the oil pan drain plug.
- Torque:
- 38 N*m { 387 kgf*cm, 28 ft.*lbf }
-
-
REMOVE NO. 1 ENGINE COVER
-
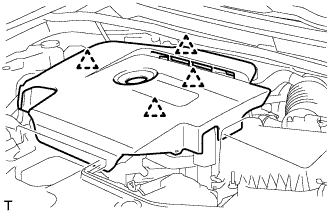
Hold the rear of the No. 1 engine cover and slowly raise it to detach the clip on the rear of the No. 1 engine cover. Continue to raise the No. 1 engine cover to detach the 3 clips on the front and side of the No. 1 engine cover and remove the No. 1 engine cover.
Note
Attempting to disengage both front and rear clips at the same time may cause the No. 1 engine cover to break.
-
-
REMOVE RADIATOR SUPPORT OPENING COVER
-
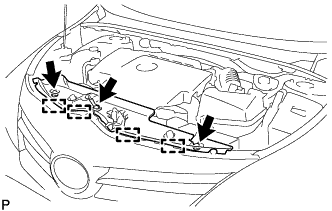
Remove the 3 clips.
-
Detach the 4 hooks and remove the radiator support opening cover.
-
-
REMOVE ENGINE OIL PRESSURE SWITCH ASSEMBLY
-
Disconnect the engine oil pressure switch connector.
-

Using a 24 mm deep socket wrench, remove the engine oil pressure switch assembly.
-