for Manual Transaxle:
When the transaxle is removed, be sure to use a new clutch release with bearing cylinder and new installation bolts. Removal of the transaxle allows the compressed clutch release with bearing cylinder to return to its original position, and dust could damage the seal of the clutch release with bearing cylinder, possibly causing clutch fluid leaks.
- Click here
REMOVE ENGINE ASSEMBLY WITH TRANSAXLE
-
Remove the engine assembly with transaxle (Click here).
-
- Click here
REMOVE MANUAL TRANSAXLE ASSEMBLY
-
Remove the manual transaxle assembly (Click here).
-
- Click here
REMOVE CONTINUOUSLY VARIABLE TRANSAXLE ASSEMBLY
-
Remove the continuously variable transaxle assembly (Click here).
-
-
Click here
REMOVE CLUTCH COVER ASSEMBLY (for Manual Transaxle)
-
Put matchmarks on the clutch cover assembly and flywheel sub-assembly.
Table 1. Text in Illustration *1 Matchmark -
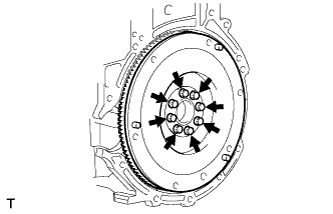
Loosen each set bolt one turn at a time in the order shown in the illustration until the spring tension is released.
-
Remove the set bolts and pull off the clutch cover assembly.
Note:Do not drop the clutch disc assembly.
-
- Click here
REMOVE CLUTCH DISC ASSEMBLY (for Manual Transaxle)
- Click here
REMOVE CLUTCH RELEASE WITH BEARING CYLINDER ASSEMBLY (for Manual Transaxle)
-
Remove the clutch release with bearing cylinder assembly (Click here).
-
- Click here
REMOVE FLYWHEEL SUB-ASSEMBLY (for Manual Transaxle)
-
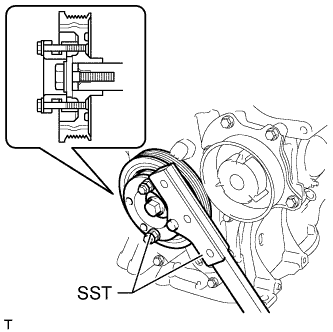
Using SST, hold the crankshaft.
for 86 mm (3.39 in.) Bolt Pitch Type:
09213-58014 91551-80840 09330-00021 for 64 mm (2.52 in.) Bolt Pitch Type:
09213-54015 09330-00021 Tip:For the 64 mm (2.52 in.) bolt pitch type, the part number of the installation bolt for SST (crankshaft pulley holding tool) is 91551-00850 (quantity: 2).
-
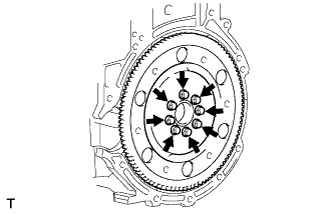
Remove the 8 bolts and flywheel.
-
- Click here
REMOVE DRIVE PLATE AND RING GEAR SUB-ASSEMBLY (for CVT)
-
Using SST, hold the crankshaft.
for 86 mm (3.39 in.) Bolt Pitch Type:
09213-58014 91551-80840 09330-00021 for 64 mm (2.52 in.) Bolt Pitch Type:
09213-54015 09330-00021 Tip:For the 64 mm (2.52 in.) bolt pitch type, the part number of the installation bolt for SST (crankshaft pulley holding tool) is 91551-00850 (quantity: 2).
-
Remove the 8 bolts, rear spacer, drive plate and front spacer.
-
- Click here
REMOVE ENGINE REAR OIL SEAL
-
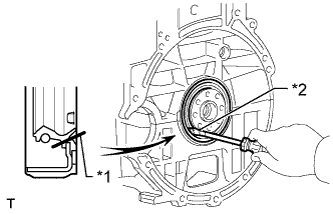
Using a knife, cut off the lip of the oil seal.
Table 2. Text in Illustration *1 Cut Position *2 Protective Tape -
Using a screwdriver with its tip wrapped with tape, pry out the oil seal.
Note:
-
Do not damage the surface of the oil seal press fit hole or the crankshaft.
-
After removing the oil seal, check the crankshaft for damage. If damaged, smooth the surface with 400-grit sandpaper.
-
-