- Click here
INSTALL TIMING CHAIN COVER OIL SEAL
-
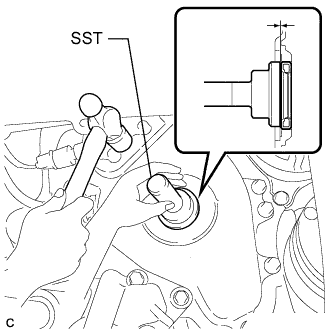
Apply MP grease to the lip of a new oil seal.
Note:
-
Do not allow foreign matter to contact the lip of the oil seal.
-
Do not allow MP grease to contact the dust seal.
-
-
Using SST and a hammer, tap in the oil seal until its surface is flush with the timing chain cover edge.
09223-22010 Note:
-
Wipe off any extra grease from the crankshaft.
-
Do not tap in the oil seal at an angle.
-
-
- Click here
INSTALL CRANKSHAFT PULLEY
-
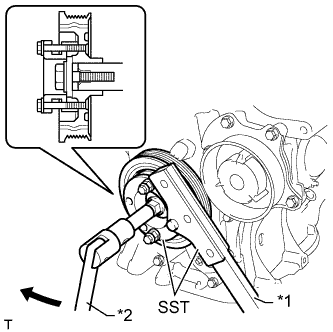
Align the key groove of the pulley with the pulley set key.
-
Temporarily install the pulley with the pulley bolt.
-
Using SST, hold the pulley in place and tighten the bolt.
for 86 mm (3.39 in.) Bolt Pitch Type:
09213-58014 91551-80840 09330-00021 for 64 mm (2.52 in.) Bolt Pitch Type:
09213-54015 09330-00021 190 N*m 1940 kgf*cm 140 ft.*lbf Table 1. Text in Illustration *1 Hold *2 Turn Tip:For the 64 mm (2.52 in.) bolt pitch type, the part number of the installation bolt for SST (crankshaft pulley holding tool) is 91551-00850 (quantity: 2).
-
- Click here
INSTALL V-RIBBED BELT
-
Temporarily install the V-ribbed belt.
-
- Click here
ADJUST V-RIBBED BELT
-
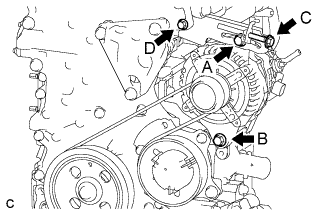
Turn bolt C to adjust the tension of the V-ribbed belt.
-
Tighten bolts A and B.
for bolt A 25 N*m 255 kgf*cm 18 ft.*lbf for bolt B 43 N*m 438 kgf*cm 32 ft.*lbf Note:Do not loosen bolt D.
-
- Click here
INSPECT V-RIBBED BELT
-

Check the belt for wear, cracks or other signs of damage.
If any of the following defects is found, replace the V-ribbed belt.
-
The belt is cracked.
-
The belt is worn out to the extent that the cords are exposed.
-
The belt has chunks missing from the ribs.
-
-
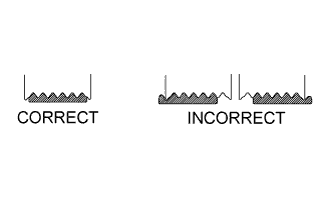
Check that the belt fits properly in the ribbed grooves.
Tip:Check with your hand to confirm that the belt has not slipped out of the grooves on the bottom to the pulley. If it has slipped out, replace the V-ribbed belt. Install a new V-ribbed belt correctly.
-
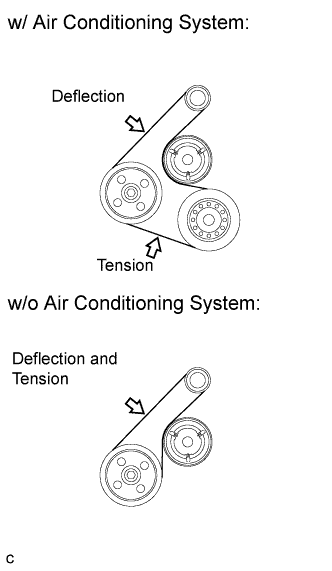
Check the V-ribbed belt deflection and tension.
Standard Deflection Item Specified Condition New belt 7.0 to 8.2 mm (0.276 to 0.323 in.) Used belt 7.6 to 10.0 mm (0.299 to 0.394 in.) Standard Tension Item Specified Condition New belt 700 to 800 N (70 to 80 kgf, 157.4 to 179.8 lbf) Used belt 550 to 750 N (55 to 75 kgf, 123.6 to 168.6 lbf) Tip:
-
When inspecting the V-ribbed belt deflection, apply 98 N (10 kgf, 22.0 lbf) of tensile force to it.
-
Check the V-ribbed belt deflection at the specified point.
-
V-ribbed belt tension and deflection should be checked after 2 revolutions of engine cranking.
-
Measure the belt tension when the engine is cold.
-
When adjusting the belt, be sure to adjust it so that the tension is as close as possible to the median of the specified range.
-
When replacing the belt with a new one, be sure to perform the following after adjusting the belt: idle the engine for 5 minutes, and then adjust the belt to the specified value for a new belt after the engine has cooled.
-
When inspecting a belt which has been used for over 5 minutes, apply the used belt specifications.
-
When using a belt tension gauge, confirm its accuracy by using a master gauge first.
-
-
- Click here
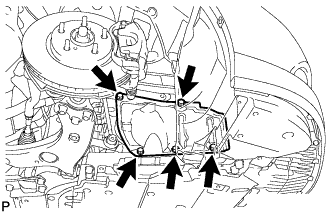
INSTALL FRONT SUSPENSION MEMBER REINFORCEMENT RH
-

Install the reinforcement with the 4 bolts.
99 N*m 1010 kgf*cm 73 ft.*lbf Note:Tighten the bolts in the order of C, B, D and A.
-
- Click here
ADD ENGINE OIL
-
Clean and install the oil pan drain plug together with a new gasket.
37 N*m 377 kgf*cm 27 ft.*lbf -
Add new engine oil.
Standard Oil Grade Oil Grade Oil Viscosity (SAE) API grade SL, SM or SN multigrade engine oil
-
20W-50
-
15W-40
API grade SL "Energy-Conserving", SM "Energy-Conserving", SN "Resource-Conserving" or ILSAC multigrade engine oil
-
0W-20
-
5W-20
-
5W-30
-
10W-30
Standard Capacity Item Specified Condition Drain and refill without oil filter change 3.9 liters (4.1 US qts, 3.4 Imp. qts) Drain and refill with oil filter change 4.2 liters (4.4 US qts, 3.7 Imp. qts) Dry fill 4.7 liters (5.0 US qts, 4.1 Imp. qts) -
-
Install the oil filler cap.
-
- Click here
INSPECT FOR ENGINE OIL LEAK
-
Start the engine. Make sure that there are no oil leaks from the areas that were worked on.
-
- Click here
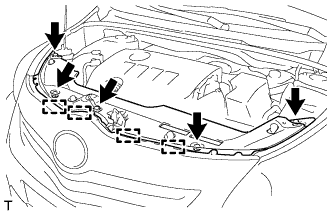
INSTALL REAR ENGINE UNDER COVER RH
-
Install the under cover RH with the 5 clips.
-
- Click here
INSTALL NO. 1 ENGINE UNDER COVER
-
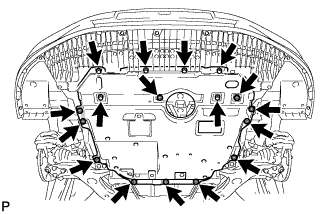
Install the under cover with the 11 clips and 6 bolts.
-
- Click here
INSTALL RADIATOR SUPPORT OPENING COVER
-
Attach the 4 hooks to install the radiator support opening cover.
-
Install the 5 clips.
-
- Click here
INSTALL BATTERY SERVICE HOLE COVER
-
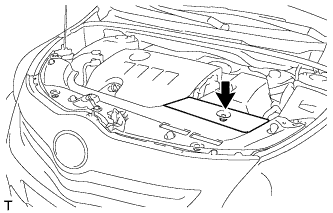
Install the battery service hole cover with the clip.
-
- Click here
INSTALL NO. 2 CYLINDER HEAD COVER
-
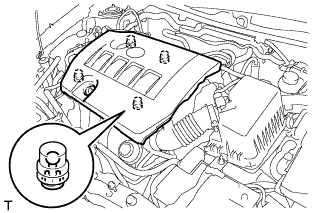
Attach the 4 clips to install the cover.
Note:
-
Be sure to attach the clips securely.
-
Do not apply excessive force or hit the cover to attach the clips. This may cause the cover to break.
-
-