REAR CRANKSHAFT OIL SEAL REMOVAL

-
PRECAUTION
Note
After turning the ignition switch off, waiting time may be required before disconnecting the cable from the battery terminal. Therefore, make sure to read the disconnecting the cable from the battery terminal notice before proceeding with work Click here.
-
DISCONNECT CABLE FROM NEGATIVE BATTERY TERMINAL
Note
When disconnecting the cable, some systems need to be initialized after the cable is reconnected Click here.
-
REMOVE MANUAL TRANSAXLE ASSEMBLY (for Manual Transaxle)
-
REMOVE AUTOMATIC TRANSAXLE ASSEMBLY (for Automatic Transaxle)
-
REMOVE CLUTCH COVER ASSEMBLY (for Manual Transaxle)
-
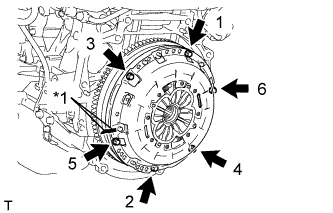
Text in Illustration *1 Matchmark Place matchmarks on the clutch cover and flywheel.
-
Loosen each set bolt 180° at a time until the spring tension is released.
Note
Be sure to uniformly loosen the bolts 180° at a time according to the order in the illustration.
-
Remove the set bolts and pull off the clutch cover to remove it.
Note
Do not drop the clutch disc.
-
-
REMOVE CLUTCH DISC ASSEMBLY (for Manual Transaxle)
Note
Keep the lining part of the clutch disc, the pressure plate, and the surface of the flywheel away from oil and foreign matter.
-
REMOVE FLYWHEEL SUB-ASSEMBLY (for Manual Transaxle)
-
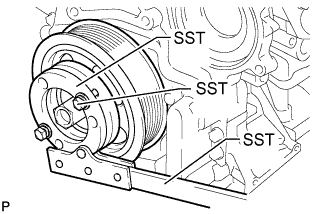
Using SST, hold the crankshaft pulley.
- SST
- 09213-58014 ( 91551-80840 )
- 09330-00021
-
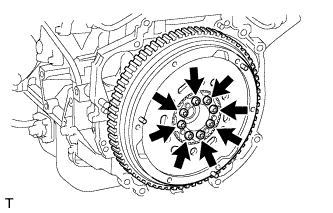
Using a T55 "TORX" socket wrench, remove the 8 bolts and flywheel sub-assembly.
-
-
REMOVE DRIVE PLATE AND RING GEAR SUB-ASSEMBLY (for Automatic Transaxle)
-
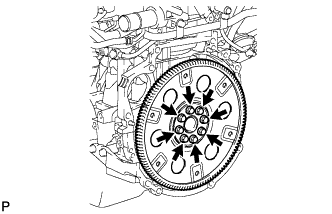
Remove the 8 bolts, rear drive plate spacer, drive plate and ring gear sub-assembly, and front drive plate spacer.
-
-
REMOVE REAR CRANKSHAFT OIL SEAL
-
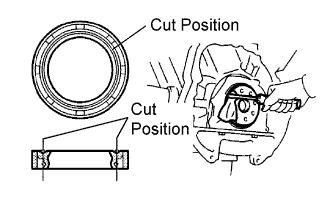
Using a knife, cut off the lip of the rear crankshaft oil seal.
-
Using a screwdriver, pry out the rear crankshaft oil seal.
Note
Be careful not to damage the crankshaft.
-