HOOD LOCK CONTROL CABLE ASSEMBLY REMOVAL

-
REMOVE FRONT BUMPER ASSEMBLY
for Sport Package: Click here
for Standard: Click here
-
REMOVE FRONT FENDER TOP REINFORCEMENT SUB-ASSEMBLY LH
-
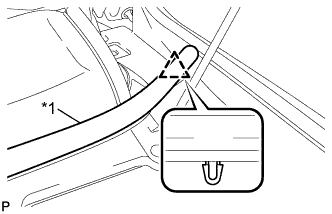
Text in Illustration *1 Hood to Cowl Top Seal Disengage the clip and the hood to cowl top seal from the front fender top reinforcement sub-assembly LH.
-
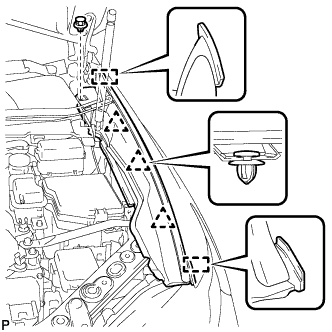
Remove the clip.
-
Disengage the 3 clips and 2 guides, and remove the front fender top reinforcement sub-assembly LH.
-
-
REMOVE FRONT FENDER TOP REINFORCEMENT SUB-ASSEMBLY RH
Tech Tips
Use the same procedure for the RH side and LH side.
-
REMOVE FRONT FENDER TO COWL SIDE SEAL LH
-
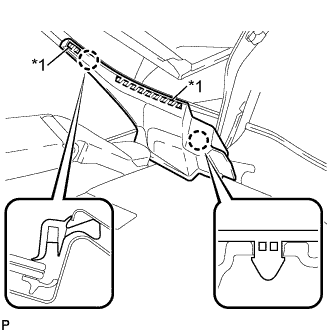
Text in Illustration *1 Double-sided Tape Disengage the 2 claws and remove the front fender to cowl side seal LH.
-
-
REMOVE FRONT FENDER TO COWL SIDE SEAL RH
Tech Tips
Use the same procedure for the RH side and LH side.
-
REMOVE FRONT WIPER ARM HEAD CAP
-
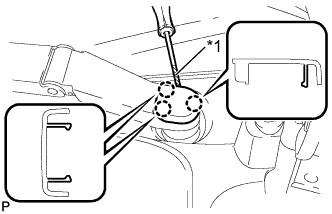
Text in Illustration *1 Protective Tape Using a screwdriver, disengage the 3 claws and remove the front wiper arm head cap.
Tech Tips
Tape the screwdriver tip before use.
-
-
REMOVE FRONT WIPER ARM AND BLADE ASSEMBLY LH
-
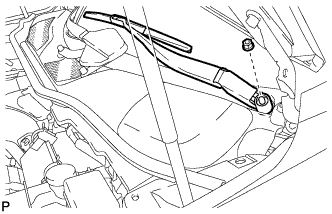
Remove the nut and the front wiper arm and blade assembly LH.
-
-
REMOVE FRONT WIPER ARM AND BLADE ASSEMBLY RH
-
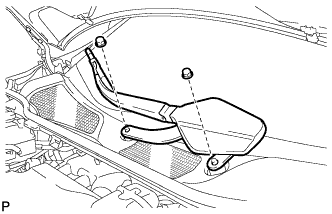
Remove the 2 nuts and the front wiper arm and blade assembly RH.
-
-
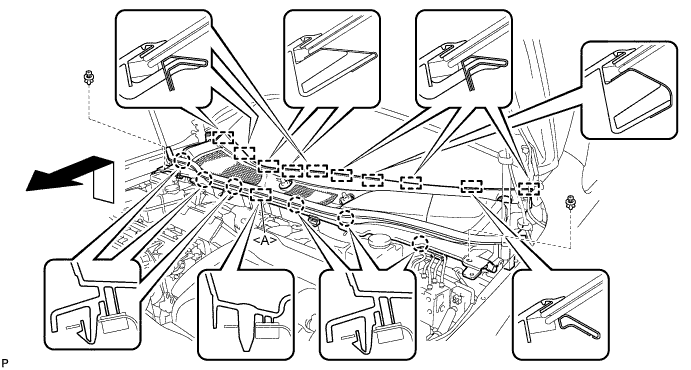
REMOVE COWL TOP VENTILATOR LOUVER SUB-ASSEMBLY
-
Remove the 2 clips.
-
Disengage the 6 claws and guide <A>.
-
Disengage the 10 guides and pull out the cowl top ventilator louver sub-assembly as shown in the illustration.
-
-
REMOVE WINDSHIELD WIPER MOTOR AND LINK ASSEMBLY
-
Operate the wiper and stop the windshield wiper motor at the automatic stop position.
-
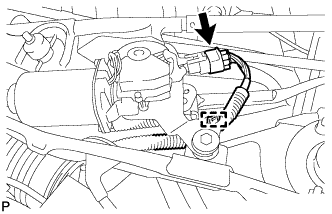
w/o Deicer:
-
Disconnect the connector.
-
Disengage the clamp.
-
-
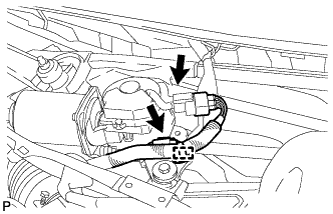
w/ Deicer:
-
Disconnect the 2 connectors.
-
Disengage the clamp.
-
-
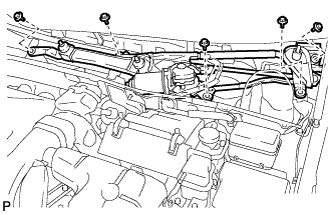
Remove the 5 bolts and the windshield wiper motor and link assembly.
Note
Be careful not to damage the windshield when removing the windshield wiper motor and link assembly.
-
-
REMOVE FRONT SHOCK ABSORBER CAP LH (w/ Air Suspension)
-
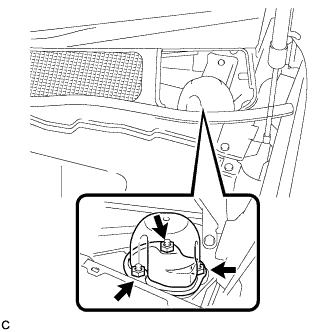
Remove the 3 nuts and front shock absorber cap.
-
-
REMOVE FRONT SHOCK ABSORBER CAP RH (w/ Air Suspension)
Tech Tips
Use the same procedure for the RH side and LH side.
-
REMOVE OUTER COWL TOP PANEL SUB-ASSEMBLY (for LHD)
-
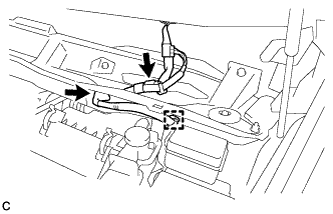
Disconnect the connector (w/ Windshield Deicer).
-
Disengage the grommet and clamp, and separate the wire harness.
-
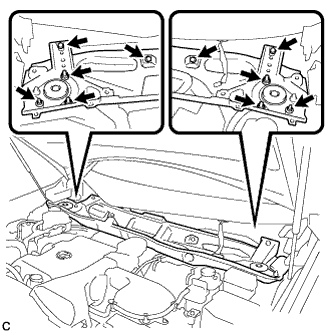
Remove the 6 nuts, 4 bolts and outer cowl top panel sub-assembly.
-
-
REMOVE OUTER COWL TOP PANEL SUB-ASSEMBLY (for RHD)
-
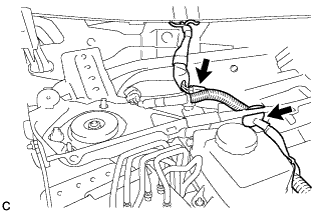
Disconnect the connector (w/ Windshield Deicer).
-
Disengage the grommet and clamp, and separate the wire harness.
-
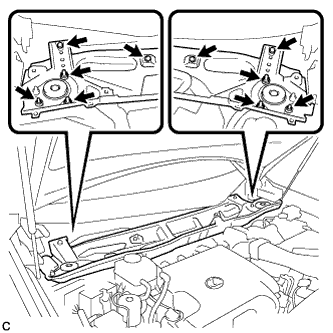
Remove the 6 nuts, 4 bolts and outer cowl top panel sub-assembly.
-
-
REMOVE MILLIMETER WAVE RADAR SENSOR ASSEMBLY (w/ Dynamic Radar Cruise Control System)
-
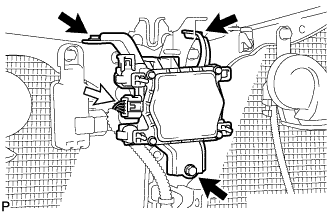
Disconnect the connector.
-
Remove the 3 bolts and the millimeter wave radar sensor assembly.
-
-
REMOVE LOW PITCHED HORN ASSEMBLY (for LHD)
-
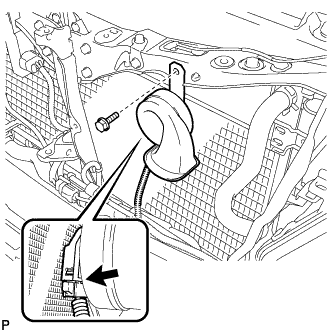
Disconnect the connector.
-
Remove the bolt and low pitched horn assembly.
-
-
REMOVE HIGH PITCHED HORN ASSEMBLY (for RHD)
-
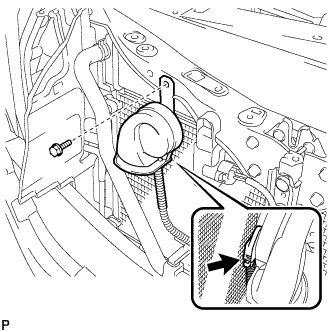
Disconnect the connector.
-
Remove the bolt and high pitched horn assembly.
-
-
REMOVE SMOG VENTILATION SENSOR (for RHD)
-
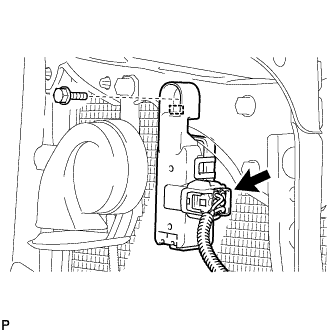
Disconnect the connector.
-
Remove the bolt
-
Disengage the guide and remove the smog ventilation sensor.
-
-
REMOVE HOOD LOCK CONTROL CABLE COVER (for LHD)
-

Remove the 3 screws.
-
Disengage the clamp and remove the hood lock control cable cover.
-
-
REMOVE HOOD LOCK CONTROL CABLE COVER (for RHD)
-
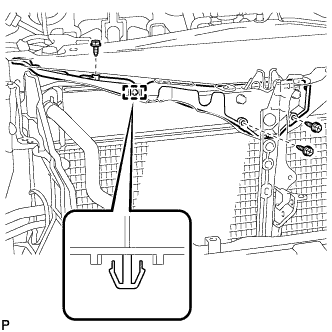
Remove the 3 screws.
-
Disengage the clamp and remove the hood lock control cable cover.
-
-
REMOVE HOOD LOCK ASSEMBLY (for LHD)
-
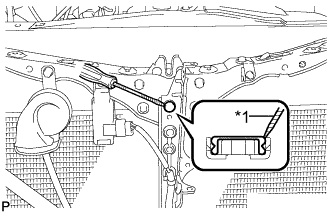
Text in Illustration *1 Protective Tape Using a screwdriver, remove the hood lock nut cap.
Tech Tips
Tape the screwdriver tip before use.
-
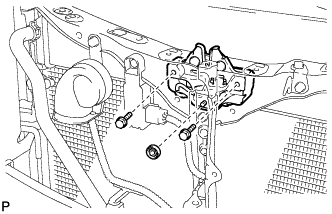
Remove the 2 bolts and hood lock nut.
-
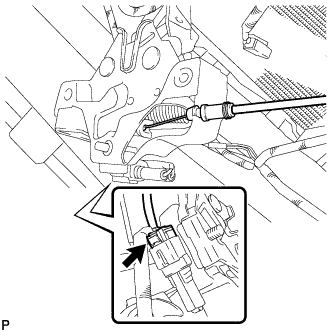
Disconnect the connector.
-
Disconnect the hood lock control cable and remove the hood lock assembly.
-
-
REMOVE HOOD LOCK ASSEMBLY (for RHD)
-
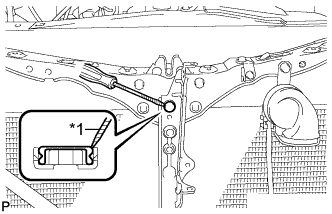
Text in Illustration *1 Protective Tape Using a screwdriver, remove the hood lock nut cap.
Tech Tips
Tape the screwdriver tip before use.
-
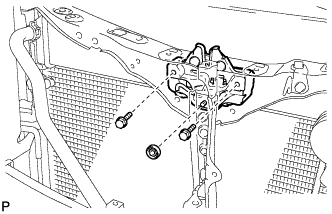
Remove the 2 bolts and hood lock nut.
-
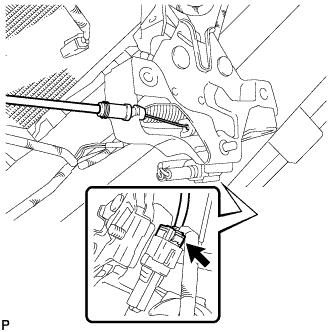
Disconnect the connector.
-
Disconnect the hood lock control cable and remove the hood lock assembly.
-
-
REMOVE NO. 1 INSTRUMENT PANEL UNDER COVER SUB-ASSEMBLY (for LHD)
-
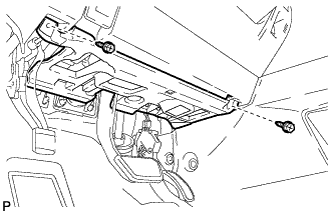
Remove the 2 screws <D>.
-
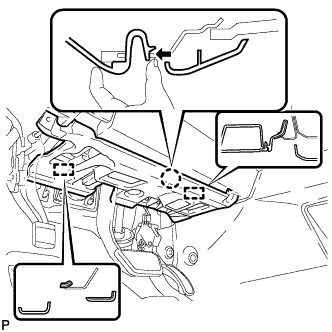
Disengage the claw and 2 guides as shown in the illustration.
-
Disconnect each connector.
-
Disengage each clamp and remove the No. 1 instrument panel under cover sub-assembly.
-
-
REMOVE NO. 1 INSTRUMENT PANEL UNDER COVER SUB-ASSEMBLY (for RHD)
-
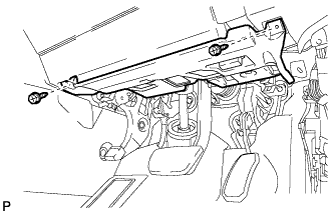
Remove the 2 screws <D>.
-
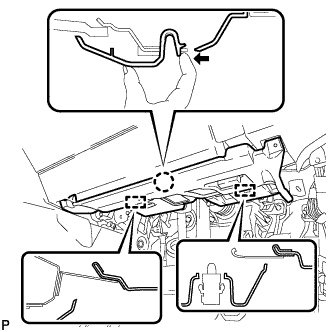
Disengage the claw and 2 guides as shown in the illustration.
-
Disconnect each connector.
-
Disengage each clamp and remove the No. 1 instrument panel under cover sub-assembly.
-
-
REMOVE HOOD LOCK CONTROL LEVER SUB-ASSEMBLY
-
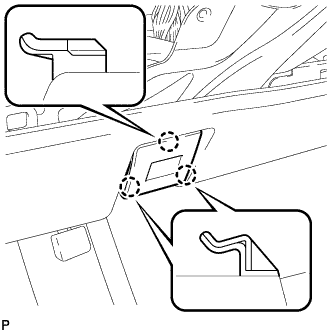
Disengage the 3 claws.
-
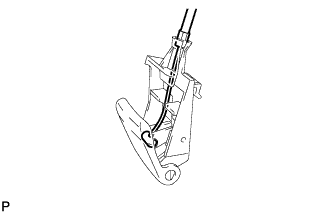
Remove the hood lock control cable assembly and hood lock control lever sub-assembly.
-
-
REMOVE HOOD LOCK CONTROL CABLE ASSEMBLY (for LHD)
-
Using a screwdriver, disconnect the clamps shown in the illustration.
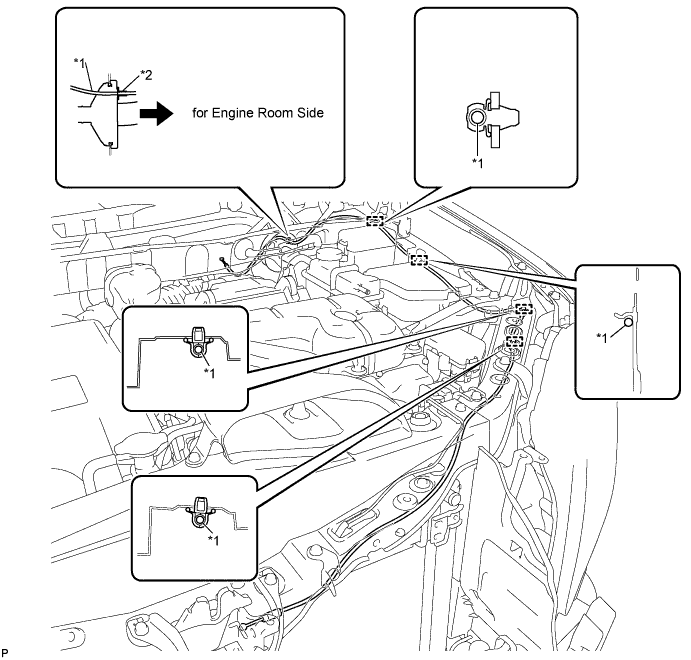
Text in Illustration *1 Hood Lock Control Cable *2 Stopper Tech Tips
Tape the screwdriver tip before use.
-
Pull the hood lock control cable assembly from the engine compartment and remove it.
-
-
REMOVE HOOD LOCK CONTROL CABLE ASSEMBLY (for RHD)
-
Using a screwdriver, disconnect the clamps shown in the illustration.
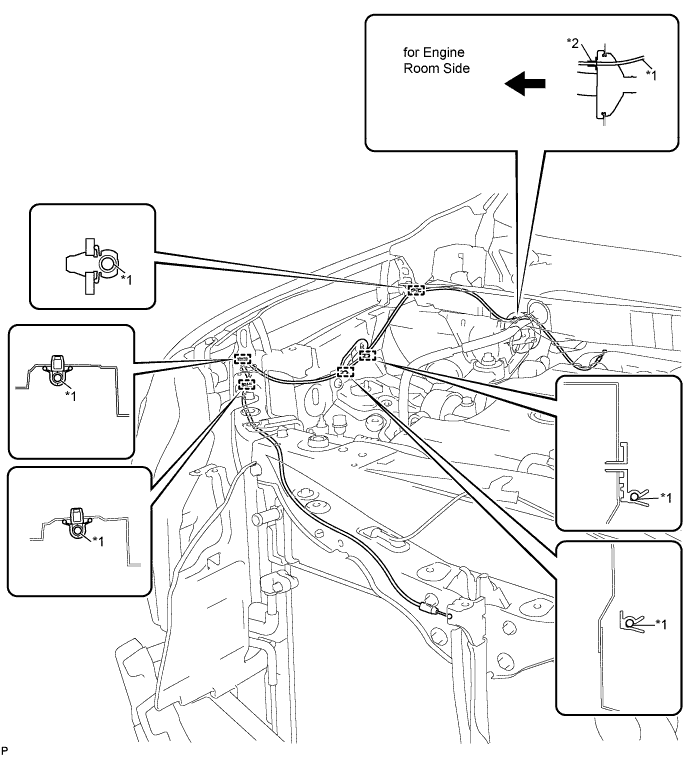
Text in Illustration *1 Hood Lock Control Cable *2 Stopper Tech Tips
Tape the screwdriver tip before use.
-
Pull the hood lock control cable assembly from the engine compartment and remove it.
-