- Click here
PRECAUTION (w/ Air Suspension)
Note:Be sure to read Precaution thoroughly before servicing (Click here).
- Click here
INSPECT TIRE
-
Check the tires for wear and proper inflation pressure.
Cold Tire Inflation Pressure Area Tire Size For driving under 160 km/h (100 mph) For driving at over 160 km/h (100 mph) Front
kPa (kgf/cm2, psi)
Rear
kPa (kgf/cm2, psi)
Front
kPa (kgf/cm2, psi)
Rear
kPa (kgf/cm2, psi)
Europe
(Countries that use WVTA)
235/60R18 103V 230 (2.3, 33)*1
250 (2.5, 36)*2
230 (2.3, 33)*1
250 (2.5, 36)*2
250 (2.5, 36) 270 (2.7, 39) 235/55R19 101V 230 (2.3, 33)*1
250 (2.5, 36)*2
230 (2.3, 33)*1
250 (2.5, 36)*2
260 (2.6, 38) 290 (2.9, 42) Others 235/60R18 103V 230 (2.3, 33) 230 (2.3, 33) 250 (2.5, 36) 270 (2.7, 39) 235/55R19 101V 230 (2.3, 33) 230 (2.3, 33) 260 (2.6, 38) 290 (2.9, 42) *1: Standard Pressure
*2: ECO Pressure
-
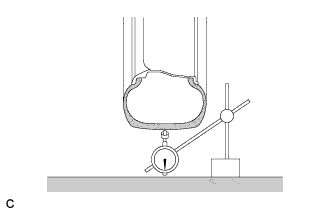
Using a dial indicator, check the runout of the tires.
Maximum tire runout 1.4 mm (0.0551 in.) or less
-
- Click here
ROTATE TIRE
-
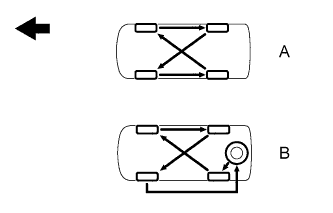
If the vehicle is equipped with a compact spare tire, rotate the tires as shown by (A) in the illustration. If the vehicle is equipped with a full-size spare tire, rotate the tires, including the spare tire, as shown by (B) in the illustration.
Table 1. Text in Illustration 
Front 103 N*m 1050 kgf*cm 76 ft.*lbf
-
- Click here
INSPECT WHEEL BALANCE
-
for 18 inch Wheel:
-
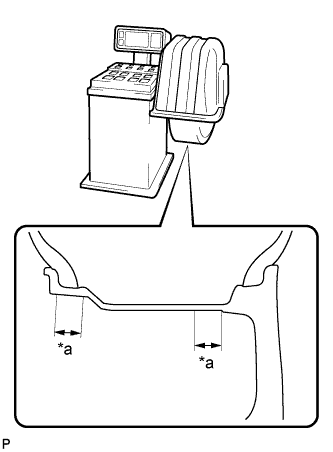
Check and adjust the off-the-car balance.
Table 2. Text in Illustration *a 25 mm (0.984 in.) Maximum imbalance after adjustment 8.0 g (0.0176 lb) Note:
-
Use a cleaning detergent to remove dirt, oil and water from the surface where the balance weight is to be adhered.
-
Do not touch the adhesive surface of the balance weight.
-
Adhere a stick-on type balance weight to the flat surface*a shown in the illustration.
-
Push the balance weight with your finger to securely adhere it to the desired position.
-
Do not reuse balance weights.
Tip:Use stick-on type balance weights for both the inner and outer side.
-
-
-
for 19 inch Wheel:
-
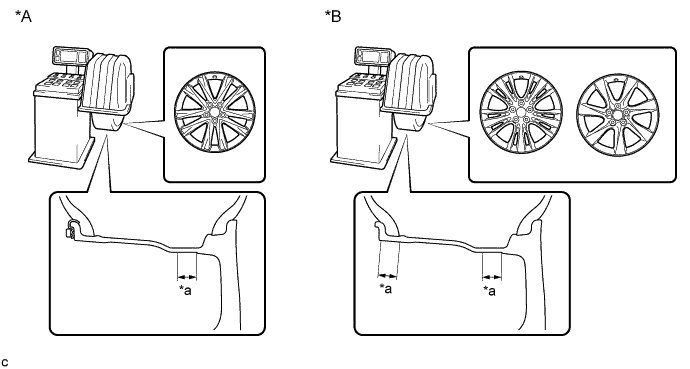
Check and adjust the off-the-car balance.
Table 3. Text in Illustration *A Type A *B Type B *a 25 mm (0.984 in.) - - Maximum imbalance after adjustment 8.0 g (0.0176 lb) Note:
-
Use a cleaning detergent to remove dirt, oil and water from the surface where the balance weight is to be adhered.
-
Do not touch the adhesive surface of the balance weight.
-
Adhere a stick-on type balance weight to the flat surface*a shown in the illustration.
-
Push the balance weight with your finger to securely adhere it to the desired position.
-
Do not reuse balance weights.
Tip:
-
Type A: Use clip-on type balance weights for the inner side, and stick-on type balance weights for the outer side.
-
Type B: Use stick-on type balance weights for both the inner and outer side.
-
-
-
- Click here
INSPECT FRONT AXLE HUB BEARING LOOSENESS
-
Inspect the front axle hub bearing looseness (Click here).
-
- Click here
INSPECT REAR AXLE HUB BEARING LOOSENESS
-
Inspect the rear axle hub bearing looseness (Click here).
-
- Click here
INSPECT FRONT AXLE HUB RUNOUT
-
Inspect the front axle hub runout (Click here).
-
- Click here
INSPECT REAR AXLE HUB RUNOUT
-
Inspect the rear axle hub runout (Click here).
-