INSPECTION PROCEDURE
- w/ G-BOOK System:
-
When replacing the multi-media module receiver assembly or telematics transceiver, perform vehicle contract setting (w/ Telematics Transceiver) (Click here).
-
When replacing the multi-media module receiver assembly, perform vehicle contract setting (w/o Telematics Transceiver) (Click here).
PROCEDURE
- Click here
CHECK IF A PROPER DISC IS INSERTED
-
Make sure that the disc is an audio disc or a disc with MP3 or WMA files, and that it is not deformed, flawed, stained, deteriorated or otherwise defective.
OK Normal disc Tip:
-
Translucent or uniquely-shaped discs cannot be played.
-
CDs and DVDs with adhesive paper labels should not be played.
-
Commercial audio CDs and DVDs can be played.
-
CD-DA files on CD-ROMs, CD-Rs and CD-RWs can be played.
-
MP3 and WMA files on CD-ROMs, CD-Rs and CD-RWs can be played.
-
For details on playable CDs and DVDs, refer to the Owner's Manual.
-
- OKClick here
- NGClick here
-
- Click here
CHECK THAT DISC IS INSERTED PROPERLY
-
Check whether or not the disc is inserted upside down.
OK Disc is properly inserted.
- OKClick here
- NGClick here
-
- Click here
CLEAN DISC AND RECHECK
-
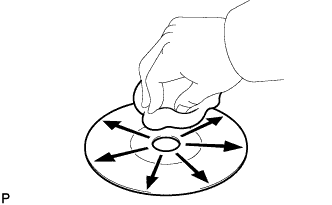
Clean the disc by wiping it clean with a soft cloth from the inside to the outside in a radial direction.
OK Malfunction disappears. Note:Do not use a conventional record cleaner or anti-static preservative.
- OKClick here
- NGClick here
-
- Click here
END
- Click here
REPLACE DISC AND RECHECK
-
Replace the disc with a known good one and check that the malfunction disappears.
OK Malfunction disappears.
- OKClick here
- NGClick here
-
- Click here
CHANGE DISC
- Click here
INSERT DISC PROPERLY
- Click here
REPLACE MULTI-MEDIA MODULE RECEIVER ASSEMBLYClick here