- Click here
PRECAUTION (w/ Air Suspension)
Note:Be sure to read Precaution thoroughly before servicing (Click here).
- Click here
REMOVE FUEL SUCTION TUBE ASSEMBLY WITH PUMP AND GAUGE
-
Remove the fuel suction tube assembly with pump and gauge (Click here).
-
- Click here
DRAIN FUEL
- Click here
REMOVE FRONT CENTER FLOOR COVER
- Click here
REMOVE REAR SUSPENSION MEMBER
-
Remove the rear suspension member (Click here).
-
- Click here
REMOVE CHARCOAL CANISTER PROTECTOR
-

Remove the 3 bolts and charcoal canister protector.
-
- Click here
REMOVE NO. 1 FUEL TANK PROTECTOR SUB-ASSEMBLY
-

Remove the 3 clips (A) and 7 nuts, and then remove the No. 1 fuel tank protector sub-assembly.
-
- Click here
REMOVE FUEL TANK ASSEMBLY
-

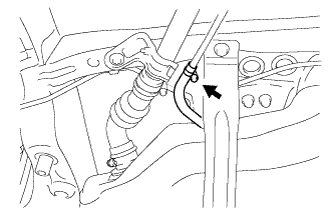
Disconnect the fuel tank main tube sub-assembly.
Table 1. Text in Illustration *1 Retainer *2 Quick Connector *3 Nylon Tube *4 Pipe *5 O-ring
-
Pinch the tab of the retainer to disengage the lock claws and pull it down as shown in the illustration.
-
Pull out the fuel tank main tube sub-assembly.
Note:
-
Check if there is any dirt or mud around the connector before this operation and clean the connector if necessary.
-
It is necessary to prevent mud or dirt from entering the quick connector. If any foreign objects enter the connector, the O-rings may not seal properly.
-
Do not use any tools in this operation.
-
Do not bend or twist the nylon tube. Protect the connector by covering it with a plastic bag.
-
When the pipe and connector are stuck, push and pull the connector to release it and pull the connector out carefully.
-
-
-

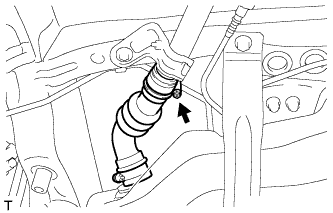
Disconnect the fuel tank vent hose from the charcoal canister assembly.
Note:
-
Remove dirt or foreign objects on the quick connector before this work.
-
Do not allow any scratches or foreign objects on the parts when disconnecting as the fuel hose connector has the O-ring that seals the pipe.
-
Perform this work by hand. Do not use any tools.
-
Do not forcibly bend, twist or turn the nylon tube.
-
Protect the connected part by covering it with a plastic bag after disconnecting the fuel tank vent hose.
-
If the quick connector and pipe are stuck, push and pull them to release.
-
-
Loosen the hose clamp bolt and disconnect the fuel tank breather tube sub-assembly.
-
Loosen the hose clamp bolt and disconnect the fuel tank to filler pipe hose.
-
Remove the bolt and nut, and then remove the rear fuel tank bracket LH.
-

Remove the bolt.
-

Set a engine lifter under the fuel tank.
-
Remove the 4 bolts, and then remove the 2 fuel tank bands.
-
Operate the transmission jack to remove the fuel tank.
-
- Click here
REMOVE NO. 2 FUEL TANK SIDE PLATE
-

Remove the No. 2 fuel tank side plate.
-
- Click here
REMOVE FUEL TANK MAIN TUBE SUB-ASSEMBLY
-

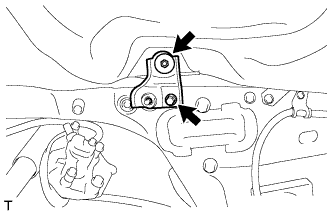
Release the 2 claws, and then remove the fuel pump tube.
Table 2. Text in Illustration *1 Claw
-
- Click here
REMOVE FUEL TANK TO FILLER PIPE HOSE
-

Loosen the hose clamp bolt, and then remove the fuel tank to filler pipe hose.
-
- Click here
REMOVE FUEL TANK CUSHION SET
-

Remove the fuel tank cushion sets and No. 5 fuel tank cushions.
Table 3. Text in Illustration *1 Fuel Tank Cushion Set *2 No. 5 Fuel Tank Cushion
-
- Click here
REMOVE TANK SUCTION TUBE SUPPORT
-

Remove the tank suction tube support from the fuel tank.
-