SEAT POSITION SENSOR INSTALLATION

-
INSTALL SEAT POSITION SENSOR
-

Install the seat position sensor to the seat slide position sensor protector with the pin as shown in the illustration.
-

Text in Illustration *1 Seat Position Sensor *2 Feeler Gauge *3 Seat Rail Using a 1.3 mm (0.0512 in.) feeler gauge, temporarily install the seat position sensor.
Note
-
If the seat position sensor has been dropped, or there are any cracks, dents or other defects in the case or connector, replace the seat position sensor with a new one.
-
When installing the seat position sensor, be careful that the SRS wiring does not interfere with or is pinched between other parts.
Tech Tips
Be sure that the clearance between the seat position sensor and seat rail is between 0.6 mm (0.0236 in.) and 2.0 mm (0.0787 in.).
-
-
Using a T30 "TORX" socket wrench, tighten the "TORX" screw to install the seat position sensor.
- Torque:
- 8.0 N*m { 82 kgf*cm, 71 in.*lbf }
-
Make sure that the clearance between the seat position sensor and seat rail is between 0.6 mm (0.0236 in.) and 2.0 mm (0.0787 in.).
-
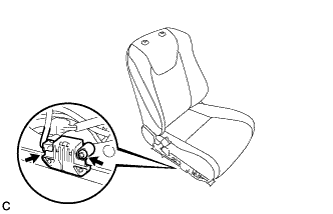
Connect the connector.
-
Check that there is no looseness in the installation parts of the seat position sensor.
-
-
INSTALL FRONT SEAT ASSEMBLY LH
-
Place the front seat assembly in the cabin.
Note
Be careful not to damage the vehicle body.
-
Connect the connectors under the seat.
-
Connect the cable to the negative (-) battery terminal.
Note
When disconnecting the cable, some systems need to be initialized after the cable is reconnected Click here.
-
Temporarily install the front seat assembly with the 4 bolts.
-
Operate the power seat switch knob and move the seat to the rearmost position.
-
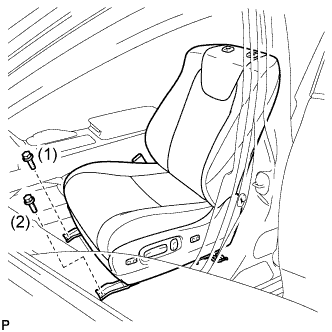
Tighten the 2 bolts on the front side of the seat.
- Torque:
- 37 N*m { 374 kgf*cm, 27 ft.*lbf }
Tech Tips
Tighten the bolts in the order indicated in the illustration.
-
Operate the power seat switch knob and move the seat to the foremost position.
-
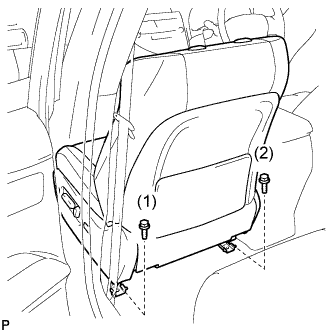
Tighten the 2 bolts on the rear side of the seat.
- Torque:
- 37 N*m { 374 kgf*cm, 27 ft.*lbf }
Tech Tips
Tighten the bolts in the order indicated in the illustration.
-
-
INSTALL REAR INNER SEAT TRACK BRACKET COVER LH
-
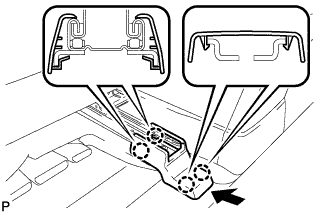
Engage the 4 claws and install the rear inner seat track bracket cover as shown in the illustration.
-
-
INSTALL REAR OUTER SEAT TRACK BRACKET COVER LH
-
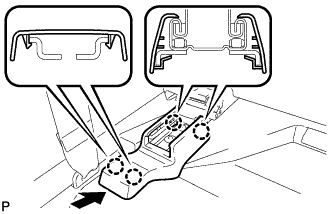
Engage the 4 claws to install the rear outer seat track bracket cover as shown in the illustration.
-
-
INSTALL FRONT INNER SEAT TRACK BRACKET COVER LH
-
Operate the power seat switch knob and move the seat to the rearmost position.
-
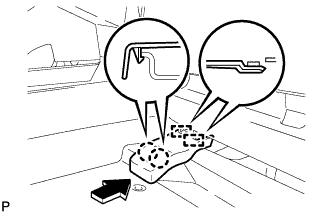
Engage the 2 guides and 2 claws to install the front inner seat track bracket cover as shown in the illustration.
-
-
INSTALL FRONT OUTER SEAT TRACK BRACKET COVER LH
-
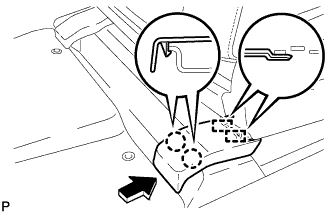
Engage the 2 guides and 2 claws to install the front outer seat track bracket cover as shown in the illustration.
-
-
INSTALL FRONT SEAT HEADREST ASSEMBLY LH
-
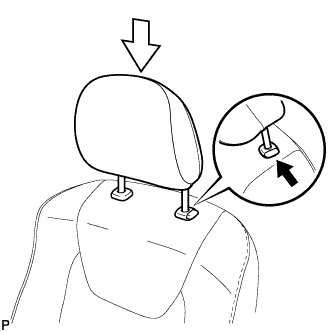
Install the front seat headrest assembly as shown in the illustration.
-
-
INSPECT FRONT SEAT ASSEMBLY
-
Check the power seat operation.
-
Check the seat heater operation.
w/o Climate Control Seat System:
-
Turn the engine switch on (IG).
-
Turn the seat heater switch on.
-
Wait 5 minutes or more and confirm that the seat surface becomes warm.
-
-
-
PERFORM DIAGNOSTIC SYSTEM CHECK
-
Perform a diagnostic system check Click here.
-
-
INSPECT SRS WARNING LIGHT
-
Inspect the SRS warning light Click here.
-