REAR COMBINATION LIGHT ASSEMBLY INSPECTION
CAUTION / NOTICE / HINT
Tech Tips
-
Use the same procedure for both the RH and LH sides.
-
The procedure described below is for the LH side.
PROCEDURE
-
INSPECT REAR COMBINATION LIGHT SOCKET AND WIRE SUB-ASSEMBLY (w/o Side Marker Light)
-
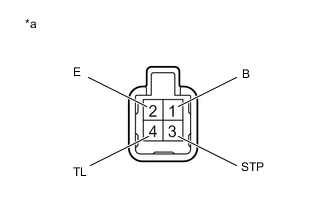
Text in Illustration *a Component without harness connected
(Rear Combination Light Socket and Wire Sub-assembly)
Apply battery voltage to the connector and check the light comes on.
Standard Voltage Condition Specified Condition Battery positive (+) → 1 (B)
Battery negative (-) → 2 (E)
Turn signal light comes on Battery positive (+) → 3 (STP)
Battery negative (-) → 2 (E)
Stop light comes on Battery positive (+) → 4 (TL)
Battery negative (-) → 2 (E)
Tail light comes on If the result is not as specified, replace the bulb or the rear combination light socket and wire sub-assembly.
-
-
INSPECT REAR COMBINATION LIGHT SOCKET AND WIRE SUB-ASSEMBLY (w/ Side Marker Light)
-
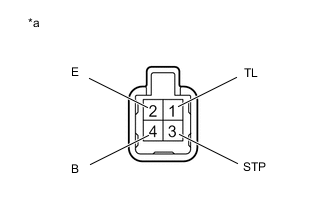
Text in Illustration *a Component without harness connected
(Rear Combination Light Socket and Wire Sub-assembly)
Apply battery voltage to the connector and check the light comes on.
Standard Voltage Condition Specified Condition Battery positive (+) → 4 (B)
Battery negative (-) → 2 (E)
Turn signal light comes on Battery positive (+) → 3 (STP)
Battery negative (-) → 2 (E)
Stop light comes on Battery positive (+) → 1 (TL)
Battery negative (-) → 2 (E)
Tail and Side marker light comes on If the result is not as specified, replace the bulb or the rear combination light socket and wire sub-assembly.
-