ROOF HEADLINING INSTALLATION
PROCEDURE
-
INSTALL ROOF HEADLINING ASSEMBLY
-

Put the roof headlining assembly into the vehicle through the front passenger side door.
Note
Do not damage the roof headlining assembly or body interior.
-
Engage the clip at the front of the roof headlining, and install the roof headlining assembly.
-
Connect the antenna cord sub-assembly connectors.
-
Install the 3 clips at the rear of the roof headlining.
-
Engage the 2 clamps and connect the connector from the front pillar LH.
-
Engage the 3 clamps and connect the connector from the front pillar RH.
-
-
INSTALL VISOR HOLDER
-
Engage the 2 claws install the 2 visor holders.
-
-
INSTALL VISOR ASSEMBLY LH
-
Connect the connector (w/ Illumination).
-
Install the visor assembly LH with the 2 screws.
-
-
INSTALL VISOR ASSEMBLY RH
Tech Tips
Use the same procedure as for the LH side.
-
INSTALL MAP LIGHT ASSEMBLY
-
INSTALL CENTER PILLAR GARNISH LH
-
Engage the 2 guides and clip.
-
Install the center pillar garnish LH with the 2 bolts and clip.
- Torque:
- 7.5 N*m { 76 kgf*cm, 66 in.*lbf }
-
-
INSTALL CENTER PILLAR GARNISH RH
Tech Tips
Use the same procedure as for the LH side.
-
INSTALL REAR QUARTER TRIM GARNISH FRONT LH
-
Engage the claw and clip.
-
Install the rear quarter trim front garnish LH with the 2 bolts.
- Torque:
- 7.5 N*m { 76 kgf*cm, 66 in.*lbf }
-
-
INSTALL REAR QUARTER TRIM FRONT GARNISH RH
Tech Tips
Use the same procedure as for the LH side.
-
INSTALL REAR WINDOW SIDE GARNISH LH
-
Engage the guide and 2 clips.
-
Install the rear window side garnish LH with the bolt.
- Torque:
- 7.5 N*m { 76 kgf*cm, 66 in.*lbf }
-
-
INSTALL REAR WINDOW SIDE GARNISH RH
Tech Tips
Use the same procedure as for the LH side.
-
INSTALL QUARTER TRIM LID SUB-ASSEMBLY LH
-
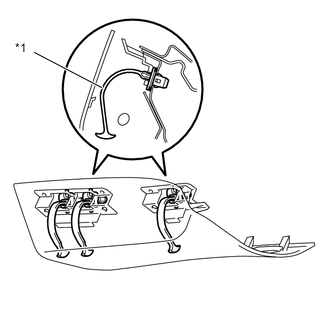
Text in Illustration *1 Lid Cover Clip Install the 3 lid cover clips to the quarter trim lid sub-assembly LH.
Note
If there is any damage, be sure to replace the lid cover clip with a new one.
-
Engage the 2 guides, 3 clips and 6 claws to install the quarter trim lid sub-assembly LH.
-
-
INSTALL QUARTER TRIM LID SUB-ASSEMBLY RH
Tech Tips
Use the same procedure as for the LH side.
-
INSTALL LUGGAGE COMPARTMENT TRIM COVER LH
-
Engage the 8 clips install the quarter trim panel assembly LH.
-
Install the clip.
-
-
INSTALL LUGGAGE COMPARTMENT TRIM COVER RH
Tech Tips
Use the same procedure as for the for LH side.
-
INSTALL LUGGAGE COMPARTMENT INNER TRIM COVER LH
-
Fold down the rear seatback assembly.
-
Engage the 2 clips install the luggage compartment inner trim cover LH.
-
-
INSTALL LUGGAGE COMPARTMENT INNER TRIM COVER RH
Tech Tips
Use the same procedure as for the LH side.
-
INSTALL SEPARATE TYPE REAR SEAT CUSHION ASSEMBLY LH
-
INSTALL SEPARATE TYPE REAR SEAT CUSHION ASSEMBLY RH
-
INSTALL FRONT SEAT OUTER BELT ASSEMBLY LH
-
INSTALL FRONT SEAT OUTER BELT ASSEMBLY RH
Tech Tips
Use the same procedure as for the LH side.
-
INSTALL COWL SIDE TRIM BOARD LH
-
Engage the 2 clips install the cowl side trim board LH.
-
Install the clip.
-
-
INSTALL COWL SIDE TRIM BOARD RH
Tech Tips
Use the same procedure as for the LH side.
-
INSTALL FRONT DOOR OPENING TRIM WEATHERSTRIP LH
-
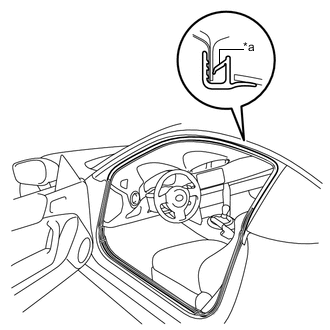
Text in Illustration *a Alignment Mark Align the alignment mark on the weatherstrip with the protruding portion on the body indicated by the arrow in the illustration, and install the front door opening trim weatherstrip LH.
Note
After installation, check that the corners fit correctly.
-
-
INSTALL FRONT DOOR OPENING TRIM WEATHERSTRIP RH
Tech Tips
Use the same procedure as for the LH side.
-
INSTALL FRONT DOOR SCUFF PLATE LH
-
Engage the 6 claws install the front door scuff plate LH.
-
-
INSTALL FRONT DOOR SCUFF PLATE RH
Tech Tips
Use the same procedure as for the LH side.
-
INSTALL FRONT PILLAR GARNISH LH
-
INSTALL FRONT PILLAR GARNISH RH
-
INSTALL NO. 2 INSTRUMENT PANEL SPEAKER PANEL SUB-ASSEMBLY
-
INSTALL NO. 1 INSTRUMENT PANEL SPEAKER PANEL SUB-ASSEMBLY
-
CONNECT CABLE TO NEGATIVE BATTERY TERMINAL
- Torque:
- 6.0 N*m { 61 kgf*cm, 53 in.*lbf }