UPPER INSTRUMENT PANEL INSTALLATION
PROCEDURE
-
INSTALL INSTRUMENT PANEL SUB-ASSEMBLY
-
Install the instrument panel sub-assembly with the 7 screws and 2 bolts.
-
-
INSTALL INSTRUMENT PANEL PASSENGER AIRBAG ASSEMBLY
-
Install the instrument panel passenger airbag assembly with the 2 bolts.
- Torque:
- 7.5 N*m { 76 kgf*cm, 66 in.*lbf }
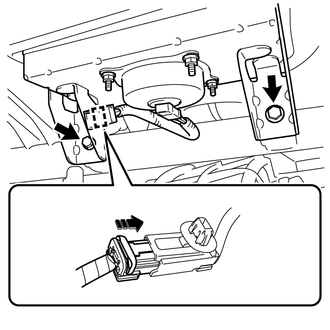
-
Connect the passenger airbag connector.
-
Engage the clamp.
-
-
INSTALL AUTOMATIC LIGHT CONTROL SENSOR (w/ Automatic Light Control System)
-
INSTALL INSTRUMENT PANEL ORNAMENT (w/o Large Ornament Panel)
-
Engage the 3 claws and 3 clips to install the instrument panel ornament.
-
-
INSTALL COMBINATION METER ASSEMBLY
-
INSTALL FRONT PILLAR GARNISH LH
-
Remove the protective cover (w/curtain shield airbag).
-
Make sure that the front pillar garnish clip is not damaged.
Note
If there is any damage, replace the front pillar garnish clip with a new one.
-
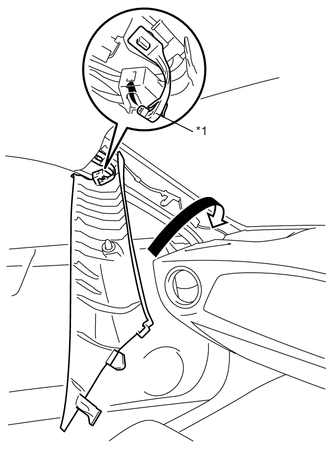
Text in Illustration *1 Front Pillar Garnish Clip Hook the tip of the front pillar garnish clip on the front pillar garnish LH as shown in the illustration.
-
Turn the front pillar garnish LH in the direction of the arrow.
-
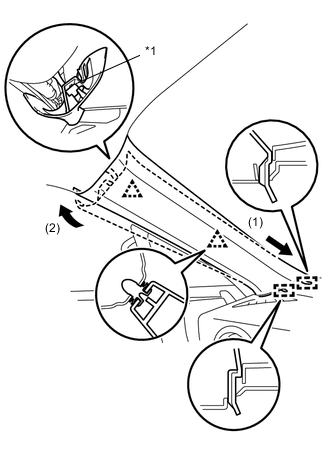
Text in Illustration *1 Front Pillar Garnish Clip Insert the 2 guides in the direction of the arrow (1).
-
Engage the 2 clips and the front pillar garnish clip in the direction of the arrow, and install the front pillar garnish LH.
-
-
INSTALL FRONT PILLAR GARNISH RH
Tech Tips
Use the same procedure as for the LH side.
-
INSTALL FRONT NO. 2 SPEAKER ASSEMBLY (for 6 Speakers)
-
INSTALL NO. 2 INSTRUMENT PANEL SPEAKER PANEL SUB-ASSEMBLY
-
Connect connector.
-
Engage the 6 claws to install the No. 2 instrument panel speaker panel sub-assembly.
-
-
INSTALL FRONT NO. 2 SPEAKER ASSEMBLY (for 6 Speakers)
-
INSTALL NO. 1 INSTRUMENT PANEL SPEAKER PANEL SUB-ASSEMBLY
Tech Tips
Use the same procedure as for the LH side.
-
INSTALL LOWER INSTRUMENT PANEL SUB-ASSEMBLY
-
CONNECT CABLE TO NEGATIVE BATTERY TERMINAL
- Torque:
- 6.0 N*m { 61 kgf*cm, 53 in.*lbf }
-
CHECK SRS WARNING LIGHT