FRONT SEAT OUTER BELT ASSEMBLY INSTALLATION

CAUTION / NOTICE / HINT
Tech Tips
-
Use the same procedure for the RH and LH sides.
-
The procedure listed below is for the LH side.
PROCEDURE
-
INSPECT FRONT SEAT OUTER BELT ASSEMBLY
-
INSTALL FRONT SEAT OUTER BELT ASSEMBLY
-
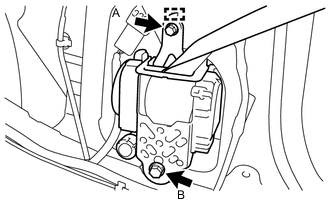
Engage the hook and install the front seat outer belt assembly with the 2 bolts.
- Torque:
- Bolt A
- 7.5 N*m { 76 kgf*cm, 66 in.*lbf }
- Bolt B
- 30 N*m { 306 kgf*cm, 22 ft.*lbf }
-
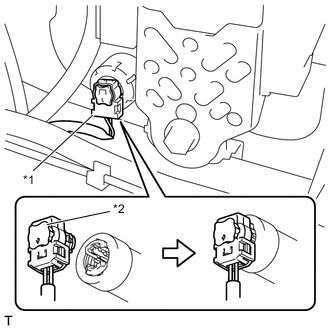
Text in Illustration *1 Pretensioner Connector *2 Pretensioner Connector Lock Connect the pretensioner connector.
Note
When connecting any pretensioner connector, take care not to damage the pretensioner wire harness.
-
Push in the lock to install the pretensioner connector.
Note
Securely lock the locking button.
-
Install the shoulder anchor of the front seat outer belt assembly with the bolt.
- Torque:
- 30 N*m { 306 kgf*cm, 22 ft.*lbf }
-
-
INSTALL CENTER PILLAR GARNISH
-
CONNECT FRONT SEAT OUTER BELT ASSEMBLY
-
Install the floor anchor of the front seat outer belt assembly with the bolt.
- Torque:
- 30 N*m { 306 kgf*cm, 22 ft.*lbf }
-
Check if the ELR locks.
Note
The check should be performed with the front seat outer belt assembly installed.
-
With the belt assembly installed, check that the belt locks when it is pulled out quickly.
-
-
Install the floor anchor cover.
-
-
INSTALL REAR QUARTER TRIM FRONT GARNISH
-
INSTALL REAR WINDOW SIDE GARNISH
-
INSTALL QUARTER TRIM LID SUB-ASSEMBLY
-
INSTALL LUGGAGE COMPARTMENT TRIM COVER
-
INSTALL FRONT DOOR OPENING TRIM WEATHERSTRIP
-
INSTALL FRONT DOOR SCUFF PLATE
-
CONNECT CABLE TO NEGATIVE BATTERY TERMINAL
- Torque:
- 6.0 N*m { 61 kgf*cm, 53 in.*lbf }
-
INSPECT SRS WARNING LIGHT